Whirlpool GU3200XTXY Installation Instructions - Page 14
Choose Attachment Option - dishwasher parts
 |
UPC - 883049201979
View all Whirlpool GU3200XTXY manuals
Add to My Manuals
Save this manual to your list of manuals |
Page 14 highlights
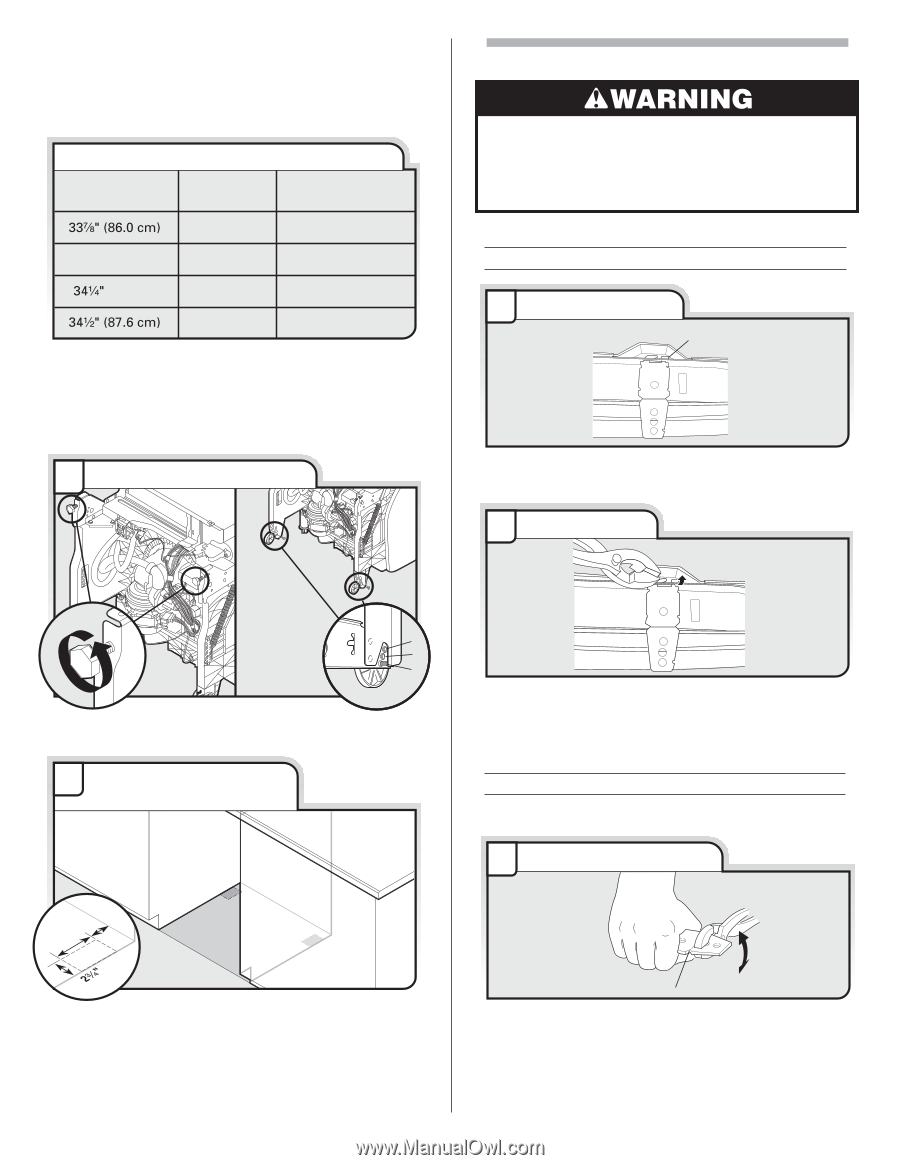
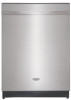
Measure height of cabinet opening from underside of countertop to floor where dishwasher will be installed (you will need to measure the lowest point on the underside of the countertop and the highest point on the floor). Refer to "Dishwasher Height Adjustment Chart" for wheel position and the number of turns needed. Dishwasher Height Adjustment Chart Cabinet opening height Wheel position Number of turns on front leg Removed All the way up 34" (86.4 cm) 1 10 (87.0 cm) 2 5 3 0 NOTE: If the minimum cabinet opening height is less than 34" (86.4 cm), the rear wheels can be removed for additional clearance. This will allow the dishwasher to fit into a 33⁷⁄₈" (86 cm) high cabinet opening, but the dishwasher will be more difficult to move. (Measurements are approximate. Wheels and legs are preset at the factory for 34¹⁄₂" [87.6 cm].) 2 Adjust wheels and legs Choose Attachment Option Excessive Weight Hazard Use two or more people to move and install dishwasher. Failure to do so can result in back or other injury. Using 2 or more people, stand the dishwasher up. Option 1, Countertop attachment: 1 Remove bracket Tabs must point to the right Remove the brackets from the package and place in the open slots on the left and right-hand top of the dishwasher collar as shown. 2 Insert bracket 1 2 3 wheel Turn both leveler legs to the same height. Put wheels in the required position determined from "Dishwasher Height Adjustment Chart." 3 Built-up Floors-Add shims as needed 4" (10.1 cm) (52c"m) (7 cm) Built-up floors: If the kitchen floor is higher than the cabinet opening's floor - for example, the kitchen floor tile does not extend into the cabinet opening - add shims as needed in the area shown to bring the dishwasher up to 34" (86.4 cm) below the countertop. NOTE: Shims must be securely attached to floor to avoid movement when the dishwasher is in use. 14 Insert the bracket into the slot on the collar. Using a pair of pliers, bend the tab down to secure the bracket in place. Repeat this step for the other side. NOTE: Do not attach the dishwasher. This will be done later. Option 2, Dishwasher side attachment: NOTE: Remove the brackets from the parts package. 1 Break end of bracket score line Break off the end of the bracket along the scored line. With another person holding the rear of the dishwasher to keep it from tipping, open dishwasher door and place towel over pump assembly and spray arm of dishwasher. This will keep screws from falling into pump area when you are securing dishwasher to cabinet.
-
 1
1 -
2
-
3
-
4
-
5
-
6
-
7
-
8
-
 9
9 -
 10
10 -
 11
11 -
 12
12 -
 13
13 -
 14
14 -
 15
15 -
 16
16 -
 17
17 -
 18
18 -
 19
19 -
20
-
21
-
22
-
23
-
24
-
25
-
26
-
27
-
28
-
29
-
30
-
31
-
32
-
33
-
34
-
35
-
36
-
37
-
38
-
39
-
40
-
41
-
42
-
43
-
44
-
45
-
46
-
47
-
48
 |
 |