Whirlpool SC8720EDB Installation Instructions - Page 8
Gas conversions - gas cooktops
 |
UPC - 050946528700
View all Whirlpool SC8720EDB manuals
Add to My Manuals
Save this manual to your list of manuals |
Page 8 highlights
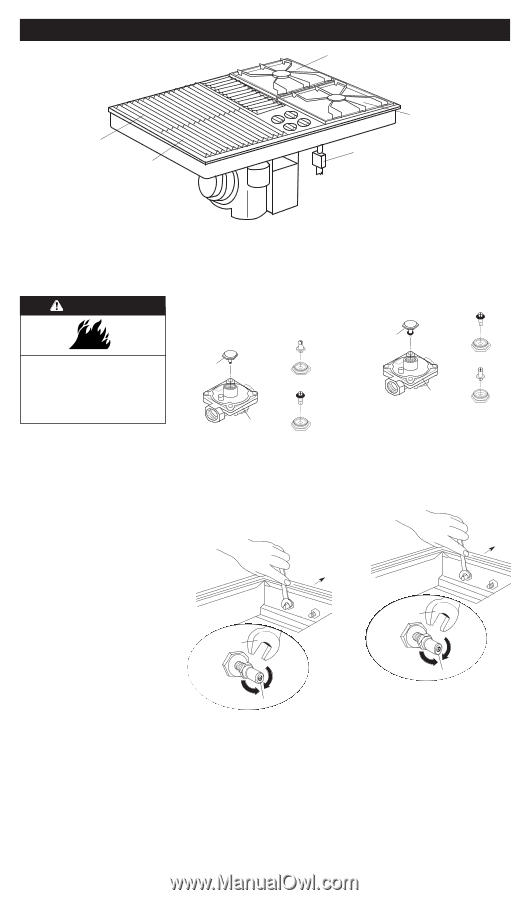
Gas conversions left rear burner Orifice hoods: Natural - Green, drill size #55 (orifice dia. 0.052") L.P. - Zinc, drill size #66 (orifice dia. 0.033") left front burner right rear burner Orifice hoods: Natural - Brass, drill size #53 (orifice dia. 0.0595") L.P. - Blue, drill size #63 (orifice dia. 0.037") right front burner pressure regulator Gas conversions (from Natural gas to L.P. gas; or from L.P. gas to Natural gas) must be done by a qualified installer. WARNING Fire Hazard Shut off main gas supply line valve. Make all conversions before turning gas supply valve back on. Failure to follow these instructions can result in explosion, fire or other personal injury. L.P. gas conversion 1. Complete installation sections A-C (page 5) before converting cooktop to L.P. gas. Check that main gas supply line has been shut off and the power supply cord is disconnected. natural cap and pin Squeeze to remove pin from cap. natural gas position Press down on disc. pressure regulator L.P. position DO NOT REMOVE THE PRESSURE REGULATOR. 2. Turn cap on top of pressure regulator counterclockwise with a wrench to remove cap. Squeeze edges of pin with your fingers and pull upward to remove pin from cap. Turn pin over so disk end is up. Press down on disk to snap pin in place on cap. Reinstall cap on pressure regulator. front of unit Natural gas conversion 1. Shut off main gas supply line and disconnect the power supply cord. Pull up on disc. L.P. cap and pin L.P. position Squeeze and press down. pressure regulator natural gas position DO NOT REMOVE THE PRESSURE REGULATOR. 2. Turn cap on top of pressure regulator counterclockwise with a wrench to remove cap. Pull upward on edges of disk with your fingers to remove pin from cap. Turn pin over so disk end is down. Squeeze pin and snap it into place on cap. Reinstall cap on pressure regulator. front of unit Page 7 1/2" open-end wrench counterclockwise to remove clockwise to install orifice hood 3. Remove Natural gas orifice hoods by turning hoods counterclockwise with 1/2" open-end wrench. Locate color-coded L.P. gas orifice hoods and sticker in plastic parts bag attached to right side of plenum. • Zinc-colored orifice hoods, drill size #66 (orifice dia. 0.033"): Install on LEFT rear and front burners. • Blue-colored orifice hoods, drill size #63 (orifice dia. 0.037"): Install on RIGHT rear and front burners. Place Natural gas hoods in plastic parts bag for future use. Reattach bag to plenum. 4. Complete installation Sections D through E. L.P. gas flames have slightly yellow tips in addition to the other proper characteristics. 1/2" open-end wrench counterclockwise to remove clockwise to install orifice hood 3. Remove surface burner and grille modules from cooktop. Remove L.P. gas orifice hoods by turning hoods counterclockwise with 1/2" open-end wrench. Locate color-coded Natural gas orifice hoods in plastic parts bag attached to bottom of cooktop. • Green-colored orifice hoods, drill size #55 (orifice dia. 0.052"): Install on LEFT rear and front burners. • Brass-colored orifice hoods, drill size #53 (orifice dia. 0.0595"): Install on RIGHT rear and front burners. Place L.P. gas hoods and sticker in plastic parts bag for future use. Reattach bag to plenum. 4. After all the burners have been converted to Natural gas, plug the power supply cord into a grounded outlet. Adjust the air shutters and flame following the instructions in Section E. Natural gas burner flames do not have yellow tips.
-
 1
1 -
2
-
 3
3 -
 4
4 -
 5
5 -
 6
6 -
 7
7 -
 8
8 -
 9
9
 |
 |