Whirlpool WCI55US0JB Installation Instructions - Page 4
Product Dimensions, Cabinet Dimensions
 |
View all Whirlpool WCI55US0JB manuals
Add to My Manuals
Save this manual to your list of manuals |
Page 4 highlights
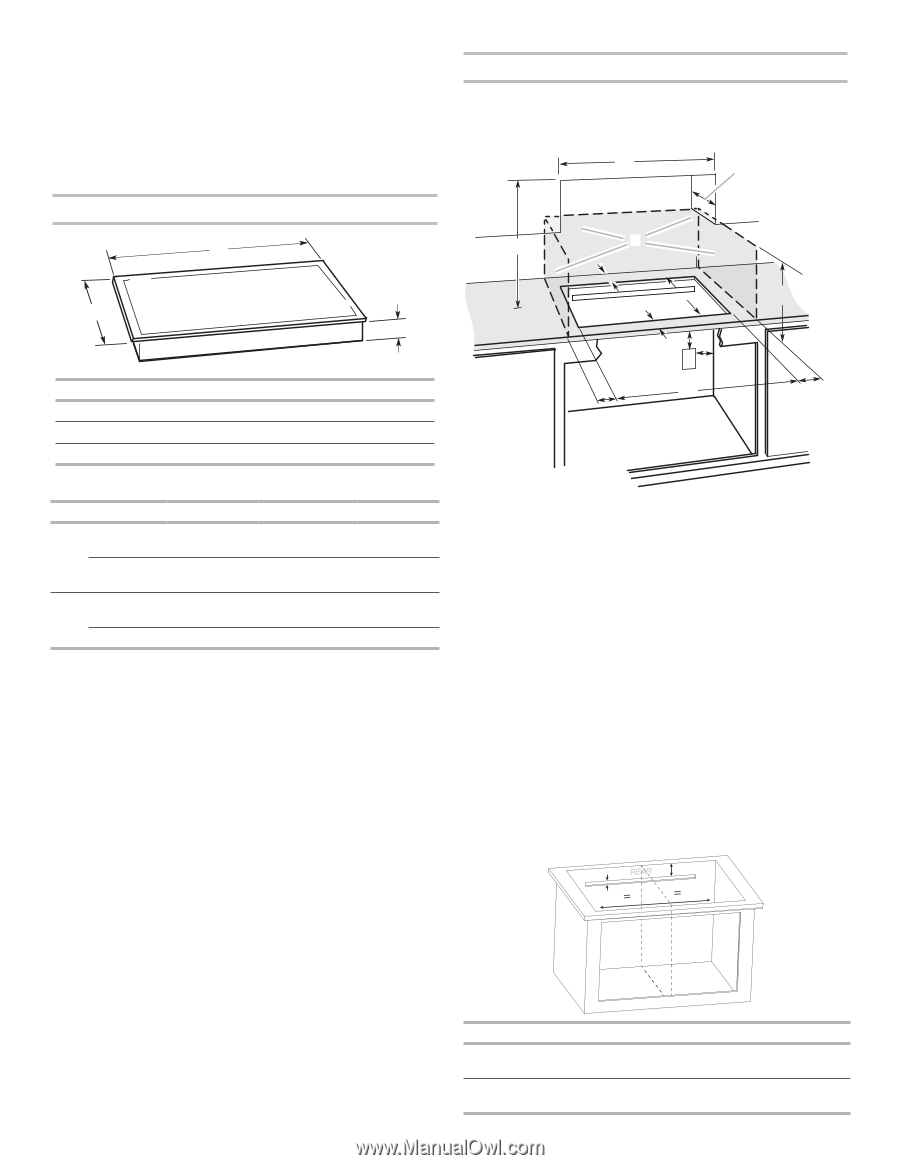
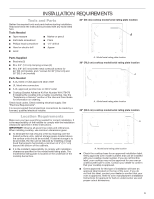
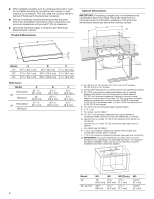
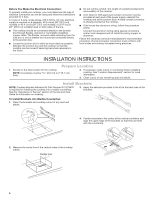
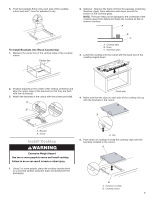
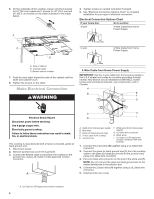
■ When installing cooktop over an undercounter built-in oven, do not fasten cooktop to countertop with clamps or seal cooktop to countertop. This will make the cooktop easier to remove if future servicing becomes necessary. ■ Use the countertop opening dimensions that are given with these Installation Instructions. Given dimensions are minimum clearances and provide 0" (0 cm) clearance. ■ Grounded electrical supply is required. See "Electrical Requirements" section. Product Dimensions B A C Model 24" 30" 36" A 215/16" (54.1 cm) 215/16" (54.1 cm) 215/16" (54.1 cm) B 255/8" (65 cm) 303/4" (78.2 cm) 365/16" (92.2 cm) C 311/16" (9.4 cm) 311/16" (9.4 cm) 311/16" (9.4 cm) With frame: Model KitchenAid 30" Whirlpool KitchenAid 36" Whirlpool A 2111/16" (55.1 cm) 22" (55.9 cm) 2111/16" (55.1 cm) - B 311/8" (79.1 cm) 3013/16" (78.2 cm) 3611/16" (93.15 cm) - C 39/16" (9.0 cm) 39/16" (9.1 cm) 39/16" (9.0 cm) - Cabinet Dimensions IMPORTANT: If installing a range hood or microwave hood combination above the range, follow the range hood or microwave hood combination installation instructions for dimensional clearances above the cooktop surface. A D C B L M E F G H I K J A. 24" (65 cm) on 24" models, 30" (78.2 cm) on 30" models, 36" (92.2 cm) on 36" models B. Combustible area above countertop (shown by dashed box above) C. 30" (78.2 cm) minimum clearance between top of cooktop platform and bottom of uncovered wood or metal cabinet (24" [61 cm] minimum clearance if bottom of wood or metal cabinet is covered by not less than 1/4" [6.4 mm] flame retardant millboard covered with not less than No. 28 MSG sheet steel, 0.015" [0.04 cm] stainless steel, or 0.024" [0.06 cm] aluminum or 0.020" [0.05 cm] copper) D. 13" (33.0 cm) recommended upper cabinet depth E. 2" (5.1 cm) F. For details see the Table 1 G. 18" (45.7 cm) minimum clearance from upper cabinet to countertop within minimum horizontal clearances to cooktop H. Junction box or outlet; 12" (30.5 cm) minimum from bottom of countertop I. Junction box or outlet; 10" (25.4 cm) from right-hand side of cabinet J. For details see the Table 1 K. 1" (2.5 cm) minimum distance to nearest left and right side combustible surface above cooktop L. 1" (2.5 cm) minimum clearance between back wall and countertop M. IMPORTANT: For proper ventilation, provide a vent cut out in the back of the cabinet per the following illustration. For standard and flush installation make sure the cut out and its cut out for ventilation have their center line aligned. M2 M3 M1 Model 24" 30" and 36" M1 19" (48.2 cm) 263/4" (68 cm) M2 29/16" (6.5 cm) 29/16" (6.5 cm) M2 (Flush) 213/16" (7.1 cm) 213/16" (7.1 cm) M3 13/16" (2.1 cm) 13/16" (2.1 cm) 4
-
 1
1 -
 2
2 -
 3
3 -
 4
4 -
 5
5 -
 6
6 -
 7
7 -
 8
8 -
 9
9 -
 10
10 -
11
-
12
-
13
-
14
-
15
-
16
-
17
-
18
-
19
-
20
-
21
-
22
-
23
-
24
-
25
-
26
-
27
-
28
 |
 |