Whirlpool WCI55US0JB Installation Instructions - Page 7
Install Cooktop
 |
View all Whirlpool WCI55US0JB manuals
Add to My Manuals
Save this manual to your list of manuals |
Page 7 highlights
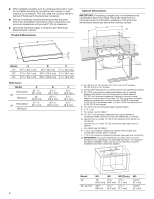
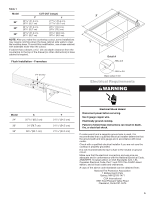
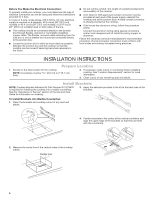
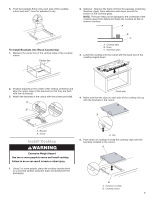
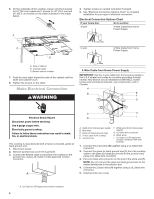
5. Push the brackets firmly onto each side of the cooktop cutout and wait 1 hour for adhesive to dry. 2. Optional - Remove the foam roll from the package containing literature. Apply foam adhesive-side down around the bottom of the cooktop glass. NOTE: The foam helps avoid damage to the underside of the cooktop glass from debris and helps the cooktop sit flat on uneven counters. A To Install Brackets into Wood Countertop: 1. Measure the center line of the vertical sides of the cooktop cutout. Center line B C A. Cooktop base B. Foam C. Assembly glass 3. Lower the cooktop into the cutout with the back end of the cooktop angled down. 2. Position brackets in the center of the vertical centerline and align the upper edge of the brackets so that they are flush with the countertop. 3. Attach the brackets in the cutout with the screws provided. A B Front side 4. Make sure that the clips on each side of the cooktop line up with the brackets in the cutout. A A. Bracket B. Screw Install Cooktop WARNING Excessive Weight Hazard Use two or more people to move and install cooktop. Failure to do so can result in back or other injury. 1. Using 2 or more people, place the cooktop upside down on a covered surface using the foam end posts from the packaging. A. Clip 5. Push down on cooktop to snap the cooktop clips onto the brackets installed in the cutout. A B A. Induction cooktop B. Cooktop cutout 7
-
 1
1 -
 2
2 -
 3
3 -
 4
4 -
 5
5 -
 6
6 -
 7
7 -
 8
8 -
 9
9 -
 10
10 -
 11
11 -
 12
12 -
13
-
14
-
15
-
16
-
17
-
18
-
19
-
20
-
21
-
22
-
23
-
24
-
25
-
26
-
27
-
28
 |
 |
