Whirlpool WET3300SQ User Instructions - Page 15
Install Vent System, Level Washer/Dryer, Connect Vent
 |
UPC - 883049046570
View all Whirlpool WET3300SQ manuals
Add to My Manuals
Save this manual to your list of manuals |
Page 15 highlights
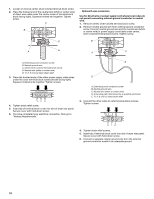
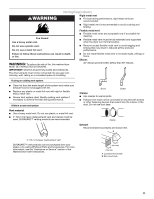
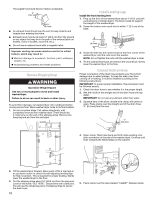
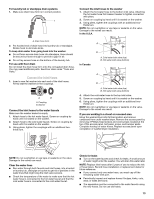
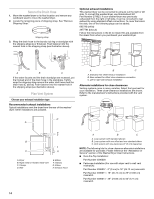
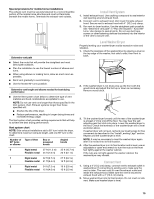
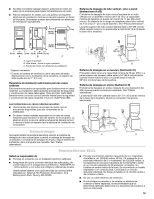
Special provisions for mobile home installations The exhaust vent must be securely fastened to a noncombustible portion of the mobile home structure and must not terminate beneath the mobile home. Terminate the exhaust vent outside. Determine vent path ■ Select the route that will provide the straightest and most direct path outdoors. ■ Plan the installation to use the fewest number of elbows and turns. ■ When using elbows or making turns, allow as much room as possible. ■ Bend vent gradually to avoid kinking. ■ Use the fewest 90° turns possible. Determine vent length and elbows needed for best drying performance ■ Use the Vent system chart below to determine type of vent material and hood combinations acceptable to use. NOTE: Do not use vent runs longer than those specified in the Vent system chart. Exhaust systems longer than those specified will: ■ Shorten the life of the dryer. ■ Reduce performance, resulting in longer drying times and increased energy usage. The Vent system chart provides venting requirements that will help to achieve the best drying performance. Vent system chart NOTE: Side exhaust installations add a 90º turn inside the dryer. To determine maximum exhaust length, add one 90º turn to the chart. Number of Type of Vent 90º turns or elbows Box or Louvered hoods Angled hoods 0 Rigid metal 37 ft (11.3 m) 35 ft (10.7 m) Flexible metal 25 ft (7.6 m) 20 ft (6.1 m) 1 Rigid metal 32 ft (9.7 m) 27 ft (8.2 m) Flexible metal 21 ft (6.4 m) 16 ft (4.9 m) 2 Rigid metal 24 ft (7.3 m) 19 ft (5.8 m) Flexible metal 15 ft (4.6 m) 10 ft (3.0 m) Install Vent System 1. Install exhaust hood. Use caulking compound to seal exterior wall opening around exhaust hood. 2. Connect vent to exhaust hood. Vent must fit inside exhaust hood. Secure vent to exhaust hood with 4" (10.2 cm) clamp. 3. Run vent to dryer location. Use the straightest path possible. See "Determine vent path" in "Plan Vent System." Avoid 90º turns. Use clamps to seal all joints. Do not use duct tape, screws or other fastening devices that extend into the interior of the vent to secure vent. Level Washer/Dryer Properly leveling your washer/dryer avoids excessive noise and vibration. 1. Check the levelness of the washer/dryer by placing a level on the top edge of the washer, first side to side, then front to back. 2. If the washer/dryer is not level, prop up the front with the wood block and adjust the feet up or down as necessary. Remove wood block. 3. Tilt the washer/dryer forward until the rear of the washer/dryer is at least 4" (10.2 cm) off the floor. You may hear the selfadjusting rear feet click into place. Lower the washer/dryer to the floor. Check the levelness of the washer/dryer with a level as shown above. If washer/dryer will not level, recheck rear leveling legs for free movement as described in the "Install Leveling Legs" section. Repeat until the washer/dryer is level. NOTE: It may be necessary to level the washer/dryer again after it is moved into its final location. 4. After the washer/dryer is in its final location and is level, use an adjustable or open-end wrench to turn the nuts on the front feet tightly against the washer cabinet. If the nuts are not tight against the washer cabinet, the washer/dryer may vibrate. Connect Vent 1. Using a 4" (10.2 cm) clamp, connect vent to exhaust outlet in washer/dryer. If connecting to existing vent, make sure the vent is clean. The vent must fit over the exhaust outlet and inside the exhaust hood. Make sure the vent is secured to exhaust hood with a 4" (10.2 cm) clamp. 2. Move washer/dryer into its final location. Do not crush or kink vent. Make sure washer/dryer is level. 15
-
 1
1 -
2
-
3
-
4
-
5
-
6
-
7
-
8
-
9
-
 10
10 -
 11
11 -
 12
12 -
 13
13 -
 14
14 -
 15
15 -
 16
16 -
 17
17 -
 18
18 -
 19
19 -
 20
20 -
21
-
22
-
23
-
24
-
25
-
26
-
27
-
28
-
29
-
30
-
31
-
32
-
33
-
34
-
35
-
36
-
37
-
38
-
39
-
40
-
41
-
42
-
43
-
44
 |
 |
