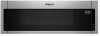
Whirlpool WML55011HS Installation Instructions - Page 5
Install Damper Assembly, for roof venting only, Vent Cover Installation, for both wall and upper - parts
 |
View all Whirlpool WML55011HS manuals
Add to My Manuals
Save this manual to your list of manuals |
Page 5 highlights
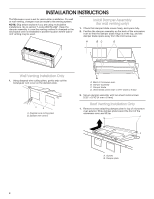
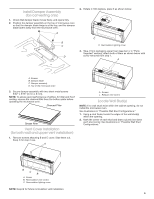
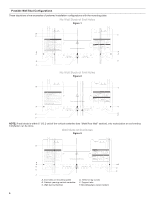
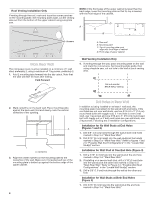
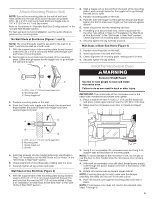
Install Damper Assembly (for roof venting only) 1. Check that damper blade moves freely, and opens fully. 2. Position the damper assembly on the top of microwave oven so that the damper blade hinge is at the top, and the damper blade opens away from the microwave oven. A B C D 2. Rotate C 180 degrees, place it as shown below. 180° C C. Recirculation lighting cover 3. Take J from packaging upper foam (see item J in "Parts Supplied" section), attach both of them as shown below with screw removed from step 1. A A. Screws B. Damper blade C. Damper assembly D. Top of the microwave oven 3. Secure damper assembly with two sheet metal screws 5/32" x 5/16" (4 mm x 8 mm). NOTE: To ensure good performance of airflow, for Wall and Roof venting, remove the charcoal filter from the bottom plate before operating the microwave oven. Charcoal Filter Grease Filter Vent Cover Installation (for both wall and upper vent installation) 1. Remove screws attaching B and C cover. Slide them out. Keep C for step 2 use. A J A. Screws J. Exhaust vent covers Locate Wall Stud(s) NOTE: If no wall studs exist within the cabinet opening, do not install the microwave oven. See illustrations in "Possible Wall Stud Configurations." 1. Using a stud finder, locate the edges of the wall stud(s) within the opening. 2. Mark the center of each stud and draw a plumb line down each stud center. See illustrations in "Possible Wall Stud Configurations." B C B A. Screw B. Recirculation vent covers C. Recirculation lighting cover NOTE: Keep B for future recirculation vent installation. 5
-
 1
1 -
 2
2 -
 3
3 -
 4
4 -
 5
5 -
 6
6 -
 7
7 -
 8
8 -
 9
9 -
 10
10 -
 11
11 -
12
 |
 |
