Xerox XD103F User Guide - Page 55
Creating WorkCentre XD Floppy Disk Installation Diskettes, Windows 3.1x, WorkCentre CD-ROM - software
 |
View all Xerox XD103F manuals
Add to My Manuals
Save this manual to your list of manuals |
Page 55 highlights
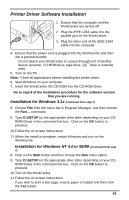
Creating WorkCentre XD Floppy Disk Installation Diskettes If floppy diskettes are required to install the WorkCentre Printer Driver Software, the user can order floppy diskettes or create a set of diskettes from CD-ROM. To create a set of WorkCentre XD Printer Driver floppy Diskettes, find a PC that has a floppy diskette drive with a CD-ROM drive and follow the procedure below. Four or five blank high density diskettes will be required. Windows 3.1x: 1. Insert the WorkCentre CD-ROM into the CD-ROM Drive. 2. Choose File from the menu bar in Program Manager, and then choose the Run... command. 3. Type D:\MAKEDISK\MAKEDISK.EXE (or the appropriate drive letter depending on your CD-ROM Drive) in the command line box. Click on the OK button to proceed. 4. Follow the on-screen instructions. Windows 95/98 and Windows NT 4.0: 1. Insert the WorkCentre CD into the CD-ROM Drive. 2. Click on the Start button and then choose the Run menu option. 3. Type D:\MAKEDISK\MAKEDISK.EXE (or the appropriate drive letter depending on your CD-ROM Drive) in the command line box. Click on the OK button to proceed. 4. Follow the on-screen instructions. To use the Floppy Disk Installation Disks created, follow the same procedure for your operating system but refer to the floppy disk drive (A: B:) rather than the CD-ROM drive (D:). 47
-
 1
1 -
2
-
3
-
4
-
5
-
6
-
7
-
8
-
9
-
10
-
11
-
12
-
13
-
14
-
15
-
16
-
17
-
18
-
19
-
20
-
21
-
22
-
23
-
24
-
25
-
26
-
27
-
28
-
29
-
30
-
31
-
32
-
33
-
34
-
35
-
36
-
37
-
38
-
39
-
40
-
41
-
42
-
43
-
44
-
45
-
46
-
47
-
48
-
49
-
 50
50 -
 51
51 -
 52
52 -
 53
53 -
 54
54 -
 55
55 -
 56
56 -
 57
57 -
 58
58 -
 59
59 -
 60
60 -
61
-
62
-
63
 |
 |
