Yamaha CLP-280 Owner's Manual - Page 40
Other recording techniques
 |
View all Yamaha CLP-280 manuals
Add to My Manuals
Save this manual to your list of manuals |
Page 40 highlights
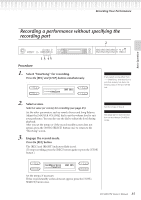
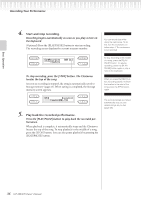
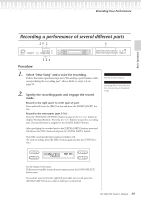
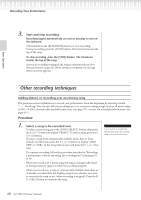
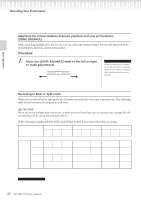
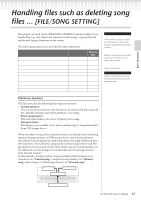
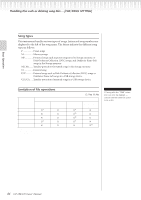
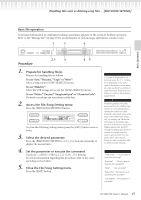
Recording Your Performance Basic Operation 3. Start and stop recording. Recording begins automatically as soon as you play a note on the keyboard. (Optional) Press the [PLAY/PAUSE] button to start recording. To stop recording, press the [STOP] button. The Clavinova locates the top of the song. To stop recording, press the [STOP] button. The Clavinova locates the top of the song. As soon as recording is stopped, the song is automatically saved to Storage memory (page 43). When saving is completed, the Storage memory screen appears. Other recording techniques Adding data to or recording over an existing song The previous section explains how to record your performance from the beginning by selecting a blank "-----: NewSong." You can also add your performance to or overwrite existing songs (such as 50 preset songs [P-001-P-050], commercially-available music data , or your old recorded performances ). Procedure 1. Select a song to be recorded over. To select a preset song, press the [SONG SELECT] button, then press the A [-][+] buttons to display "PRESET." To select a song, press the C [-][+] buttons. To select a song from commercially available music data or from already-recorded data, press the A [-][+] buttons to display "MEMORY" or "USB1" in the Song Select screen and press the C [-][+] buttons. To continue recording, follow the procedure described in "Recording a performance without specifying the recording part" from pages 35 to 36. When you record over a preset song, the song is automatically saved to Storage memory (page 43) when the recording stopped. When you record over a song of commercially available music data or of already-recorded data, the display prompts you whether you want to overwrite the song or not (when recording is stopped). Press the B [+ (YES)] button to overwrite the song. TIP If you record on a part that already has data, the existing data on the part will be lost. 40 CLP-280/270 Owner's Manual
-
 1
1 -
2
-
3
-
4
-
5
-
6
-
7
-
8
-
9
-
10
-
11
-
12
-
13
-
14
-
15
-
16
-
17
-
18
-
19
-
20
-
21
-
22
-
23
-
24
-
25
-
26
-
27
-
28
-
29
-
30
-
31
-
32
-
33
-
34
-
 35
35 -
 36
36 -
 37
37 -
 38
38 -
 39
39 -
 40
40 -
 41
41 -
 42
42 -
 43
43 -
 44
44 -
 45
45 -
46
-
47
-
48
-
49
-
50
-
51
-
52
-
53
-
54
-
55
-
56
-
57
-
58
-
59
-
60
-
61
-
62
-
63
-
64
-
65
-
66
-
67
-
68
-
69
-
70
-
71
-
72
-
73
-
74
-
75
-
76
-
77
-
78
-
79
-
80
-
81
-
82
-
83
-
84
-
85
-
86
-
87
-
88
-
89
-
90
-
91
-
92
-
93
-
94
-
95
-
96
-
97
-
98
-
99
-
100
-
101
-
102
-
103
-
104
-
105
-
106
-
107
-
108
-
109
-
110
-
111
-
112
-
113
-
114
-
115
-
116
-
117
-
118
-
119
-
120
-
121
-
122
-
123
-
124
 |
 |