Yamaha CVP-600 Reference Manual - Page 62
Attach the pedal box D., Turn over the instrument and packing., Den Pedalkasten D montieren., Das
 |
View all Yamaha CVP-600 manuals
Add to My Manuals
Save this manual to your list of manuals |
Page 62 highlights
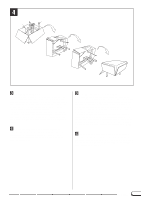
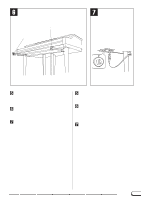
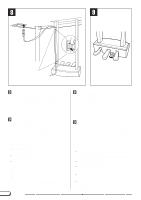
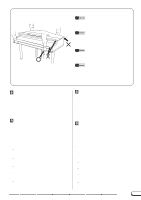
3 5 x 20 mm long screws Lange Schrauben (5 x 20 mm) D Vis longue 5 x 20 mm Tornillos largos de 5 x 20 mm Rear Side Rückseite Côté arrière Lado posterior Keyboard Side Tastaturseite Côté clavier Lado del teclado CAttach the pedal box (D). Before attaching the pedal box, connect the pedal cord. Pull the pedal plug out from the hole in the base plate and plug it into the socket in the bottom of the main unit with the lug on the plug facing the rear of the main unit (refer to the illustration). If the plug won't go in properly, don't force it ... check the plug orientation and try again. Making sure that the pedal cord doesn't get caught between the base plate and main unit, carefully lower the pedal box assembly onto the bottom of the main unit and line up the screw holes. Finally, attach the pedal box with four 5 x 20 mm long screws. V Turn over the instrument and packing. Make sure that the three legs are firmly attached, then using the front legs (A) and (B) for support, turn over the instrument and packing so that the carton is on top of the instrument. CDen Pedalkasten (D) montieren. Schließen Sie vor der Montage des Pedalkastens zunächst das Pedalkabel an. Führen Sie den Kabelstecker durch das Loch in der Grundplatte, um ihn dann, mit der Führungsnase zur Rückseite des Instruments weisend, an die Buchse an der Unterseite anzuschließen (siehe Abbildung). Wenn der Stecker nicht in die Buchse paßt, bitte nicht mit Gewalt hineinstecken ... prüfen Sie seine Ausrichtung, und versuchen Sie es dann noch einmal. Setzen Sie den Pedalkasten nun so auf der Unterseite des Instruments an, daß das Pedalkabel nicht zwischen Grundplatte und Instrument eingeklemmt wird und die Schraubenbohrungen zur Deckung kommen. Schrauben Sie den Pedalkasten dann mit vier langen Schrauben (5 x 20 mm) fest. V Das Instrument mit dem Karton aufstellen. Prüfen Sie noch einmal, ob die drei Standbeine fest montiert sind, und stellen Sie das Instrument dann über die vorderen Standbeine (A und B) so aufrecht, daß der Karton oben ist. 40 CVP-98/96/600
-
 1
1 -
2
-
3
-
4
-
5
-
6
-
7
-
8
-
9
-
10
-
11
-
12
-
13
-
14
-
15
-
16
-
17
-
18
-
19
-
20
-
21
-
22
-
23
-
24
-
25
-
26
-
27
-
28
-
29
-
30
-
31
-
32
-
33
-
34
-
35
-
36
-
37
-
38
-
39
-
40
-
41
-
42
-
43
-
44
-
45
-
46
-
47
-
48
-
49
-
50
-
51
-
52
-
53
-
54
-
55
-
56
-
 57
57 -
 58
58 -
 59
59 -
 60
60 -
 61
61 -
 62
62 -
 63
63 -
 64
64 -
 65
65 -
 66
66 -
 67
67 -
68
-
69
-
70
-
71
-
72
-
73
-
74
-
75
 |
 |
