Yamaha CVP-600 Reference Manual - Page 64
Den Karton und das Verpackungsmaterial
 |
View all Yamaha CVP-600 manuals
Add to My Manuals
Save this manual to your list of manuals |
Page 64 highlights
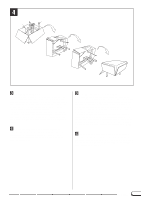
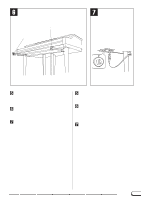
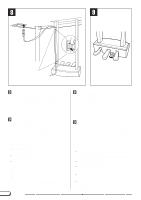
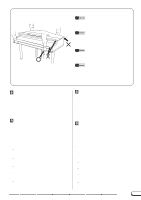
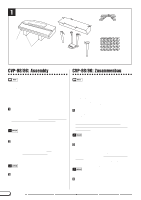
5 B Remove the carton and packing material. Lift and remove the carton, then remove the remaining packing material from the main unit. N Attach the front leg/frame screws. Firmly attach the front legs (A) and (B) to the frame on the bottom of the main unit using two 5 x 20 mm long screws for each leg. MVoltage Selector Check the setting of the voltage selector which is provided in some areas. To set the selector for 110V, 127V, 220V or 240V main voltages, use a "minus" screwdriver to rotate the selector dial so that the correct voltage for your region appears next to the pointer on the panel. The voltage selector is set at 240V when the unit is initially shipped. B Den Karton und das Verpackungsmaterial entfernen. Heben Sie zunächst den Karton weg, und entfernen Sie dann die beiden Formstücke und das übrige Verpackungsmaterial. N Die vorderen Standbeine mit dem Rahmen verschrauben. Schrauben Sie die vorderen Standbeine (A und B) mit jeweils zwei langen Schrauben (5 x 20 mm) gut am Rahmen an der Unterseite des Instruments fest. MDen Spannungswähler einstellen. Stellen Sie den Spannungswähler (falls vorhanden) auf die örtliche Netzspannung ein. Zum Verstellen drehen Sie den Spannungswähler mit einem Schlitzschraubendreher, bis der richtige Spannungswert (110, 127, 220 oder 240) an der Pfeilmarkierung steht. Bei der Auslieferung werden alle Instrumente mit Spannungswähler auf "240" voreingestellt. 42 CVP-98/96/600
-
 1
1 -
2
-
3
-
4
-
5
-
6
-
7
-
8
-
9
-
10
-
11
-
12
-
13
-
14
-
15
-
16
-
17
-
18
-
19
-
20
-
21
-
22
-
23
-
24
-
25
-
26
-
27
-
28
-
29
-
30
-
31
-
32
-
33
-
34
-
35
-
36
-
37
-
38
-
39
-
40
-
41
-
42
-
43
-
44
-
45
-
46
-
47
-
48
-
49
-
50
-
51
-
52
-
53
-
54
-
55
-
56
-
57
-
58
-
 59
59 -
 60
60 -
 61
61 -
 62
62 -
 63
63 -
 64
64 -
 65
65 -
 66
66 -
 67
67 -
 68
68 -
 69
69 -
70
-
71
-
72
-
73
-
74
-
75
 |
 |
