Yamaha CVP-600 Reference Manual - Page 70
Attach the speaker box., Attach the pedal box assembly., Den Lautsprecherkasten montieren., Die
 |
View all Yamaha CVP-600 manuals
Add to My Manuals
Save this manual to your list of manuals |
Page 70 highlights
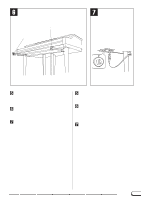
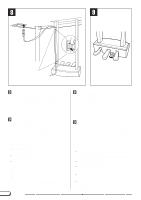
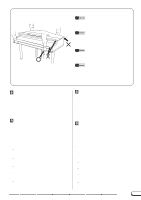
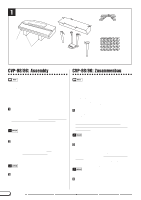
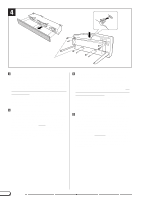
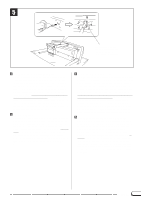
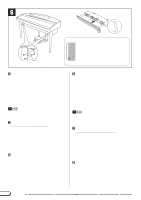
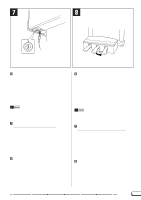
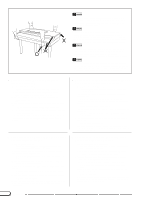
4 CVP-98 • Four screws on each side • Jeweils vier Schrauben an Vorder- und Hinterseite • Quatre vis de chaque côté • Cuatro tornillos en cada lado VAttach the speaker box. Remove the speaker box cover (attached to the speaker box in 6 places with plastic plugs) from the speaker box. Gently rest the speaker box onto the corresponding brackets on the front legs. (Be careful not to touch the speakers when handling the speaker box. Damage may result.) Make sure the speaker cord is extending out from the rear of the speaker box. Secure the speaker box to the main keyboard unit using four screws on each side. Insert the speaker cord connector into the corresponding socket on the main keyboard unit, making sure that the protruding clip on the connector is facing up. BAttach the pedal box assembly. Before attaching the rear leg and pedal box assembly, insert the pedal cord plug extending from the rear leg into the corresponding socket in the main unit. Make sure that the protruding clip on the connector is facing up. Put the excess cord into the leg and loosely secure the rear leg and pedal assembly using 6 screws for each leg (four screws per leg and two screws on each leg bracket). Once the rear leg and pedal assembly has been loosely attached, go back and tighten all 12 of the screws on the rear leg and pedal assembly. VDen Lautsprecherkasten montieren. Nehmen Sie die Bespannung (wird an 6 Punkten von Plastikdübeln gehalten) vom Lautsprecherkasten ab. Setzen Sie den Lautsprecherkasten vorsichtig auf die Halterungen an den vorderen Beinen. (Vermeiden Sie dabei unbedingt ein Berühren der Lautsprechermembrane.) Das Lautsprecherkabel muß an der Hinterseite (d.h. oben) aus dem Lautsprecherkasten ragen. Schrauben Sie den Lautsprecherkasten mit jeweils vier Schrauben an Vorderund Hinterseite an der Haupteinheit fest. Schließen Sie dann das Lautsprecherkabel an die Buchse der Haupteinheit an (die Führungsnase am Stecker muß dabei nach oben weisen). BDie Pedalkastengruppe montieren. Bevor Sie die Pedalkastengruppe mit den hinteren Beinen montieren, schließen Sie das aus dem einen Bein ragende Pedalkabel an die entsprechende Buchse der Haupteinheit an (die Führungsnase am Stecker muß dabei nach oben weisen). Schieben Sie überlanges Kabel wieder in das Bein zurück, und schrauben Sie dann die hinteren Beine mit der Pedalkastengruppe provisorisch mit 6 Schrauben pro Bein (jeweils 4 für das Bein selbst und 2 für die Halterung am Bein) an die Haupteinheit. Nachdem Sie die hinteren Beine mit dem Pedalkasten fixiert haben, ziehen Sie die 12 Schrauben fest an. 48 CVP-98/96/600
-
 1
1 -
2
-
3
-
4
-
5
-
6
-
7
-
8
-
9
-
10
-
11
-
12
-
13
-
14
-
15
-
16
-
17
-
18
-
19
-
20
-
21
-
22
-
23
-
24
-
25
-
26
-
27
-
28
-
29
-
30
-
31
-
32
-
33
-
34
-
35
-
36
-
37
-
38
-
39
-
40
-
41
-
42
-
43
-
44
-
45
-
46
-
47
-
48
-
49
-
50
-
51
-
52
-
53
-
54
-
55
-
56
-
57
-
58
-
59
-
60
-
61
-
62
-
63
-
64
-
 65
65 -
 66
66 -
 67
67 -
 68
68 -
 69
69 -
 70
70 -
 71
71 -
 72
72 -
 73
73 -
 74
74 -
 75
75
 |
 |
