Yamaha DJX-IIB Owner's Manual - Page 71
Error Message List
 |
View all Yamaha DJX-IIB manuals
Add to My Manuals
Save this manual to your list of manuals |
Page 71 highlights
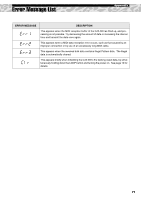
Error Message List Appendix ERROR MESSAGE Err1 Err2 Err3 C|r DESCRIPTION This appears when the MIDI reception buffer of the DJX-IIB has filled up, and processing is not possible. Try decreasing the amount of data or increasing the interval time and transmit the data once again. This appears when a MIDI data reception error occurs, such as that caused by an improper connection or by use of an excessively long MIDI cable. This appears when the received bulk data contains illegal Pattern data. The illegal data is automatically cleared. This appears briefly when initializing the DJX-IIB to the factory preset data, by simultaneously holding down the LOOP button and turning the power on. See page 13 for details. 71
-
 1
1 -
2
-
3
-
4
-
5
-
6
-
7
-
8
-
9
-
10
-
11
-
12
-
13
-
14
-
15
-
16
-
17
-
18
-
19
-
20
-
21
-
22
-
23
-
24
-
25
-
26
-
27
-
28
-
29
-
30
-
31
-
32
-
33
-
34
-
35
-
36
-
37
-
38
-
39
-
40
-
41
-
42
-
43
-
44
-
45
-
46
-
47
-
48
-
49
-
50
-
51
-
52
-
53
-
54
-
55
-
56
-
57
-
58
-
59
-
60
-
61
-
62
-
63
-
64
-
65
-
 66
66 -
 67
67 -
 68
68 -
 69
69 -
 70
70 -
 71
71 -
 72
72 -
 73
73 -
 74
74 -
 75
75 -
 76
76 -
77
-
78
-
79
-
80
-
81
-
82
-
83
-
84
-
85
-
86
-
87
-
88
-
89
-
90
-
91
-
92
-
93
 |
 |

71
Appendix
Error Message List
ERROR MESSAGE
DESCRIPTION
Err1
This appears when the MIDI reception buffer of the DJX-IIB has filled up, and pro-
cessing is not possible. Try decreasing the amount of data or increasing the interval
time and transmit the data once again.
Err2
This appears when a MIDI data reception error occurs, such as that caused by an
improper connection or by use of an excessively long MIDI cable.
Err3
This appears when the received bulk data contains illegal Pattern data.
The illegal
data is automatically cleared.
C|r
This appears briefly when initializing the DJX-IIB to the factory preset data, by simul-
taneously holding down the LOOP button and turning the power on.
See page 13 for
details.