Yamaha DT50S Drum Trigger Module Setup Manual for DT50S/DT50K - Page 25
Setup Procedures, 1. Connecting to the Instrument, 2. Setting Parameters on the Instrument
 |
View all Yamaha DT50S manuals
Add to My Manuals
Save this manual to your list of manuals |
Page 25 highlights
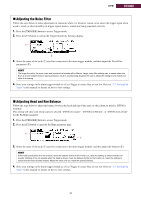
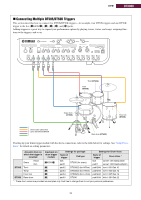
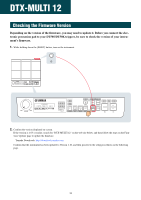
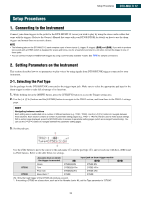
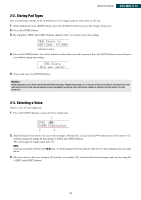
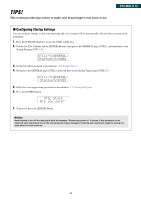
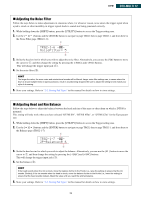
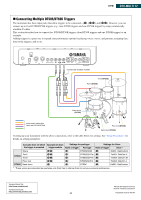
Setup Procedures DTX-MULTI 12 Setup Procedures 1. Connecting to the Instrument Connect your drum triggers to the jacks for the DTX-MULTI 12 voices you wish to play by using the stereo audio cables that came with the triggers. Refer to the Owner's Manual that came with your DT50S/DT50K for details on how to use the drum triggers and mount them on acoustic drums. NOTE • The following jacks on the DTX-MULTI 12 each comprise a pair of mono inputs (L: trigger, R: trigger): [!4/!5] and [!6/!7]. If you wish to produce two sounds with a DT50S (which is designed for snares and toms), one for a head shot and one for a rim shot, connect the trigger to one of these jacks. • You can connect multiple DT50S/DT50K triggers by using a commercially available Y-cable. See TIPS! for sample connections. 2. Setting Parameters on the Instrument This section describes how to set parameters to play voices by using signals from DT50S/DT50K triggers connected to your instrument. 2-1. Selecting the Pad Type Set the pad type for the DT50S/DT50K connected to the trigger input jack. Make sure to select the appropriate pad type for the drum trigger in order to take full advantage of its functions. 1. While holding down the [SHIFT] button, press the [UTILITY] button to access the Trigger setting area. 2. Use the [ ]/[ ] buttons and the [ENTER] button to navigate to the TRG2 section, and from there to the TRG2-1 settings page. HINT Navigating between sections Each setting area is subdivided into a number of different sections (e.g., TRG1, TRG2). Use the [ ]/[ ] buttons to navigate between these sections. Each section contains a number of parameter setting pages (e.g., TRG1-1, TRG1-2) that are used to make actual settings. With a section page displayed, press the [ENTER] button to access its parameter setting pages (which are arranged hierarchically). You can use the [ ]/[ ] buttons to navigate between the parameter setting pages. 3. Set the pad type. q w Use the [ ] button to move the cursor to the jack name (q) and the pad type (w), and set each one with the [-/DEC] and [+/INC] buttons. Refer to the table below for settings. DT50S DT50K Acoustic drum on which the trigger is mounted Snare Tom Floor tom Bass drum (*) [!3] DT50S(S)SN DT50S(S)HTm DT50S(S)LTm DT50K Input jack on drum trigger module [!4/!5] DT50S SN DT50S HTm DT50S LTm DT50K (S): Only the head trigger of the DT50S will produce a sound. *: If mounting a DT50S on a bass drum, such as in the Yamaha Junior Kit, set the Type parameter to "DT50K". [!/6 !]7 25
-
 1
1 -
2
-
3
-
4
-
5
-
6
-
7
-
8
-
9
-
10
-
11
-
12
-
13
-
14
-
15
-
16
-
17
-
18
-
19
-
 20
20 -
 21
21 -
 22
22 -
 23
23 -
 24
24 -
 25
25 -
 26
26 -
 27
27 -
 28
28 -
 29
29 -
 30
30
 |
 |