Yamaha DVD-S663 Owner's Manual - Page 11
Rear panel, Caution: Do not touch the inner pins of the jacks on the rear panel of this unit.
 |
View all Yamaha DVD-S663 manuals
Add to My Manuals
Save this manual to your list of manuals |
Page 11 highlights
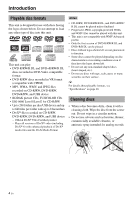
English Rear panel Functional Overview MAINS REMOTE CONTROL OUT IN HDMI PR/ CR COMPONENT Y VIDEO COAXIAL PB/ CB S VIDEO AV AUDIO OUT DIGITALOUT VIDEO OUT 1 2 3 45 678 9 (Europe model) 1 AC power cable Plug the power cable into the AC wall outlet. 2 REMOTE CONTROL (IN, OUT) jacks Connect the REMOTE CONTROL (IN) jack of this unit to the remote control output jack of your Yamaha AV receiver (see page 12). Connect the REMOTE CONTROL (OUT) jack of this unit to the remote control input jack of your Yamaha component. 3 HDMI jack Connect to the HDMI input jack of your HDMI component (see page 11). 4 AUDIO OUT (L, R) jacks Connect to the audio input jacks of your AV receiver or stereo system (see page 9). 5 DIGITAL OUT - COAXIAL jack Connect to the coaxial input jack of your AV receiver (see page 9). 6 VIDEO OUT - COMPONENT (Y, PB/CB, PR/ CR) jacks Connect to the component input jacks of your AV receiver (see page 10). 7 VIDEO OUT - S VIDEO jack Connect to the S-video input jack of your AV receiver (see page 10). 8 VIDEO OUT - VIDEO jack Connect to the composite video input jack of your AV receiver (see page 10). 9 AV terminal (Europe and Russia models only) Connect to the SCART input terminal of your TV (see page 10). Caution: Do not touch the inner pins of the jacks on the rear panel of this unit. Electrostatic discharge may cause permanent damage to this unit. 7 En
-
 1
1 -
2
-
3
-
4
-
5
-
 6
6 -
 7
7 -
 8
8 -
 9
9 -
 10
10 -
 11
11 -
 12
12 -
 13
13 -
 14
14 -
 15
15 -
 16
16 -
17
-
18
-
19
-
20
-
21
-
22
-
23
-
24
-
25
-
26
-
27
-
28
-
29
-
30
-
31
-
32
-
33
-
34
-
35
-
36
-
37
-
38
-
39
-
40
-
41
-
42
-
43
-
44
-
45
-
46
-
47
-
48
-
49
-
50
-
51
-
52
-
53
 |
 |
