Yamaha DVD-S663 Owner's Manual - Page 46
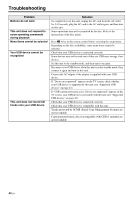
Troubleshooting, standby mode, disconnect the power cable, and contact the nearest authorized Yamaha - region
 |
View all Yamaha DVD-S663 manuals
Add to My Manuals
Save this manual to your list of manuals |
Page 46 highlights
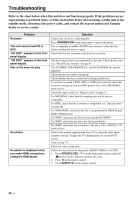
TTrrooubulesbholoetinsg hooting Refer to the chart below when this unit does not function properly. If the problem you are experiencing is not listed below or if the instruction below does not help, set this unit to the standby mode, disconnect the power cable, and contact the nearest authorized Yamaha dealer or service center. Problem No power This unit cannot read CD or DVD "NO DISC" appears in the front panel display "UN DISC" appears in the front panel display Disc or file does not play No picture No picture is displayed when you make HDMI connections (using the HDMI jacks) Solution Connect the AC power cable properly. Press STANDBY/ON on the front panel to turn on the power. Use a commonly available CD/DVD lens cleaner to clean the lens before sending this unit for repair. Check that the disc is placed in the disc tray correctly. The disc being loaded is not supported by this unit. Check the disc type (see "Playable disc formats" on page 4). The CD-R/RW, DVD+R/RW/R DL, and DVD-R/RW/R DL must be finalized. Check that the disc label is facing up. Check whether the disc is defective by trying another disc. If you have recorded a JPEG, MP3, or WMA disc yourself, check that your disc contains at least ten JPEG picture files or five MP3/WMA music tracks. Check the region code (see "Region codes" on page 3). For MP3/WMA, check that the sampling rate and bit rate are compatible. For JPEG, check that the resolution is compatible (see "Specifications" on page 48). For WMA/WMV, check that the file is not protected by DRM (Digital Rights Management). For WMV, check that the file has been encoded by WMV9. For WMV, check that the file is not Advanced Profile. For WMV, check that the resolution of the file is 720 x 480/720 x 576 pixels or less. Refer to the manual supplied with your TV to select the video input channel correctly. Change the TV channel until you see the DVD screen. Turn on your TV. Check the video connection. Follow the steps below to change the [HDMI VIDEO] to [AUTO]. 1. Press OPEN/CLOSE ( ) on the front panel or press and hold 7 on the remote control to open the disc tray. 2. Press 2 on the remote control. 3. Press SUBTITLE on the remote control. 42 En
-
 1
1 -
2
-
3
-
4
-
5
-
6
-
7
-
8
-
9
-
10
-
11
-
12
-
13
-
14
-
15
-
16
-
17
-
18
-
19
-
20
-
21
-
22
-
23
-
24
-
25
-
26
-
27
-
28
-
29
-
30
-
31
-
32
-
33
-
34
-
35
-
36
-
37
-
38
-
39
-
40
-
 41
41 -
 42
42 -
 43
43 -
 44
44 -
 45
45 -
 46
46 -
 47
47 -
 48
48 -
 49
49 -
 50
50 -
 51
51 -
52
-
53
 |
 |
