Yamaha EL-87 Owner's Manual - Page 99
Selecting Voices From a Voice Disk, Optional
 |
View all Yamaha EL-87 manuals
Add to My Manuals
Save this manual to your list of manuals |
Page 99 highlights
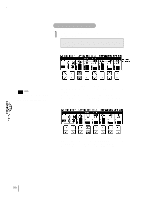
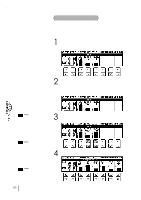
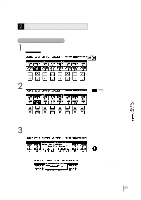
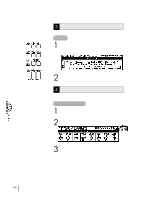
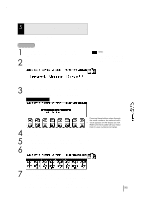
5 Selecting Voices From a Voice Disk (Optional) You can also load voices from optional Voice Disks to the 16 User voices in the Voice Menu. To do this: 1 Hold down the VOICE EDIT button in the DISPLAY SELECT section and simultaneously press any one of the panel voice buttons. 2 Select the VOICE DISK page with the Page buttons. The message "Insert Voice Disk!!" appears and prompts you the operation. NOTE: Any one of the voice sections can be used here. Make sure that the volumes of all other voices are set to off (the minimum value). 3 Insert the Voice Disk into the disk slot under the Music Disk Recorder. The voice number and name of the Voice Disk appears. VOICE DISK Page 4 Pressing these buttons steps through the voice numbers; the name of each voice appears on the display as well. Refer to the list included with your Voice Disk for voice numbers and names. Using any of the Data Control button pairs, select the voice you wish to load. 5 Play the keyboard to check the sound of the voice. Select other voices (as you did in step #4 above) and check those sounds as well. 6 If you want to save the current voice to a User Voice space, select the previous page, "SAVE" with the Page buttons. 7 Press the Data Control button that corresponds to the User Voice number you wish to save to. Press one of the four Data Control buttons below "OK" in the display to save the voice, or one of the four buttons below "Cancel" to abort the operation and return to the previous display. When the voice has been saved, a "completed!!" message appears. 95
-
 1
1 -
2
-
3
-
4
-
5
-
6
-
7
-
8
-
9
-
10
-
11
-
12
-
13
-
14
-
15
-
16
-
17
-
18
-
19
-
20
-
21
-
22
-
23
-
24
-
25
-
26
-
27
-
28
-
29
-
30
-
31
-
32
-
33
-
34
-
35
-
36
-
37
-
38
-
39
-
40
-
41
-
42
-
43
-
44
-
45
-
46
-
47
-
48
-
49
-
50
-
51
-
52
-
53
-
54
-
55
-
56
-
57
-
58
-
59
-
60
-
61
-
62
-
63
-
64
-
65
-
66
-
67
-
68
-
69
-
70
-
71
-
72
-
73
-
74
-
75
-
76
-
77
-
78
-
79
-
80
-
81
-
82
-
83
-
84
-
85
-
86
-
87
-
88
-
89
-
90
-
91
-
92
-
93
-
 94
94 -
 95
95 -
 96
96 -
 97
97 -
 98
98 -
 99
99 -
 100
100 -
 101
101 -
 102
102 -
 103
103 -
 104
104 -
105
-
106
-
107
-
108
-
109
-
110
-
111
-
112
-
113
-
114
-
115
-
116
-
117
-
118
-
119
-
120
-
121
-
122
-
123
-
124
-
125
-
126
-
127
-
128
-
129
-
130
-
131
-
132
-
133
-
134
-
135
-
136
-
137
-
138
-
139
-
140
-
141
-
142
-
143
-
144
-
145
-
146
-
147
-
148
-
149
-
150
-
151
-
152
-
153
-
154
-
155
-
156
 |
 |
