Yamaha HS80M Owner's Manual - Page 11
Maintain a Consistent, Monitoring Level - problems
 |
UPC - 086792837536
View all Yamaha HS80M manuals
Add to My Manuals
Save this manual to your list of manuals |
Page 11 highlights
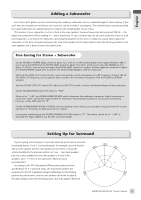
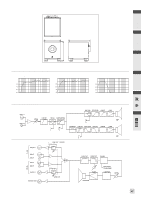
English Fine-tuning for Surround ● Set the HS50M or HS80M LEVEL control to about 12 o'clock to set the nominal input level to approximately +4dB. If you're using the HS50M set the HS10W LEVEL control to about 10 o'clock, and if you're using the HS80M set it to about 11 o'clock. You can then fine-adjust the HS10W LEVEL control as required. Another approach would be to adjust the HS50M/HS80M output level to achieve the desired relative balance with the subwoofer. * If you're using the HS50M with a digital mixer, set the HS10W LEVEL control to about 9 o'clock. If you're using the HS80M with a digital mixer set the HS10W LEVEL control to about 10 o'clock. ● Start with the HIGH CUT control set at its center click position, which corresponds to a HPF frequency of about 100 Hz*. The HIGH CUT frequency can be adjusted later to achieve the smoothest integration with the HS50M or HS80M speakers. * Set to 80 Hz if you're using a digital mixer. ● Turn the HS10W LOW CUT switch ON. Adjust the LOW CUT control to achieve the desired degree of bass extension. ● Set the HS50M/HS80M LOW CUT switch to "100 Hz"*. * Set to 80 Hz if you're using a digital mixer. ● When set to "-2 dB" the HS50M/HS80M EQ MID switch attenuates the midrange frequencies slightly to produce a somewhat "softer" sound that may be better for listening or long monitoring sessions. For accurate monitoring, however, set the MID switch to "0". ● Set the HS50M/HS80M ROOM CONTROL switch according to the distance your speakers are placed from the nearest wall (refer to "Proximity to Walls and Corners", above). ● For accurate monitoring set the HS50M/HS80M HIGH TRIM switch to "0". This switch can be set to "-2 dB" to attenuate the highs slightly if you find the sound too bright. Maintain a Consistent Monitoring Level Another difference between listening and monitoring is that when you're listening for enjoyment you probably listen at significantly different levels at different times: from soft and unobtrusive for background music, right though room-shaking for involved listening or dancing. This is definitely not the case for serious monitoring. The response of your ears changes so drastically according to level, especially in the soft to medium-loud region, that is essential to maintain a consistent monitoring level otherwise you simply won't get consistent mixing results. You'll undoubtedly need to turn up or down a bit at certain points during the production process when listening for specific problems or effects - in fact it is important to listen to your mix at different levels as a final checking process, bringing the levels down very low to check if any elements of the mix disappear and make sure that the vocal continues to maintain its balance in the mix at very low levels - but in general you should stay within a fairly small range. Just what is the best level to monitor at? Although there is a "standard" monitoring level specification,* the answer for most small studios is "whatever is most comfortable for you." You need to monitor at a level that's loud enough so that you don't miss any soft details, but not so loud that your ears become fatigued (or your neighbors complain). If you find yourself turning up the volume after monitoring for a short while, your ears are probably starting to get tired and losing sensitivity. This is obviously bad for your music as well as your ears. So find that "comfort zone" and prepare to make some great music. * For you techies, the SMPTE RP 200 standard monitoring level is 83 dB SPL (RMS average) at the listening position, or if you're mixing for film you'll need to know that the standard Dolby monitoring level for surround is 85 dB SPL. HS80M/HS50M/HS10W Owner's Manual 11
-
 1
1 -
2
-
3
-
4
-
5
-
 6
6 -
 7
7 -
 8
8 -
 9
9 -
 10
10 -
 11
11 -
 12
12 -
 13
13 -
 14
14 -
 15
15 -
 16
16
 |
 |