Yamaha MCR-B020 MCR-B020 Owners Manual - Page 10
Adjusting The Clock (option Menu), Option, Enter
 |
View all Yamaha MCR-B020 manuals
Add to My Manuals
Save this manual to your list of manuals |
Page 10 highlights
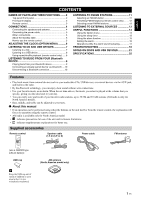
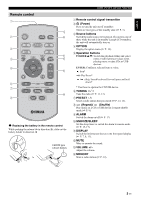
ADJUSTING THE CLOCK (OPTION MENU) You'll use the option menu (☞ P. 14) to set this unit's date and time. 1 2 34 Clock display Display (24-hour) when the unit is on 15:30 CD Display (24-hour) when the unit is off (standby)* 26 Apr Jan January Jul July Feb Mar Apr May Jun February March April May June Aug Sep Oct Nov Dec August September October November December 1 Press to turn the unit on. 2 Press OPTION. The option menu will appear. 3 Press S/T to select "CLOCK SET," and then press ENTER. The display will indicate "CLOCK YEAR," and the numerical value to be set will blink. 4 Set the date and time. Press ▲/▼ to edit each numerical value, and then press ENTER to confirm the setting. Set the items in the order of year month day hour minute. When clock setting has finished, the display will indicate "Completed!" The clock will be set to 0 second the moment you complete the clock settings. • While making these settings, you can press DISPLAY to select the time format (12-hour / 24-hour). • If you decide to cancel without changing the setting, press OPTION before confirming the change. The time settings will be reset if the unit remains unpowered for about one hour. * In ECO standby, the clock display will disappear. 6 En
-
 1
1 -
2
-
3
-
4
-
 5
5 -
 6
6 -
 7
7 -
 8
8 -
 9
9 -
 10
10 -
 11
11 -
 12
12 -
 13
13 -
 14
14 -
 15
15 -
16
-
17
-
18
-
19
-
20
-
21
-
22
-
23
-
24
-
25
-
26
-
27
-
28
-
29
-
30
-
31
-
32
-
33
-
34
-
35
-
36
-
37
-
38
-
39
-
40
-
41
-
42
-
43
-
44
-
45
-
46
-
47
-
48
-
49
-
50
-
51
-
52
-
53
-
54
-
55
-
56
-
57
-
58
-
59
-
60
-
61
-
62
-
63
-
64
-
65
-
66
-
67
-
68
-
69
-
70
-
71
-
72
-
73
-
74
-
75
-
76
-
77
-
78
-
79
-
80
-
81
 |
 |
