Yamaha MCR-B020 MCR-B020 Owners Manual - Page 8
CONNECTIONS, Connecting the speakers and antenna - black
 |
View all Yamaha MCR-B020 manuals
Add to My Manuals
Save this manual to your list of manuals |
Page 8 highlights
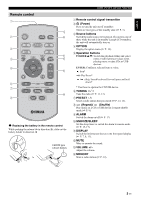
CONNECTIONS Connecting the speakers and antenna Connect the speakers and antenna. Do not connect this unit's power cable until you've finished connecting all cables. If the radio reception is poor, try changing the height or direction or placement of the antenna to find a location that has better reception. If you use a commercially available outdoor antenna instead of the supplied antenna, reception may be better. ‹Speakers • You must peel off the insulation (covering) from the tip of the speaker cable to expose the conductor. • Check the connections; make sure that left and right (L, R) and polarity (red: +, black: -) are connected correctly. If connections are incorrect, the sound will be unnatural and the low frequencies may be insufficient. There might not be any sound at all if connections are incorrect. • Take care that the conductors of the speaker cable do not touch each other, and that the conductors do not touch any other metal part. Such conditions can damage this unit or the speakers. • Use only the supplied speakers. Using other speakers may result in unnatural sound. • If you're using this unit nearby a CRT display and you notice distorted color or noise in the display, move the speakers farther away from the display. ‹FM antenna Connect the FM antenna plug to the rear panel FM antenna terminal with the side illustrated on the left. Fix the end of the FM antenna to a wall. The AM antenna cable is not polarized. When you've finished making connections, pull gently on the cable to ensure that the connection is solid. ‹AM antenna (North America model only) Signal reception may be inadvertently affected if a digital device is located near the antenna. Assembling AM antenna Reset button (☞ P. 18) 4 En Twist the bare wires tightly so the individual strands are not splayed.
-
 1
1 -
2
-
 3
3 -
 4
4 -
 5
5 -
 6
6 -
 7
7 -
 8
8 -
 9
9 -
 10
10 -
 11
11 -
 12
12 -
 13
13 -
14
-
15
-
16
-
17
-
18
-
19
-
20
-
21
-
22
-
23
-
24
-
25
-
26
-
27
-
28
-
29
-
30
-
31
-
32
-
33
-
34
-
35
-
36
-
37
-
38
-
39
-
40
-
41
-
42
-
43
-
44
-
45
-
46
-
47
-
48
-
49
-
50
-
51
-
52
-
53
-
54
-
55
-
56
-
57
-
58
-
59
-
60
-
61
-
62
-
63
-
64
-
65
-
66
-
67
-
68
-
69
-
70
-
71
-
72
-
73
-
74
-
75
-
76
-
77
-
78
-
79
-
80
-
81
 |
 |
