Yamaha MCX-C15 MCXSP10 Manual - Page 28
IP Address, Subnet Mask, Save&Network restart, Cancel
 |
UPC - 027108920016
View all Yamaha MCX-C15 manuals
Add to My Manuals
Save this manual to your list of manuals |
Page 28 highlights
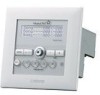
CLIENT CONFIGURATION CONFIGURING THE CLIENT 4 Enter the client's IP address. Press u / d to select numbers and j / i to move the cursor to the left or right. Be sure to enter all four numbers. 5 When you have finished, press SELECT to confirm the IP address. 6 Press u / d to choose "Save & Network Restart" and press SELECT. The client resets its network hardware. [ 0. 0. 0. 0] Save&Network restart Cancel To cancel without making any changes, choose "Cancel" and press SELECT. ■ Setting the subnet mask address You can manually enter the subnet mask. This setting is only possible when the DHCP mode is set to "NO". y You must enter the subnet mask exactly as it appears on your server. To view the server's subnet mask, see the MCX-1000 Owner's Manual, page 112. 1 Select "Setup" > "Network" > "Manual Setup" from the Top Menu. 2 Press u / d to choose "Subnet Mask" and press SELECT. 3 Move the cursor to the subnet mask field and press SELECT. [ 0. 0. 0. 0] Save&Network restart Cancel 4 Enter the subnet mask address. Preee u / d to select numbers and j / i to move the cursor to the left or right. Be sure to enter all four numbers. 5 When you have finished, press SELECT to confirm the subnet mask address. 6 Press u / d to choose "Save & Network Restart" and press SELECT. The client resets its network hardware. [ 0. 0. 0. 0] Save&Network restart Cancel To cancel without making any changes, choose "Cancel" and press SELECT. Manual Setup IP Address Subnet Mask 27
-
 1
1 -
2
-
3
-
4
-
5
-
6
-
7
-
8
-
9
-
10
-
11
-
12
-
13
-
14
-
15
-
16
-
17
-
18
-
19
-
20
-
21
-
22
-
 23
23 -
 24
24 -
 25
25 -
 26
26 -
 27
27 -
 28
28 -
 29
29 -
 30
30 -
 31
31 -
 32
32 -
 33
33 -
34
-
35
-
36
-
37
-
38
-
39
-
40
-
41
-
42
-
43
-
44
-
45
-
46
-
47
-
48
-
49
-
50
-
51
-
52
-
53
-
54
-
55
-
56
-
57
-
58
-
59
-
60
-
61
-
62
-
63
-
64
-
65
-
66
-
67
-
68
-
69
-
70
-
71
-
72
-
73
-
74
-
75
-
76
-
77
-
78
-
79
-
80
-
81
-
82
-
83
-
84
-
85
-
86
-
87
-
88
-
89
-
90
-
91
-
92
-
93
-
94
-
95
-
96
-
97
-
98
-
99
-
100
-
101
-
102
-
103
-
104
-
105
-
106
-
107
-
108
-
109
-
110
-
111
-
112
-
113
-
114
-
115
 |
 |
