Yamaha NX-B150 NX-B150 Owners Manual - Page 9
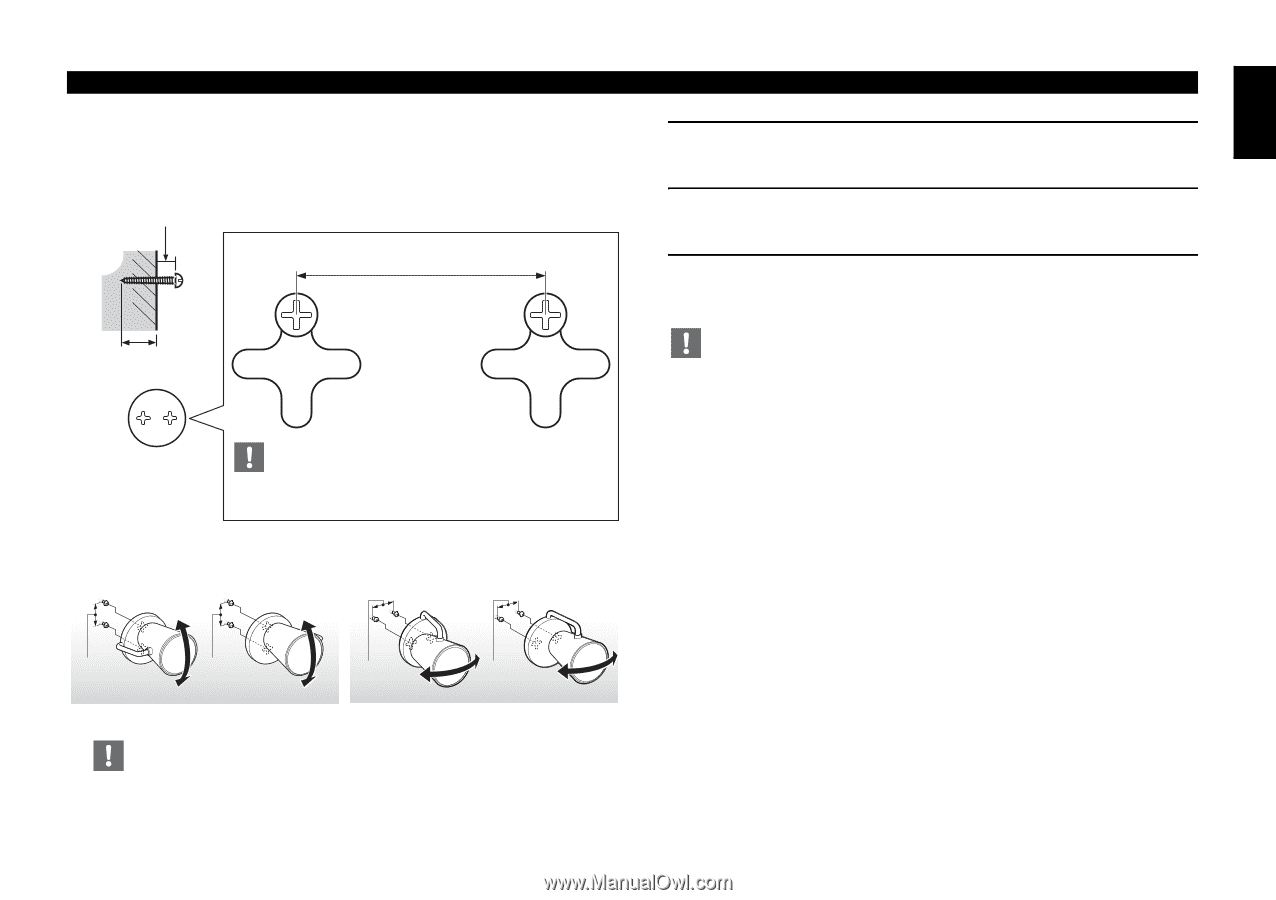
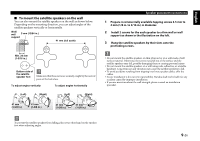
To mount the satellite speakers on the wall, support as shown in the illustration on the left.
 |
View all Yamaha NX-B150 manuals
Add to My Manuals
Save this manual to your list of manuals |
Page 9 highlights
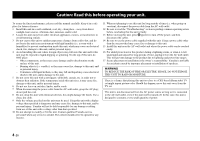
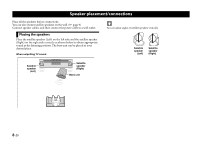
English ■ To mount the satellite speakers on the wall You can also mount the satellite speakers on the wall as shown below. Depending on the mounting direction, you can adjust angles of the satellite speakers vertically or horizontally. Wall/ wall 5 mm (13/64 in.) support 41 mm (full scale) Min. 20 mm (1-3/16 in.) Bottom side of the satellite speaker foot Make sure that the screws are securely caught by the narrow parts of the hole slots. To adjust angles vertically To adjust angles horizontally (Left) (Right) (Left) (Right) 41 mm (1-5/8 in.) 41 mm (1-5/8 in.) 41 mm (1-5/8 in.) 41 mm (1-5/8 in.) Speaker placement/connections 1 Prepare 4 commercially available tapping screws 3.5 mm to 4 mm (1/8 in. to 3/16 in.) in diameter. 2 Install 2 screws for the each speaker to a firm wall or wall support as shown in the illustration on the left. 3 Hang the satellite speakers by their slots onto the protruding screws. • Do not mount the satellite speakers on thin plywood or on a wall made of soft surface material. Otherwise, the screws may pull out of the surface and the satellite speakers may fall, possibly damaging them or causing personal injury. • Do not mount the satellite speakers on a wall using nails, adhesives, or unstable hardware. Long term use and vibration may cause the satellite speakers to fall. • To avoid accidents resulting from tripping over loose speaker cables, affix the cables. • Secure installation is the owner's responsibility. Yamaha shall not be liable for any accident caused by improper installation. • If you are uncertain about the wall strength, please consult an installation specialist. To prevent the satellite speakers from falling, place your other hand on the speaker foot when adjusting angles. 9 En
-
 1
1 -
2
-
3
-
 4
4 -
 5
5 -
 6
6 -
 7
7 -
 8
8 -
 9
9 -
 10
10 -
 11
11 -
 12
12 -
 13
13 -
 14
14 -
15
-
16
-
17
-
18
-
19
-
20
-
21
-
22
-
23
-
24
-
25
-
26
-
27
-
28
-
29
-
30
-
31
-
32
-
33
-
34
-
35
-
36
-
37
-
38
-
39
-
40
-
41
-
42
-
43
-
44
-
45
-
46
-
47
-
48
-
49
-
50
 |
 |