Yamaha PSR-200 Owner's Manual - Page 13
Auto Harmony, The Chord Memory - record
 |
View all Yamaha PSR-200 manuals
Add to My Manuals
Save this manual to your list of manuals |
Page 13 highlights
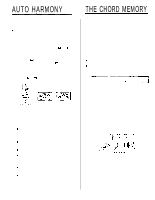
AUTO HARMONY This sophisticated feature automatically adds appropriate harmony notes to a melody you play on the keyboard. You can choose from 5 different types of harmony. Only a single note can be played at a time on the keyboard (or the right-hand section of the keyboard when in the SPLIT mode) when the AUTO HARMONY feature is used. 1. Use the [AUTO HARMONY] buttons to select a harmony type between "01" and "05." The first time the AUTO HARMONY or but- ton is pressed the current harmony type number will appear on the MULTI DISPLAY. While the current harmony type is still showing on the display, press the AUTO HARMONY button briefly to increment (increase by one) the harmony type number, or the button to decrement (decrease by one) the harmony type number. Holding either button causes continuous incrementing or decrementing. The selected harmony type number will be shown on the MULTI DISPLAY while the [AUTO HARMONY] or button is pressed (the letter "H" will appear before the harmony type number). PSR-200/PSR-300 Harmony Types 00 OFF 01 DUET 02 TRIO 03 BLOCK 04 COUNTRY 05 OCTAVE The OFF setting can be selected at any time by pressing both the [AUTO HARMONY] buttons simultaneously. 2. Play. In the SINGLE FINGER or FINGERED mode, the left-hand chords determine the harmony notes that will be applied to the right-hand melody. In the NORMAL mode, all harmony is based on a C major chord. If AUTO HARMONY is used at the same time as the SPLIT feature (see page 6) harmony will be not be applied to the lefthand voice. Left-hand chord fingerings are used to determine the harmony applied to the right-hand voice. Usable fingerings are the same as for the FINGERED mode. If AUTO HARMONY is used at the same time as the DUAL feature (see page 5) harmony will be not be applied to the second "dual" voice. If the synchro start mode is turned off by pressing the [SYNCHRO START/ENDING] button prior to playing, right-hand melody and harmony without accompaniment can be produced - but the left-hand chords will still have to be fingered to produce the appropriate harmony. THE CHORD MEMORY The PSR-200/PSR-300 CHORD MEMORY allows you to "record" and play back chord sequences created using the Auto Accompaniment feature. You can record a complete accompaniment part, for example, and then play along with it using both hands - you're free to use the entire keyboard for your performance rather than being limited to only the upper keyboard area. The CHORD MEMORY also has three separate "banks" that can be used to record different accompaniments. The banks can be "chained" - i.e. they will play back in any specified order. This allows you to record a verse and chorus in different banks, for example, then "chain" them in the desired order for playback. Chord sequences containing a maximum of 60 different chords can be recorded in each bank. Material recorded using the CHORD MEMORY is retained in memory even when the POWER switch is turned OFF (if batteries are present). Recording 1. Pick out an accompaniment style that is appropriate for the type of music you want to record. 2. Press the [BANK 1], [BANK 2], or [BANK 3] button while holding the CHORD MEMORY [REC] button. This engages the "record ready" mode for the selected bank. The bank indicator will flash, the metronome will sound, and the three dots along the bottom of the MULTI DISPLAY will flash at the currently selected tempo. Press the [REC] button again if you want to disengage the record ready mode and perform some other function. If the NORMAL or SPLIT mode is selected, the FINGERED mode is automatically selected when the record ready mode is engaged. If the FINGERED or SINGLE FINGER mode is selected, no change occurs. 3. Before actually beginning to record, you should set a tempo that will be easy to record at using the [TEMPO] buttons. 11
-
 1
1 -
2
-
3
-
4
-
5
-
6
-
7
-
 8
8 -
 9
9 -
 10
10 -
 11
11 -
 12
12 -
 13
13 -
 14
14 -
 15
15 -
 16
16 -
 17
17 -
 18
18 -
19
-
20
-
21
-
22
-
23
-
24
-
25
-
26
-
27
-
28
-
29
 |
 |
