Yamaha PSR-730 Owner's Manual - Page 50
Adjusting the Harmony Volume, Multi Effect (PSR-730), How Multi Effect Works
 |
View all Yamaha PSR-730 manuals
Add to My Manuals
Save this manual to your list of manuals |
Page 50 highlights
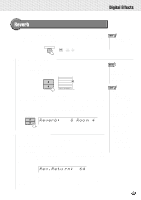
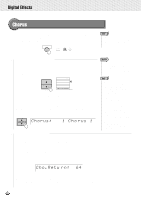
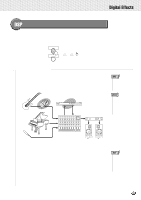
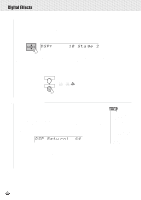
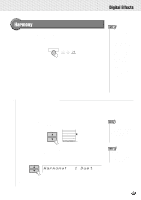
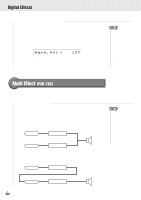
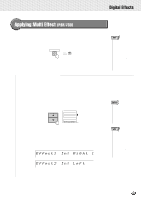
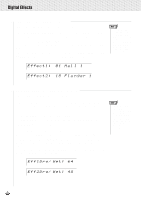
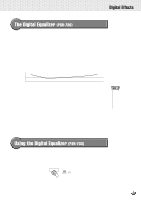
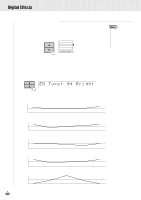
,,QQ,,QQDigi,,QQtal Ef,,QQfects,,QQ,,QQ,,QQ,,QQ,,QQ,,QQ,,QQ,,QQ,,QQ,,QQ,,QQ,,QQ s Adjusting the Harmony Volume The volume of the harmony sound in relation to the keyboard sound can be adjusted for Harmony types 1 through 16 as follows: Use the MENU [v] and [w] buttons to move the triangular indicator in the display next to "DIGITAL EFFECT", then use the SUB MENU [v] and [w] buttons to select "Harm.Vol". The current harmony volume setting will appear to the right of "Harm.Vol" on the display. Harm.Vol : 127 Use the [-] and [+] buttons, the [1]-[0] number buttons, or Data Dial to adjust the harmony volume as required. The range is from "0" to "127". • When the Voice Set function is ON (see page 116), the Harmony Volume may change according to the selected R1 panel voice. • Changing the volume of the harmony sound may not produce audible effect for some R1 voices (ex. organ sounds) when you select Harmony types 1 through 6. Multi Effect (PSR-730) Multi Effect allows you to apply three types of effects (reverb, chorus and DSP) more powerfully and effectively. s How Multi Effect Works With Multi Effect, you can combine 2 effects (Effect 1/2) and apply them to the output from the keyboard (R1/R2/L parts). There are 2 ways to combine the effects; in series or in parallel. Example 1) Applying Effects 1 and 2 to separate parts (parallel) Part Right1 Effect1 In Effect1 Dist. Hard Effect1 Part Left Effect2 In Effect 2 Rotary SP.4 Effect2 • By adding Multi-Effect to Reverb, Chorus and DSP, the PSR730 can have up to 5 system effects. • Since Multi-Effect is installed closer to the tone generator than Reverb, Chorus or DSP, it can function as an insertion effect. See page 143, "About Digital Effects." Example 2) Applying Effects 1 and 2 to a single part (series) Part Right1 Effect1 In Effect1 Auto Pan Effect1 Effect1 Effect2 In Effect 2 Auto Wah Effect2 48
-
 1
1 -
2
-
3
-
4
-
5
-
6
-
7
-
8
-
9
-
10
-
11
-
12
-
13
-
14
-
15
-
16
-
17
-
18
-
19
-
20
-
21
-
22
-
23
-
24
-
25
-
26
-
27
-
28
-
29
-
30
-
31
-
32
-
33
-
34
-
35
-
36
-
37
-
38
-
39
-
40
-
41
-
42
-
43
-
44
-
 45
45 -
 46
46 -
 47
47 -
 48
48 -
 49
49 -
 50
50 -
 51
51 -
 52
52 -
 53
53 -
 54
54 -
 55
55 -
56
-
57
-
58
-
59
-
60
-
61
-
62
-
63
-
64
-
65
-
66
-
67
-
68
-
69
-
70
-
71
-
72
-
73
-
74
-
75
-
76
-
77
-
78
-
79
-
80
-
81
-
82
-
83
-
84
-
85
-
86
-
87
-
88
-
89
-
90
-
91
-
92
-
93
-
94
-
95
-
96
-
97
-
98
-
99
-
100
-
101
-
102
-
103
-
104
-
105
-
106
-
107
-
108
-
109
-
110
-
111
-
112
-
113
-
114
-
115
-
116
-
117
-
118
-
119
-
120
-
121
-
122
-
123
-
124
-
125
-
126
-
127
-
128
-
129
-
130
-
131
-
132
-
133
-
134
-
135
-
136
-
137
-
138
-
139
-
140
-
141
-
142
-
143
-
144
-
145
-
146
-
147
-
148
-
149
-
150
-
151
-
152
-
153
-
154
-
155
-
156
-
157
-
158
-
159
-
160
-
161
-
162
-
163
-
164
-
165
-
166
-
167
-
168
-
169
-
170
-
171
-
172
-
173
-
174
-
175
-
176
-
177
-
178
 |
 |
