Yamaha RX-V2095 Owner's Manual - Page 35
Changing selections - av
 |
View all Yamaha RX-V2095 manuals
Add to My Manuals
Save this manual to your list of manuals |
Page 35 highlights
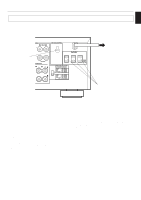
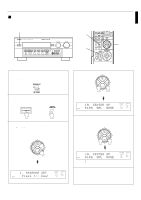
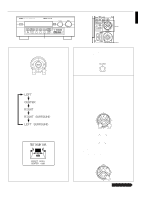
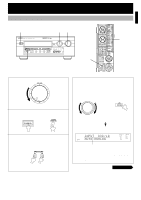
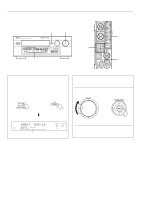
English Ⅵ Changing selections Refer to the display panel or the monitor screen when changing the selections. 2 1 NATURAL SOUND AV RECEIVER RX V2095 CINEMA DSP 7ch INPUT SELECTOR STANDBY/ON INPUT MODE SPEAKERS A B PROGRAM EFFECT EXT. DECODER A/B/C/D/E PRESET STATIONS TUNING PHONES BASS TONE EXTENSION BYPASS BASS l 0l 2 2 3 3 4 5 4 5 TREBLE l 0l 2 2 3 3 4 5 4 5 BALANCE l 0l 2 2 3 3 4 L5 4 5R REC OUT/ZONE 2 SOURCE/REMOTE DVD/LD TAPE/MD TV/DBS CD VCR 1 TUNER VCR 2 VIDEO AUX PHONO PRESET/TUNING FM/AM MEMORY TUNING MODE EDIT MAN'L/AUTO FM AUTO/MAN'L MONO VIDEO AUX VOLUME l6 20 l2 28 8 40 4 60 2 0 -dB 2 1 2 3 JAZZ ROCK ENTER- CLUB CONCERT TAINMENT 4 5 6 CONCERT TV STADIUM VIDEO THEATER 7 8 9 MOVIE MOVIE / DTS THEATER 1 THEATER 2 SURROUND 10 11 12 LEVEL PARAMETER PHONO EXT. DEC. EFFECT ON/OFF TEST SET MENU SLEEP ON SCREEN SYSTEM POWER ON TV MASTER VOLUME MUTE VCR STANDBY PREPARATION 3, 4, 5 1 Set the PARAMETER/SET MENU switch on the remote controller to the SET MENU position. Note: The cover of the remote controller must be open. Remote control PARAMETER SET MENU 2 Turn on the power of this unit. (If necessary, turn on the power of the monitor to display information.) Front panel Remote control SYSTEM POWER ON STANDBY/ON or 3 Select the function "1. SPEAKER SET" by using the " " or " " key. (The title will appear on the display). Remote control 4 Remote control Press once. SPEAKERS A DVD/LD TV/DBS VCR 1 VCR 2 V-AUX TAPE/MD CD TUNER PHONO 5 Use the "+" or "-" key to position the arrow-shaped cursor at the desired selection. Remote control SPEAKERS A DVD/LD TV/DBS VCR 1 VCR 2 V-AUX TAPE/MD CD TUNER PHONO Cursor DVD/LD TAPE/MD 6 Follow the same procedure for "1B. REAR SP", "1C. TV/DBS CD VCR 1 TUNER MAIN SP", "1D. LFE/BASS OUT", "1E. SYS. SETUP" VCR 2 PHONO SPEAKERS A V-AUX and/or "1F. MAIN LEVEL". First select the function by following step 3, and then select the proper position by following step 5. 31
-
 1
1 -
2
-
3
-
4
-
5
-
6
-
7
-
8
-
9
-
10
-
11
-
12
-
13
-
14
-
15
-
16
-
17
-
18
-
19
-
20
-
21
-
22
-
23
-
24
-
25
-
26
-
27
-
28
-
29
-
 30
30 -
 31
31 -
 32
32 -
 33
33 -
 34
34 -
 35
35 -
 36
36 -
 37
37 -
 38
38 -
 39
39 -
 40
40 -
41
-
42
-
43
-
44
-
45
-
46
-
47
-
48
-
49
-
50
-
51
-
52
-
53
-
54
-
55
-
56
-
57
-
58
-
59
-
60
-
61
-
62
-
63
-
64
-
65
-
66
-
67
-
68
-
69
-
70
-
71
-
72
-
73
-
74
-
75
-
76
-
77
-
78
-
79
-
80
-
81
-
82
-
83
-
84
-
85
-
86
-
87
-
88
-
89
-
90
 |
 |
