Yamaha RX-V363 Owner's Manual - Page 5

Contents, Preparation, Introduction, Basic, Operation, Advanced, Additional, Information, Appendix - remote

Page 5 highlights

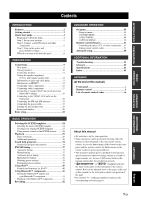
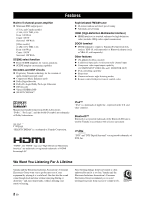
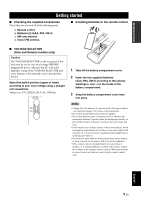
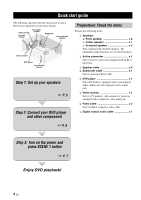
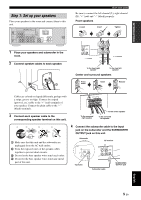
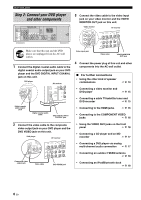
INTRODUCTION PREPARATION BASIC OPERATION ADVANCED OPERATION Contents INTRODUCTION Features 2 Getting started 3 Quick start guide 4 Preparation: Check the items 4 Step 1: Set up your speakers 5 Step 2: Connect your DVD player and other components 6 Step 3: Turn on the power and press SCENE 1 button 7 What do you want to do with this unit 8 PREPARATION Connections 9 Rear panel 9 Placing speakers 10 Connecting speakers 11 Setting the speaker impedance (U.S.A. and Canada models only 12 Information on jacks and cable plugs 13 Information on HDMI 14 Connecting video components 15 Connecting audio components 17 Connecting a Yamaha iPod™ universal dock and Bluetooth™ adapter 18 Connecting to the VIDEO AUX jacks on the front panel 18 Connecting the FM and AM antennas 19 Connecting the power cable 19 Turning on and off the power 19 Front panel display 20 Basic setup 22 BASIC OPERATION Selecting the SCENE templates 24 Selecting the desired SCENE template 24 Creating your original SCENE templates 27 Using remote control on the SCENE feature........... 28 Playback 29 Basic operations 29 Additional operations 30 Sound field programs 34 Sound field program descriptions 34 FM/AM tuning 37 Automatic tuning 37 Manual tuning 37 Automatic preset tuning 38 Manual preset tuning 38 Selecting preset stations 39 Exchanging preset stations 39 Using iPod 40 Controls and functions for iPod 40 Using Bluetooth™ components 41 Pairing the Bluetooth™ adapter and your Bluetooth™ component 41 Playback of the Bluetooth™ component 41 Recording 42 ADVANCED OPERATION Set menu 43 Using set menu 44 1 SOUND MENU 45 2 INPUT MENU 48 3 OPTION MENU 50 Remote control features 51 Controlling this unit, a TV, or other components.... 51 Setting remote control codes 53 Advanced setup 54 ADDITIONAL INFORMATION Troubleshooting 55 Glossary 60 Specifications 62 Index 63 APPENDIX (at the end of this manual) Front panel i Remote control ii List of remote control codes iii About this manual • y indicates a tip for your operation. • Some operations can be performed by using either the buttons on the front panel or the ones on the remote control. In case the button names differ between the front panel and the remote control, the button name on the remote control is given in parentheses. • This manual is printed prior to production. Design and specifications are subject to change in part as a result of improvements, etc. In case of differences between the manual and product, the product has priority. • "ASTANDBY/ON" or "3DVD" (example) indicates the name of the parts on the front panel or the remote control. Refer to the attached sheet or the pages at the end of this manual for the information about each position of the parts. • The symbol "☞ " with page number(s) indicates the corresponding reference page(s). ADDITIONAL INFORMATION APPENDIX English 1 En

  • 1
  • 2
  • 3
  • 4
  • 5
  • 6
  • 7
  • 8
  • 9
  • 10
  • 11
  • 12
  • 13
  • 14
  • 15
  • 16
  • 17
  • 18
  • 19
  • 20
  • 21
  • 22
  • 23
  • 24
  • 25
  • 26
  • 27
  • 28
  • 29
  • 30
  • 31
  • 32
  • 33
  • 34
  • 35
  • 36
  • 37
  • 38
  • 39
  • 40
  • 41
  • 42
  • 43
  • 44
  • 45
  • 46
  • 47
  • 48
  • 49
  • 50
  • 51
  • 52
  • 53
  • 54
  • 55
  • 56
  • 57
  • 58
  • 59
  • 60
  • 61
  • 62
  • 63
  • 64
  • 65
  • 66
  • 67
  • 68
  • 69
  • 70
  • 71
  • 72
  • 73
  • 74
  • 75
  • 76
  • 77
  • 78

1
En
PREPARATION
INTRODUCTION
BASIC
OPERATION
ADVANCED
OPERATION
ADDITIONAL
INFORMATION
APPENDIX
English
Features
...................................................................
2
Getting started
........................................................
3
Quick start guide
....................................................
4
Preparation: Check the items
.....................................
4
Step 1: Set up your speakers
......................................
5
Step 2: Connect your DVD player and other
components
............................................................
6
Step 3: Turn on the power and
press SCENE 1 button
...........................................
7
What do you want to do with this unit?
.....................
8
Connections
.............................................................
9
Rear panel
..................................................................
9
Placing speakers
.......................................................
10
Connecting speakers
................................................
11
Setting the speaker impedance
(U.S.A. and Canada models only)
.......................
12
Information on jacks and cable plugs
......................
13
Information on HDMI™
..........................................
14
Connecting video components
.................................
15
Connecting audio components
.................................
17
Connecting a Yamaha iPod™ universal dock and
Bluetooth™ adapter
.............................................
18
Connecting to the VIDEO AUX jacks on the
front panel
............................................................
18
Connecting the FM and AM antennas
.....................
19
Connecting the power cable
.....................................
19
Turning on and off the power
..................................
19
Front panel display
..................................................
20
Basic setup
.............................................................
22
Selecting the SCENE templates
...........................
24
Selecting the desired SCENE template
....................
24
Creating your original SCENE templates
................
27
Using remote control on the SCENE feature
...........
28
Playback
................................................................
29
Basic operations
.......................................................
29
Additional operations
...............................................
30
Sound field programs
...........................................
34
Sound field program descriptions
............................
34
FM/AM tuning
......................................................
37
Automatic tuning
.....................................................
37
Manual tuning
..........................................................
37
Automatic preset tuning
...........................................
38
Manual preset tuning
...............................................
38
Selecting preset stations
...........................................
39
Exchanging preset stations
......................................
39
Using iPod™
..........................................................
40
Controls and functions for iPod™
...........................
40
Using Bluetooth™ components
...........................
41
Pairing the Bluetooth™ adapter and
your Bluetooth™ component
..............................
41
Playback of the Bluetooth™ component
.................
41
Recording
..............................................................
42
Set menu
.................................................................
43
Using set menu
........................................................
44
1 SOUND MENU
....................................................
45
2 INPUT MENU
......................................................
48
3 OPTION MENU
...................................................
50
Remote control features
........................................
51
Controlling this unit, a TV, or other components
....
51
Setting remote control codes
...................................
53
Advanced setup
......................................................
54
Troubleshooting
.....................................................
55
Glossary
..................................................................
60
Specifications
.........................................................
62
Index
.......................................................................
63
(at the end of this manual)
Front panel
................................................................
i
Remote control
.......................................................
ii
List of remote control codes
.................................
iii
Contents
INTRODUCTION
PREPARATION
BASIC OPERATION
ADVANCED OPERATION
ADDITIONAL INFORMATION
APPENDIX
About this manual
y
indicates a tip for your operation.
Some operations can be performed by using either the
buttons on the front panel or the ones on the remote
control. In case the button names differ between the front
panel and the remote control, the button name on the
remote control is given in parentheses.
This manual is printed prior to production. Design and
specifications are subject to change in part as a result of
improvements, etc. In case of differences between the
manual and product, the product has priority.
•“
A
STANDBY/ON
” or “
3
DVD
” (example) indicates
the name of the parts on the front panel or the remote
control. Refer to the attached sheet or the pages at the end
of this manual for the information about each position of
the parts.
The symbol “
” with page number(s) indicates the
corresponding reference page(s).