Yamaha RX V463 Owner's Manual - Page 19
Connecting video components - hdmi or optical
 |
UPC - 027108929897
View all Yamaha RX V463 manuals
Add to My Manuals
Save this manual to your list of manuals |
Page 19 highlights
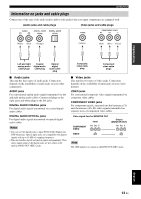
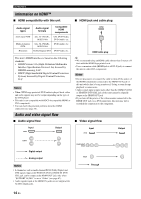
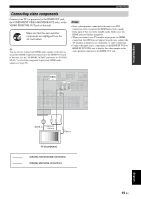
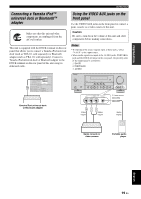
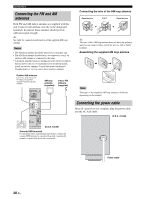
PREPARATION Connections Connecting video components Connect your TV (or projector) to the HDMI OUT jack, the COMPONENT VIDEO MONITOR OUT jacks, or the VIDEO MONITOR OUT jack of this unit. Make sure that this unit and other components are unplugged from the AC wall outlets. y You can choose to play back HDMI audio signals on this unit or on another HDMI component connected to the HDMI OUT jack of this unit. Use the "SUPPORT AUDIO" parameter in "SOUND MENU" to select the component to play back HDMI audio signals (see page 67). Notes • Some video monitors connected to this unit via a DVI connection fail to recognize the HDMI audio/video signals being input if they are in the standby mode. In this case, the HDMI indicator flashes irregularly. • When you connect your TV monitor or projector via HDMI connection, the OSD does not appear. In such cases, connect the TV monitor or projector via component, or video connection. • Connect the input source components to the HDMI IN DVD or HDMI IN DTV/CBL jack to display the video images on the video monitor connected to the HDMI OUT jack. VD IN1 DTV/CBL IN2 HDMI COAXIAL OPTICAL DVD DTV/CBL CD OUT 1 2 3 DIGITAL INPUT DVD PR COMPONENT VIDEO PB Y PR A VIDEO MONITOR OUT XM PB SIRIUS DTV/CBL Y B DVR C DVD DTV/CBL IN DVR OUT MONITOR OUT D/ OUT IN OUT -R (REC) DVD DTV/CBL DVR CD AUDIO L CENTER R SUB FRONT SURROUND WOOFER MULTI CH INPUT WO OUTPUT PR PB Y HDMI in Component video in V Video in TV (or projector) indicates recommended connections indicates alternative connections English 15 En
-
 1
1 -
2
-
3
-
4
-
5
-
6
-
7
-
8
-
9
-
10
-
11
-
12
-
13
-
 14
14 -
 15
15 -
 16
16 -
 17
17 -
 18
18 -
 19
19 -
 20
20 -
 21
21 -
 22
22 -
 23
23 -
 24
24 -
25
-
26
-
27
-
28
-
29
-
30
-
31
-
32
-
33
-
34
-
35
-
36
-
37
-
38
-
39
-
40
-
41
-
42
-
43
-
44
-
45
-
46
-
47
-
48
-
49
-
50
-
51
-
52
-
53
-
54
-
55
-
56
-
57
-
58
-
59
-
60
-
61
-
62
-
63
-
64
-
65
-
66
-
67
-
68
-
69
-
70
-
71
-
72
-
73
-
74
-
75
-
76
-
77
-
78
-
79
-
80
-
81
-
82
-
83
-
84
-
85
-
86
-
87
-
88
-
89
-
90
-
91
-
92
-
93
-
94
-
95
-
96
-
97
-
98
-
99
-
100
-
101
-
102
-
103
-
104
-
105
-
106
 |
 |