Yamaha RX V995 Owner's Manual - Page 14
The AUTO, D.D.RF, DTS, DGTL and ANALOG modes, TUNING MODE AUTO/MAN'L MONO button - 5 1 rear panel
 |
UPC - 027108908069
View all Yamaha RX V995 manuals
Add to My Manuals
Save this manual to your list of manuals |
Page 14 highlights
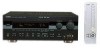
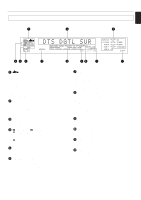
GETTING STARTED 8 A/B/C/D/E button Press this button to select a group (A-E) of preset stations. 9 SPEAKERS switches Press the switch A or B (or both) for the main speakers you will use to select them. Press the switch for the main speakers you will not use again to cancel them. On the display panel, "SPEAKERS A" and/or "SPEAKERS B" will be illuminated, depending on which main speakers are being selected. 0 Preset station number selector buttons Select a preset station number (1 to 8). A BASS EXTENSION button Press this button inward (ON) to boost the bass frequency response at the main left and right channels while maintaining overall tonal balance. This function is effective for reinforcing the bass frequencies when a subwoofer is not used. B TONE BYPASS button Press this button inward (ON) to bypass the tone (BASS and TREBLE) control circuitry. This function is used for outputting pure sound and checking the tone control settings. The tone control circuitry can be used when this button is released outward (OFF). C BASS and TREBLE controls Rotate these knobs to adjust the low and high frequency response for the left and right main channels only. D BALANCE control This knob controls the sound from the main speakers only. The balance of the output volume to the left and right main speakers can be adjusted to compensate for sound imbalances caused by the speaker location or listening room conditions. E MEMORY (MAN'L/AUTO FM) button Use this button to enter a station to memory. Refer to the section "Manual preset tuning" on page 44 for details. Hold down this button for more than 3 seconds to start automatic preset tuning. Refer to page 45 for details. F EDIT button This button is used to exchange the places of two preset stations with each other. G TUNING MODE (AUTO/MAN'L MONO) button Press this button to switch the tuning mode between automatic and manual. To select the automatic tuning mode, press this button so that the "AUTO" indicator is illuminated on the display. To select the manual tuning mode, press this button so that the "AUTO" indicator is not illuminated. H FM/AM button Press this button to switch the reception band between FM and AM. I REC OUT/ZONE 2 selector Rotate this knob to select the source for recording to an MD recorder (or tape deck) or VCR. This setting is independent of the INPUT SELECTOR setting, except when the REC OUT/ZONE 2 selector is set to the SOURCE position. Then the INPUT SELECTOR is used to select the source for recording to the MD recorder (or tape deck) or VCR. For a user who made up a dual-room audio/video system with this unit: The setting of the REC OUT/ZONE 2 selector controls the input source for the second room. J LEVEL button This button is used to adjust the output level of the center and rear speakers, and subwoofer. First, press this button (several times) to select the speaker(s). The name appears on the display. Then press the + or - button (K) to change the output level. K -/+ button Adjusts the level of the speaker(s) selected by pressing the LEVEL button. Moreover, performs setting changes and adjustments for functions selected by pressing the SET MENU button (L). L SET MENU button Press this button once or more to select the desired function in the SET MENU mode. M TUNING DOWN/UP button Used for tuning. Press the "UP" side to tune in to a higher frequency, and press the "DOWN" side to tune in to a lower frequency. N PROGRAM selector button Press this button in the or direction to select a digital sound field processing program. O EFFECT button Press this button to turn on and off the output from the center and rear speakers. The sound becomes normal 2-channel when this function is turned off. However, this does not apply to Dolby Digital or DTS. The signals at all channels will be distributed to the main channels and output from the main speakers, even if the output from the center and rear speakers are turned off, when Dolby Digital or DTS is decoded. P VIDEO AUX terminals Connect an auxiliary video or audio input source unit such as a camcorder to these terminals. A video unit with a S video output terminal can be connected to the S VIDEO terminal to obtain a high resolution picture. The source can be selected with the INPUT SELECTOR and REC OUT/ZONE 2 selector. Q INPUT MODE button Press this button to select how input signals are received from sources that output two or more types of signals. The "AUTO", "DTS" and "ANALOG" modes are available. Refer to page 38 for details. The "AUTO", "D.D.RF", "DTS", "DGTL" and "ANALOG" modes are available for DVD/LD sources. 10
-
 1
1 -
2
-
3
-
4
-
5
-
6
-
7
-
8
-
 9
9 -
 10
10 -
 11
11 -
 12
12 -
 13
13 -
 14
14 -
 15
15 -
 16
16 -
 17
17 -
 18
18 -
 19
19 -
20
-
21
-
22
-
23
-
24
-
25
-
26
-
27
-
28
-
29
-
30
-
31
-
32
-
33
-
34
-
35
-
36
-
37
-
38
-
39
-
40
-
41
-
42
-
43
-
44
-
45
-
46
-
47
-
48
-
49
-
50
-
51
-
52
-
53
-
54
-
55
-
56
-
57
-
58
-
59
-
60
-
61
-
62
-
63
-
64
-
65
-
66
-
67
-
68
-
69
-
70
-
71
-
72
-
73
-
74
-
75
-
76
-
77
-
78
-
79
-
80
-
81
-
82
-
83
-
84
-
85
-
86
-
87
-
88
 |
 |
