Yamaha SW-3 Owner's Manual - Page 9
Controls And Their Functions
 |
View all Yamaha SW-3 manuals
Add to My Manuals
Save this manual to your list of manuals |
Page 9 highlights
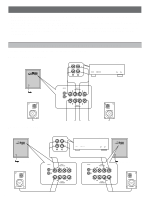
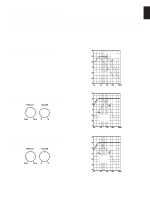
English CONTROLS AND THEIR FUNCTIONS STANDBY-RED ON-GREEN POWER OFF ON HIGH CUT 50 Hz I50 Hz AUTO POWER ON OFF INPUT2 VOLUME 0 I0 INPUT1 FROM AMPLIFIER OUTPUT TO SPEAKERS 12 STANDBY-RED ON-GREEN POWER OFF ON HIGH CUT 50 Hz I50 Hz AUTO POWER OFF ON INPUT2 VOLUME 0 I0 4 5 67 3 INPUT1 FROM AMPLIFIER OUTPUT TO SPEAKERS 8 1 POWER indicator Lights in green when the POWER switch is turned ON, and goes off when turned OFF. * STANDBY mode: If the AUTO POWER ON/OFF switch on the rear panel is set to ON, this indicator lights in red when no signal is input to this unit. 2 AUTO POWER ON/OFF switch By setting this switch to the ON position, this unit's automatic power ON/OFF function operates as described below. If you do not need this function, set to the OFF position. * Make sure to change the setting of this switch only when the power of this unit is off. Automatic power ON/OFF function When you play a source, the power to this unit turns on automatically by sensing audio signals input to this unit. The power turns off automatically if the source being played is stopped or the input signal is cut off for several minutes. * This function will operate responding to a certain level of input signal. Increase the output level on the input source if the automatic power ON function will not operate, or decrease the level if the automatic power OFF function will not operate. * There may be a case that the power turns on unexpectedly by sensing noise from other appliances. If it occurs, set the AUTO POWER ON/OFF switch to the OFF position. This function is available only when the power of this unit is on (by setting the POWER switch (4) to "on"). 3 INPUT1 (FROM AMPLIFIER) terminals Used to connect this unit with the speaker terminals of the amplifier. 4 POWER switch Turns the power of this unit ON and OFF whenever pressed. When this switch is turned ON, the POWER indicator above the POWER switch lights up. 5 HIGH CUT control Adjusts the high frequency cut off point. Frequencies higher than the frequency selected by this control are all cut off (and not output). * One graduation of this control represents 10 Hz. I00 90 80 II0 I20 70 I30 60 50 Hz I40 I50 Hz 6 VOLUME control Adjusts the volume level. 7 INPUT2 terminals Used to input line level signals from the amplifier. 8 OUTPUT (TO SPEAKERS) terminals Can be used for connections with the main speakers. These terminals send signals output from the amplifier to the main speakers directly. 9
-
 1
1 -
2
-
3
-
 4
4 -
 5
5 -
 6
6 -
 7
7 -
 8
8 -
 9
9 -
 10
10 -
 11
11 -
 12
12 -
 13
13 -
 14
14
 |
 |
