Yamaha V3.0 CISSCA V3.0 Users Manual - Page 10
Data Entry, Project name, ROOM INFO
 |
View all Yamaha V3.0 manuals
Add to My Manuals
Save this manual to your list of manuals |
Page 10 highlights
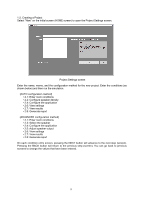
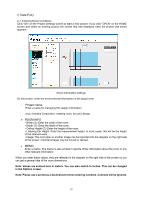
2. Data Entry 2-1. Entering Room Conditions Click "OK" on the Project Settings screen to start a new project. If you click "OPEN" on the HOME screen and select an existing project, the screen that was displayed when the project was saved appears. Room information settings On this screen, enter the environmental information of the target room ・ Project name Enter a name for managing this design information. (e.g.) Yamaha Corporation, meeting room, acoustic design ➢ ROOM INFO • Width (X): Enter the width of the room. • Depth (Y): Enter the depth of the room. • Ceiling Height (Z): Enter the height of the room. • Listening Ear Height: Enter the measurement height. In most cases, this will be the height of the listener's ears. • Image: The room plan or another image can be imported into the diagram on the right side of the screen. Imported images may be moved or resized. ➢ MEMO Enter a memo. The memo is also printed in reports. Enter information about the room or any other relevant information. When you enter these values, they are reflected in the diagram on the right side of the screen so you can get a general idea of the room dimensions. Note: Values are entered here in meters. You can also switch to inches. This can be changed in the Options screen. Note: Please use a period as a decimal point when entering numbers. Commas will be ignored. 10
-
 1
1 -
2
-
3
-
4
-
 5
5 -
 6
6 -
 7
7 -
 8
8 -
 9
9 -
 10
10 -
 11
11 -
 12
12 -
 13
13 -
 14
14 -
 15
15 -
16
-
17
-
18
-
19
-
20
-
21
-
22
-
23
-
24
-
25
-
26
-
27
-
28
 |
 |
