Yamaha V3.0 CISSCA V3.0 Users Manual - Page 14
Configuring the Application
 |
View all Yamaha V3.0 manuals
Add to My Manuals
Save this manual to your list of manuals |
Page 14 highlights
2-4. Configuring the Application On this screen, set the required sound pressure target (target SPL). Application settings (ADVANCED mode is shown here) ・ Application: Consider your application and set the maximum SPL that is necessary at the sound receiving point. ・ Application/maximum sound pressure: Consider your application and set the maximum SPL that is necessary at the sound receiving point. Specific examples are provided, so select a setting that is closest to your target (e.g. High BGM/79 dB). In actuality, there will be some margin on the maximum SPL depending on the number of speakers that are laid out (layout density). Note: The applications that are available to select are different for AUTO mode and ADVANCED mode. 14
-
 1
1 -
2
-
3
-
4
-
5
-
6
-
7
-
8
-
 9
9 -
 10
10 -
 11
11 -
 12
12 -
 13
13 -
 14
14 -
 15
15 -
 16
16 -
 17
17 -
 18
18 -
 19
19 -
20
-
21
-
22
-
23
-
24
-
25
-
26
-
27
-
28
 |
 |

14
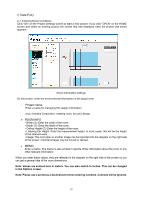
2-4. Configuring the Application
On this screen, set the required sound pressure target (target SPL).
Application settings
(ADVANCED mode is shown here)
・
Application: Consider your application and set the maximum SPL that is necessary at the
sound receiving point.
・
Application/maximum sound pressure: Consider your application and set the maximum SPL
that is necessary at the sound receiving point. Specific examples are provided, so select a
setting that is closest to your target (e.g. High BGM/79 dB). In actuality, there will be some
margin on the maximum SPL depending on the number of speakers that are laid out (layout
density).
Note: The applications that are available to select are different for AUTO mode and ADVANCED
mode.