ZyXEL P-660RU-T1 v2 Quick Start Guide - Page 6
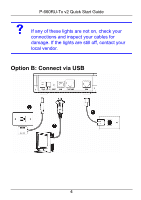
Do NOT connect the same computer to both the, ports on the P-660RU-Tx, ETHERNET
 |
View all ZyXEL P-660RU-T1 v2 manuals
Add to My Manuals
Save this manual to your list of manuals |
Page 6 highlights
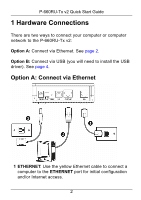
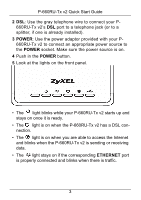
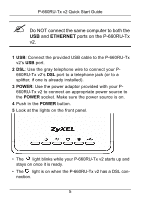
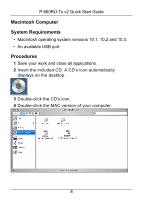
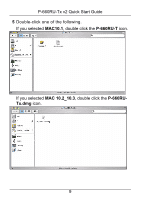
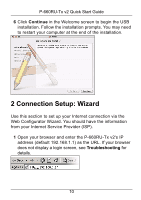
P-660RU-Tx v2 Quick Start Guide " Do NOT connect the same computer to both the USB and ETHERNET ports on the P-660RU-Tx v2. 1 USB: Connect the provided USB cable to the P-660RU-Tx v2's USB port. 2 DSL: Use the gray telephone wire to connect your P660RU-Tx v2's DSL port to a telephone jack (or to a splitter, if one is already installed). 3 POWER: Use the power adaptor provided with your P660RU-Tx v2 to connect an appropriate power source to the POWER socket. Make sure the power source is on. 4 Push in the POWER button. 5 Look at the lights on the front panel. • The light blinks while your P-660RU-Tx v2 starts up and stays on once it is ready. • The light is on when the P-660RU-Tx v2 has a DSL connection. 5
-
 1
1 -
 2
2 -
 3
3 -
 4
4 -
 5
5 -
 6
6 -
 7
7 -
 8
8 -
 9
9 -
 10
10 -
 11
11 -
 12
12 -
13
-
14
-
15
-
16
-
17
-
18
 |
 |

5
P-660RU-Tx v2 Quick Start Guide
Do NOT connect the same computer to both the
USB
and
ETHERNET
ports on the P-660RU-Tx
v2.
1 USB
:
Connect the provided USB cable to the P-660RU-Tx
v2’s
USB
port.
2 DSL
: Use the gray telephone wire to connect your P-
660RU-Tx v2’s
DSL
port to a telephone jack (or to a
splitter, if one is already installed).
3 POWER
: Use the power adaptor provided with your P-
660RU-Tx v2 to connect an appropriate power source to
the
POWER
socket. Make sure the power source is on.
4
Push in the
POWER
button.
5
Look at the lights on the front panel.
• The
light blinks while your P-660RU-Tx v2 starts up and
stays on once it is ready.
• The
light is on when the P-660RU-Tx v2 has a DSL con-
nection.