eMachines ET1161 8512161 - eMachines Desktop Hardware Reference Guide - Page 48
Adding or replacing an optical, disc drive
 |
View all eMachines ET1161 manuals
Add to My Manuals
Save this manual to your list of manuals |
Page 48 highlights
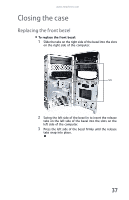
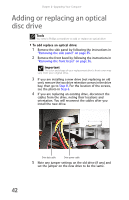
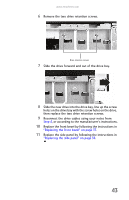
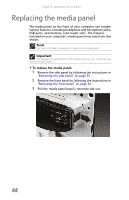
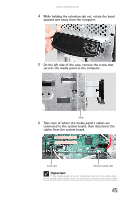
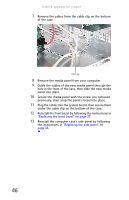
Chapter 4: Upgrading Your Computer Adding or replacing an optical disc drive Tools You need a Phillips screwdriver to add or replace an optical drive. To add replace an optical drive: 1 Remove the side panel by following the instructions in "Removing the side panel" on page 35. 2 Remove the front bezel by following the instructions in "Removing the front bezel" on page 36. Important The color and shape of your replacement drive's front cover may vary from your original drive. 3 If you are installing a new drive (not replacing an old one), remove the two drive retention screws in the drive bay, then go to Step 8. For the location of the screws, see the photo in Step 6. 4 If you are replacing an existing drive, disconnect the cables from the drive, noting their locations and orientation. You will reconnect the cables after you install the new drive. Drive data cable Drive power cable 5 Note any jumper settings on the old drive (if any) and set the jumper on the new drive to be the same. 42
-
 1
1 -
2
-
3
-
4
-
5
-
6
-
7
-
8
-
9
-
10
-
11
-
12
-
13
-
14
-
15
-
16
-
17
-
18
-
19
-
20
-
21
-
22
-
23
-
24
-
25
-
26
-
27
-
28
-
29
-
30
-
31
-
32
-
33
-
34
-
35
-
36
-
37
-
38
-
39
-
40
-
41
-
42
-
 43
43 -
 44
44 -
 45
45 -
 46
46 -
 47
47 -
 48
48 -
 49
49 -
 50
50 -
 51
51 -
 52
52 -
 53
53 -
54
-
55
-
56
-
57
-
58
-
59
-
60
-
61
-
62
-
63
-
64
-
65
-
66
-
67
-
68
-
69
-
70
-
71
-
72
-
73
-
74
-
75
-
76
-
77
-
78
-
79
-
80
-
81
-
82
-
83
-
84
-
85
-
86
-
87
-
88
-
89
-
90
-
91
-
92
-
93
-
94
-
95
-
96
-
97
-
98
-
99
-
100
-
101
-
102
-
103
-
104
-
105
-
106
-
107
-
108
-
109
-
110
-
111
-
112
-
113
-
114
-
115
-
116
-
117
-
118
-
119
-
120
-
121
-
122
-
123
-
124
-
125
-
126
-
127
-
128
-
129
-
130
-
131
-
132
-
133
-
134
 |
 |
