eMachines W3653 8512780 - eMachines Desktop PC User Guide - Page 45
Creating and copying data discs
 |
View all eMachines W3653 manuals
Add to My Manuals
Save this manual to your list of manuals |
Page 45 highlights
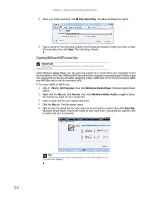
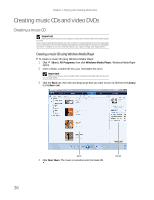
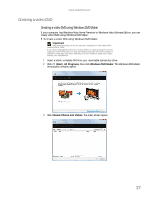
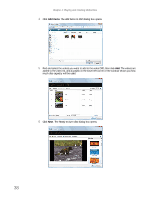
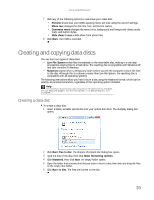
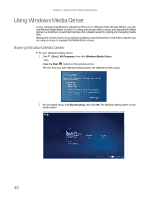
www.emachines.com 7 Click any of the following options to customize your video disc: • Preview shows how your DVD's opening menu will look using the current settings. • Menu text changes the disc title, font, and button names. • Customize menu changes the menu fonts, background and foreground videos, audio track, and button styles. • Slide show creates a slide show from photo files. 8 Click Burn. Your DVD is recorded. Creating and copying data discs You can burn two types of data discs: • Live File System writes files immediately to the recordable disc, making it a one-step process like copying files to a flash drive. The resulting disc is compatible with Windows XP and later versions of Windows. • Mastered copies files to a temporary folder before you tell the computer to burn the files to the disc. Although this is a slower process than Live File System, the resulting disc is compatible with all operating systems. The following instructions show you how to burn a disc using the Mastered format, which can be read by all personal computers, regardless of the operating system installed. Help For information about burning a disc using the Live File System format, click Start, then click Help and Support. Type live file system in the Search Help box, then press ENTER. Creating a data disc To create a data disc: 1 Insert a blank, writable optical disc into your optical disc drive. The Autoplay dialog box opens. 2 Click Burn files to disc. The Prepare this blank disc dialog box opens. 3 Type the title of the disc, then click Show formatting options. 4 Click Mastered, then click Next. An empty folder opens. 5 Open the folder that contains the files you want to burn to disc, then click and drag the files to the empty disc folder. 6 Click Burn to disc. The files are burned to the disc. 39
-
 1
1 -
2
-
3
-
4
-
5
-
6
-
7
-
8
-
9
-
10
-
11
-
12
-
13
-
14
-
15
-
16
-
17
-
18
-
19
-
20
-
21
-
22
-
23
-
24
-
25
-
26
-
27
-
28
-
29
-
30
-
31
-
32
-
33
-
34
-
35
-
36
-
37
-
38
-
39
-
 40
40 -
 41
41 -
 42
42 -
 43
43 -
 44
44 -
 45
45 -
 46
46 -
 47
47 -
 48
48 -
 49
49 -
 50
50 -
51
-
52
-
53
-
54
-
55
-
56
-
57
-
58
-
59
-
60
-
61
-
62
-
63
-
64
-
65
-
66
-
67
-
68
-
69
-
70
-
71
-
72
-
73
-
74
-
75
-
76
-
77
-
78
-
79
-
80
-
81
-
82
-
83
-
84
-
85
-
86
-
87
-
88
-
89
-
90
-
91
-
92
-
93
-
94
-
95
-
96
 |
 |