2010 Chevrolet Malibu Owner's Manual - Page 359

2010 Chevrolet Malibu Manual

Page 359 highlights

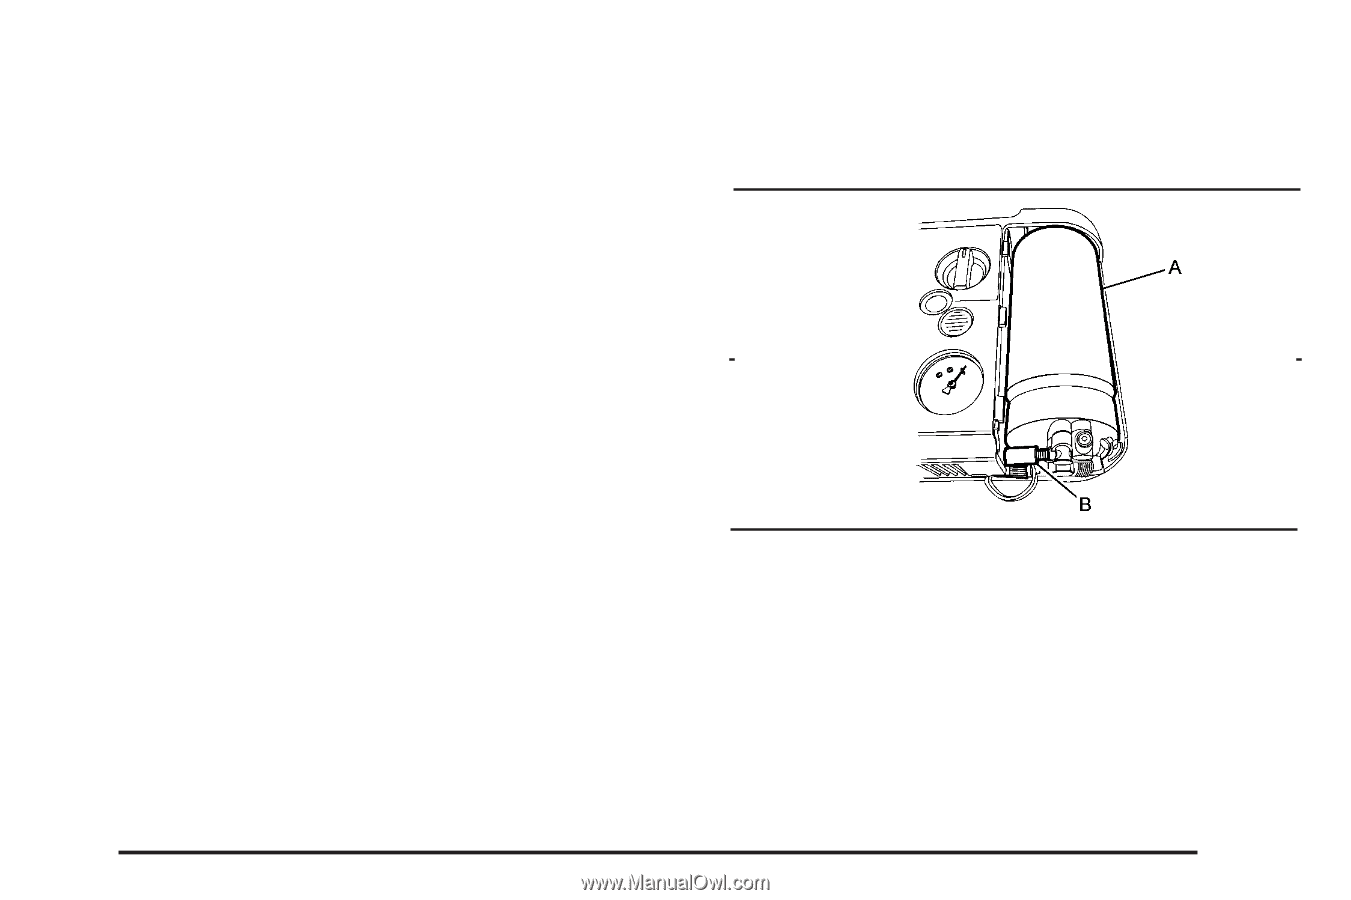
10. Inflate the tire to the recommended inflation pressure using the pressure gage (D). The recommended inflation pressure can be found on the Tire and Loading Information label. See Inflation - Tire Pressure on page 6-56. The pressure gage (D) may read higher than the actual tire pressure while the compressor is on. Turn the compressor off to get an accurate reading. The compressor may be turned on/off until the correct pressure is reached. 11. Press the on/off button (A) to turn the tire sealant and compressor kit off. Be careful while handling the tire sealant and compressor kit as it could be warm after usage. 12. Unplug the power plug (G) from the accessory power outlet in the vehicle. 13. Disconnect the air only hose (E) from the tire valve stem, by turning it counterclockwise, and replace the tire valve stem cap. 14. Replace the air only hose (E) and the power plug (G) and cord back in its original location. 15. Place the equipment in the original storage location in the vehicle. Removal and Installation of the Sealant Canister To remove the sealant canister: 1. Remove the plastic cover. 2. Unscrew the connector (B) from the canister (A). 3. Pull up on the canister (A) to remove it. 4. Replace with a new canister which is available from your dealer/retailer. 5. Push the new canister into place. 6. Screw the connector (B) to the canister (A). 7. Slide the plastic cover back on. 6-79
  • 1
  • 2
  • 3
  • 4
  • 5
  • 6
  • 7
  • 8
  • 9
  • 10
  • 11
  • 12
  • 13
  • 14
  • 15
  • 16
  • 17
  • 18
  • 19
  • 20
  • 21
  • 22
  • 23
  • 24
  • 25
  • 26
  • 27
  • 28
  • 29
  • 30
  • 31
  • 32
  • 33
  • 34
  • 35
  • 36
  • 37
  • 38
  • 39
  • 40
  • 41
  • 42
  • 43
  • 44
  • 45
  • 46
  • 47
  • 48
  • 49
  • 50
  • 51
  • 52
  • 53
  • 54
  • 55
  • 56
  • 57
  • 58
  • 59
  • 60
  • 61
  • 62
  • 63
  • 64
  • 65
  • 66
  • 67
  • 68
  • 69
  • 70
  • 71
  • 72
  • 73
  • 74
  • 75
  • 76
  • 77
  • 78
  • 79
  • 80
  • 81
  • 82
  • 83
  • 84
  • 85
  • 86
  • 87
  • 88
  • 89
  • 90
  • 91
  • 92
  • 93
  • 94
  • 95
  • 96
  • 97
  • 98
  • 99
  • 100
  • 101
  • 102
  • 103
  • 104
  • 105
  • 106
  • 107
  • 108
  • 109
  • 110
  • 111
  • 112
  • 113
  • 114
  • 115
  • 116
  • 117
  • 118
  • 119
  • 120
  • 121
  • 122
  • 123
  • 124
  • 125
  • 126
  • 127
  • 128
  • 129
  • 130
  • 131
  • 132
  • 133
  • 134
  • 135
  • 136
  • 137
  • 138
  • 139
  • 140
  • 141
  • 142
  • 143
  • 144
  • 145
  • 146
  • 147
  • 148
  • 149
  • 150
  • 151
  • 152
  • 153
  • 154
  • 155
  • 156
  • 157
  • 158
  • 159
  • 160
  • 161
  • 162
  • 163
  • 164
  • 165
  • 166
  • 167
  • 168
  • 169
  • 170
  • 171
  • 172
  • 173
  • 174
  • 175
  • 176
  • 177
  • 178
  • 179
  • 180
  • 181
  • 182
  • 183
  • 184
  • 185
  • 186
  • 187
  • 188
  • 189
  • 190
  • 191
  • 192
  • 193
  • 194
  • 195
  • 196
  • 197
  • 198
  • 199
  • 200
  • 201
  • 202
  • 203
  • 204
  • 205
  • 206
  • 207
  • 208
  • 209
  • 210
  • 211
  • 212
  • 213
  • 214
  • 215
  • 216
  • 217
  • 218
  • 219
  • 220
  • 221
  • 222
  • 223
  • 224
  • 225
  • 226
  • 227
  • 228
  • 229
  • 230
  • 231
  • 232
  • 233
  • 234
  • 235
  • 236
  • 237
  • 238
  • 239
  • 240
  • 241
  • 242
  • 243
  • 244
  • 245
  • 246
  • 247
  • 248
  • 249
  • 250
  • 251
  • 252
  • 253
  • 254
  • 255
  • 256
  • 257
  • 258
  • 259
  • 260
  • 261
  • 262
  • 263
  • 264
  • 265
  • 266
  • 267
  • 268
  • 269
  • 270
  • 271
  • 272
  • 273
  • 274
  • 275
  • 276
  • 277
  • 278
  • 279
  • 280
  • 281
  • 282
  • 283
  • 284
  • 285
  • 286
  • 287
  • 288
  • 289
  • 290
  • 291
  • 292
  • 293
  • 294
  • 295
  • 296
  • 297
  • 298
  • 299
  • 300
  • 301
  • 302
  • 303
  • 304
  • 305
  • 306
  • 307
  • 308
  • 309
  • 310
  • 311
  • 312
  • 313
  • 314
  • 315
  • 316
  • 317
  • 318
  • 319
  • 320
  • 321
  • 322
  • 323
  • 324
  • 325
  • 326
  • 327
  • 328
  • 329
  • 330
  • 331
  • 332
  • 333
  • 334
  • 335
  • 336
  • 337
  • 338
  • 339
  • 340
  • 341
  • 342
  • 343
  • 344
  • 345
  • 346
  • 347
  • 348
  • 349
  • 350
  • 351
  • 352
  • 353
  • 354
  • 355
  • 356
  • 357
  • 358
  • 359
  • 360
  • 361
  • 362
  • 363
  • 364
  • 365
  • 366
  • 367
  • 368
  • 369
  • 370
  • 371
  • 372
  • 373
  • 374
  • 375
  • 376
  • 377
  • 378
  • 379
  • 380
  • 381
  • 382
  • 383
  • 384
  • 385
  • 386
  • 387
  • 388
  • 389
  • 390
  • 391
  • 392
  • 393
  • 394
  • 395
  • 396
  • 397
  • 398
  • 399
  • 400
  • 401
  • 402
  • 403
  • 404
  • 405
  • 406
  • 407
  • 408
  • 409
  • 410
  • 411
  • 412
  • 413
  • 414
  • 415
  • 416
  • 417
  • 418
  • 419
  • 420
  • 421
  • 422
  • 423
  • 424
  • 425
  • 426
  • 427
  • 428
  • 429
  • 430
  • 431
  • 432
  • 433
  • 434
  • 435
  • 436
  • 437
  • 438
  • 439
  • 440
  • 441
  • 442
  • 443
  • 444
  • 445
  • 446
  • 447
  • 448
  • 449
  • 450

10. Inflate the tire to the recommended inflation pressure
using the pressure gage (D). The recommended
inflation pressure can be found on the Tire and
Loading Information label. See
Inflation - Tire
Pressure on page 6-56
.
The pressure gage (D) may read higher than the
actual tire pressure while the compressor is on.
Turn the compressor off to get an accurate reading.
The compressor may be turned on/off until the
correct pressure is reached.
11. Press the on/off button (A) to turn the tire sealant
and compressor kit off.
Be careful while handling the tire sealant and
compressor kit as it could be warm after usage.
12. Unplug the power plug (G) from the accessory
power outlet in the vehicle.
13. Disconnect the air only hose (E) from the tire valve
stem, by turning it counterclockwise, and replace
the tire valve stem cap.
14. Replace the air only hose (E) and the power
plug (G) and cord back in its original location.
15. Place the equipment in the original storage location
in the vehicle.
Removal and Installation of the Sealant
Canister
To remove the sealant canister:
1. Remove the plastic cover.
2. Unscrew the connector (B) from the canister (A).
3. Pull up on the canister (A) to remove it.
4. Replace with a new canister which is available from
your dealer/retailer.
5. Push the new canister into place.
6. Screw the connector (B) to the canister (A).
7. Slide the plastic cover back on.
6-79