2012 Chevrolet Equinox Owner's Manual - Page 25
2012 Chevrolet Equinox Manual

Page 25 highlights
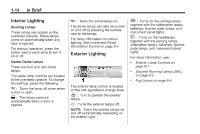
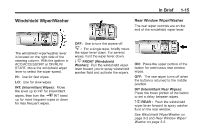
In Brief For more information about the Rear Seat Audio (RSA) System, see Rear Seat Audio (RSA) System on page 7‑34. Turning the Digital Clock On or Off 1. Press the CONFIG button. 2. Select Time and Date Settings. 3. Select Clock Displayed. 4. Press the MENU/SEL button to turn the clock on or off. Setting the Time and Date 1. Press the CONFIG button. 2. Select Time and Date Settings. 3. Select Set Time or Set Date. 4. Turn the MENU/SEL knob to adjust the highlighted value. 5. Press the MENU/SEL knob to select the next value. 6. To save the time or date and return to the Time and Date Settings menu, press the E BACK button at any time or press the MENU/SEL knob after adjusting the minutes or year. 1-19 Setting the 12/24 Hour Format 1. Press the CONFIG button. 2. Select Time and Date Settings. 3. Highlight 12/24 Hour Format. 4. Press the MENU/SEL button to select the 12 hour or 24 hour display format. Setting the Month & Day Format 1. Press the CONFIG button. 2. Select Time and Date Settings. 3. Highlight Month & Day Format. 4. Press the MENU/SEL knob to select MM/DD (month/day) or DD/MM (day/month). Setting the Auto Time Adjust 1. Press the CONFIG button. 2. Select Time and Date Settings. 3. Highlight Auto Time Adjust. 4. Press the MENU/SEL knob to turn Auto Time Adjust on or off. Storing a Favorite Station Stations from all bands can be stored in the favorite lists in any order. Up to six stations can be stored in each favorite page and the number of available favorite pages can be set. To store the station to a position in the list, press the corresponding numeric button 1-6 until the station can be heard again. For more information, see "Storing and Retrieving Favorites" in AM-FM Radio (Radio with CD) on page 7‑14 or AM-FM Radio (Radio withCD and Touchscreen) on page 7‑16. Setting the Clock The vehicle has a digital and an analog clock. For detailed instructions on setting either clock, see Clock on page 5‑6.
-
 1
1 -
2
-
3
-
4
-
5
-
6
-
7
-
8
-
9
-
10
-
11
-
12
-
13
-
14
-
15
-
16
-
17
-
18
-
19
-
 20
20 -
 21
21 -
 22
22 -
 23
23 -
 24
24 -
 25
25 -
 26
26 -
 27
27 -
 28
28 -
 29
29 -
 30
30 -
31
-
32
-
33
-
34
-
35
-
36
-
37
-
38
-
39
-
40
-
41
-
42
-
43
-
44
-
45
-
46
-
47
-
48
-
49
-
50
-
51
-
52
-
53
-
54
-
55
-
56
-
57
-
58
-
59
-
60
-
61
-
62
-
63
-
64
-
65
-
66
-
67
-
68
-
69
-
70
-
71
-
72
-
73
-
74
-
75
-
76
-
77
-
78
-
79
-
80
-
81
-
82
-
83
-
84
-
85
-
86
-
87
-
88
-
89
-
90
-
91
-
92
-
93
-
94
-
95
-
96
-
97
-
98
-
99
-
100
-
101
-
102
-
103
-
104
-
105
-
106
-
107
-
108
-
109
-
110
-
111
-
112
-
113
-
114
-
115
-
116
-
117
-
118
-
119
-
120
-
121
-
122
-
123
-
124
-
125
-
126
-
127
-
128
-
129
-
130
-
131
-
132
-
133
-
134
-
135
-
136
-
137
-
138
-
139
-
140
-
141
-
142
-
143
-
144
-
145
-
146
-
147
-
148
-
149
-
150
-
151
-
152
-
153
-
154
-
155
-
156
-
157
-
158
-
159
-
160
-
161
-
162
-
163
-
164
-
165
-
166
-
167
-
168
-
169
-
170
-
171
-
172
-
173
-
174
-
175
-
176
-
177
-
178
-
179
-
180
-
181
-
182
-
183
-
184
-
185
-
186
-
187
-
188
-
189
-
190
-
191
-
192
-
193
-
194
-
195
-
196
-
197
-
198
-
199
-
200
-
201
-
202
-
203
-
204
-
205
-
206
-
207
-
208
-
209
-
210
-
211
-
212
-
213
-
214
-
215
-
216
-
217
-
218
-
219
-
220
-
221
-
222
-
223
-
224
-
225
-
226
-
227
-
228
-
229
-
230
-
231
-
232
-
233
-
234
-
235
-
236
-
237
-
238
-
239
-
240
-
241
-
242
-
243
-
244
-
245
-
246
-
247
-
248
-
249
-
250
-
251
-
252
-
253
-
254
-
255
-
256
-
257
-
258
-
259
-
260
-
261
-
262
-
263
-
264
-
265
-
266
-
267
-
268
-
269
-
270
-
271
-
272
-
273
-
274
-
275
-
276
-
277
-
278
-
279
-
280
-
281
-
282
-
283
-
284
-
285
-
286
-
287
-
288
-
289
-
290
-
291
-
292
-
293
-
294
-
295
-
296
-
297
-
298
-
299
-
300
-
301
-
302
-
303
-
304
-
305
-
306
-
307
-
308
-
309
-
310
-
311
-
312
-
313
-
314
-
315
-
316
-
317
-
318
-
319
-
320
-
321
-
322
-
323
-
324
-
325
-
326
-
327
-
328
-
329
-
330
-
331
-
332
-
333
-
334
-
335
-
336
-
337
-
338
-
339
-
340
-
341
-
342
-
343
-
344
-
345
-
346
-
347
-
348
-
349
-
350
-
351
-
352
-
353
-
354
-
355
-
356
-
357
-
358
-
359
-
360
-
361
-
362
-
363
-
364
-
365
-
366
-
367
-
368
-
369
-
370
-
371
-
372
-
373
-
374
-
375
-
376
-
377
-
378
-
379
-
380
-
381
-
382
-
383
-
384
-
385
-
386
-
387
-
388
-
389
-
390
-
391
-
392
-
393
-
394
-
395
-
396
-
397
-
398
-
399
-
400
-
401
-
402
-
403
-
404
-
405
-
406
-
407
-
408
-
409
-
410
-
411
-
412
-
413
-
414
-
415
-
416
-
417
-
418
-
419
-
420
-
421
-
422
-
423
-
424
-
425
-
426
-
427
-
428
 |
 |