2002 Ford Excursion Owner Guide 4th Printing - Page 127
2002 Ford Excursion Manual
Page 127 highlights
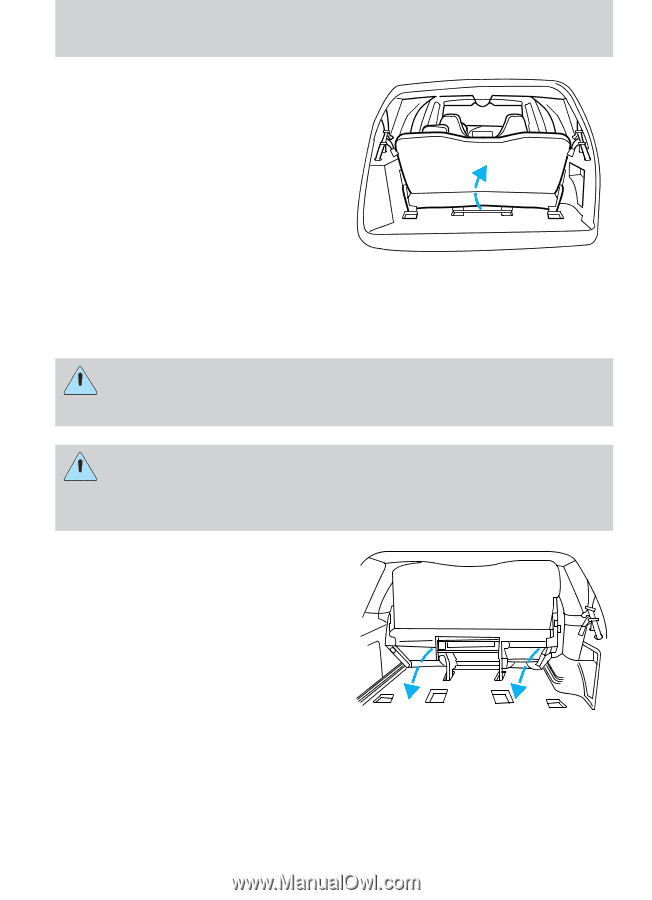
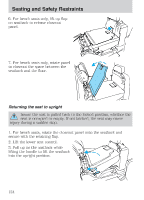
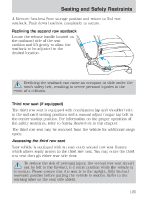
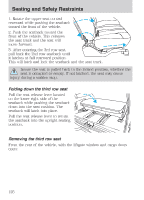
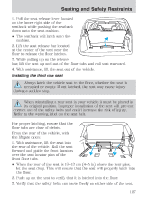
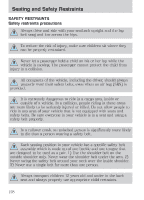
Seating and Safety Restraints 1. Pull the seat release lever located on the lower right side of the seatback while pushing the seatback down onto the seat cushion. • The seatback will latch onto the cushion. 2. Lift the seat release bar located at the center of the seat near the floor to release the floor latches. 3. While pulling up on the release bar, lift the seat up and out of the floor tubs and roll seat rearward. 4. With assistance, lift the seat out of the vehicle. Installing the third row seat Always latch the vehicle seat to the floor, whether the seat is occupied or empty. If not latched, the seat may cause injury during a sudden stop. When reinstalling a rear seat in your vehicle it must be placed in its original position. Improper installation of the seat will prevent correct use of the safety belts and could increase the risk of injury. Refer to the warning label on the seat belt. For proper latching, ensure that the floor tubs are clear of debris. From the rear of the vehicle, with the liftgate open: 1. With assistance, lift the seat into the rear of the vehicle. Roll the seat forward and guide the front locators over the seat locator pins of the front floor tubs. • When the rear of the seat is 10-13 cm (4-5 in) above the rear pins, let the seat drop. This will ensure that the seat will properly latch into the floor. 2. Push up on the seat to verify that it is latched into the floor. 3. Verify that the safety belts can move freely on either side of the seat. 127
-
 1
1 -
2
-
3
-
4
-
5
-
6
-
7
-
8
-
9
-
10
-
11
-
12
-
13
-
14
-
15
-
16
-
17
-
18
-
19
-
20
-
21
-
22
-
23
-
24
-
25
-
26
-
27
-
28
-
29
-
30
-
31
-
32
-
33
-
34
-
35
-
36
-
37
-
38
-
39
-
40
-
41
-
42
-
43
-
44
-
45
-
46
-
47
-
48
-
49
-
50
-
51
-
52
-
53
-
54
-
55
-
56
-
57
-
58
-
59
-
60
-
61
-
62
-
63
-
64
-
65
-
66
-
67
-
68
-
69
-
70
-
71
-
72
-
73
-
74
-
75
-
76
-
77
-
78
-
79
-
80
-
81
-
82
-
83
-
84
-
85
-
86
-
87
-
88
-
89
-
90
-
91
-
92
-
93
-
94
-
95
-
96
-
97
-
98
-
99
-
100
-
101
-
102
-
103
-
104
-
105
-
106
-
107
-
108
-
109
-
110
-
111
-
112
-
113
-
114
-
115
-
116
-
117
-
118
-
119
-
120
-
121
-
 122
122 -
 123
123 -
 124
124 -
 125
125 -
 126
126 -
 127
127 -
 128
128 -
 129
129 -
 130
130 -
 131
131 -
 132
132 -
133
-
134
-
135
-
136
-
137
-
138
-
139
-
140
-
141
-
142
-
143
-
144
-
145
-
146
-
147
-
148
-
149
-
150
-
151
-
152
-
153
-
154
-
155
-
156
-
157
-
158
-
159
-
160
-
161
-
162
-
163
-
164
-
165
-
166
-
167
-
168
-
169
-
170
-
171
-
172
-
173
-
174
-
175
-
176
-
177
-
178
-
179
-
180
-
181
-
182
-
183
-
184
-
185
-
186
-
187
-
188
-
189
-
190
-
191
-
192
-
193
-
194
-
195
-
196
-
197
-
198
-
199
-
200
-
201
-
202
-
203
-
204
-
205
-
206
-
207
-
208
-
209
-
210
-
211
-
212
-
213
-
214
-
215
-
216
-
217
-
218
-
219
-
220
-
221
-
222
-
223
-
224
-
225
-
226
-
227
-
228
-
229
-
230
-
231
-
232
-
233
-
234
-
235
-
236
-
237
-
238
-
239
-
240
-
241
-
242
-
243
-
244
-
245
-
246
-
247
-
248
-
249
-
250
-
251
-
252
-
253
-
254
-
255
-
256
-
257
-
258
-
259
-
260
-
261
-
262
-
263
-
264
-
265
-
266
-
267
-
268
-
269
-
270
-
271
-
272
 |
 |