2006 Mazda MPV Owner's Manual - Page 276
2006 Mazda MPV Manual

Page 276 highlights
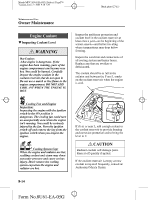
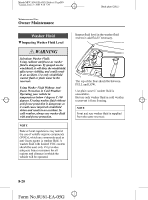
Mazda MPV_8U61-EA-05G_Edition1 Page276 Tuesday, June 21 2005 9:38 AM Black plate (276,1) Maintenance and Care Owner Maintenance To change coolant 4. Flush out the system with running water. 5. Drain the system completely. Insert and tighten the plug. Add as much ethylene-glycol-based coolant mixture and water (or undiluted FL22) as necessary to provide freezing and corrosion protection. 6. In extremely cold climates, add the mixture percentage recommended in the coolant mixture percentage table. 7. Run the engine at idle with the cooling system cap off. Slowly add additional coolant if necessary. 8. At this point, wait until the engine reaches normal operating temperature; then depress the accelerator two or three times. Add more coolant, if necessary, until the system is full. 9. Install the cooling system cap. Inspect all connections for leaks. Inspect the level in the coolant reservoir one more time and verify that the coolant level is between the F and L marks. WARNING Removing the Cooling System Cap: Removing the cooling system cap while the engine is running or hot is dangerous. This might lead to cooling system and engine damage and could result in serious injury from escaping hot coolant or steam. Turn off the engine and wait until it's cool. Even then, be very careful when removing the cap. Wrap a thick cloth around the cap and slowly turn it counterclockwise to the first stop. Step back while the pressure escapes. When you're sure all the pressure is gone, press down on the cap ― still using a cloth ― turn the cap, and remove it. 1. Make sure the engine is not running and it has cooled. 2. Remove the cooling system cap. Loosen Tighten Tighten Loosen qChanging Coolant (With Rear Heater) Have an Authorized Mazda Dealer change the coolant according to the Scheduled Maintenance (page 8-3). F L 3. Remove the radiator drain plug and drain the coolant into a suitable container. Properly dispose of the used coolant. 8-16 Form No.8U61-EA-05G
-
 1
1 -
2
-
3
-
4
-
5
-
6
-
7
-
8
-
9
-
10
-
11
-
12
-
13
-
14
-
15
-
16
-
17
-
18
-
19
-
20
-
21
-
22
-
23
-
24
-
25
-
26
-
27
-
28
-
29
-
30
-
31
-
32
-
33
-
34
-
35
-
36
-
37
-
38
-
39
-
40
-
41
-
42
-
43
-
44
-
45
-
46
-
47
-
48
-
49
-
50
-
51
-
52
-
53
-
54
-
55
-
56
-
57
-
58
-
59
-
60
-
61
-
62
-
63
-
64
-
65
-
66
-
67
-
68
-
69
-
70
-
71
-
72
-
73
-
74
-
75
-
76
-
77
-
78
-
79
-
80
-
81
-
82
-
83
-
84
-
85
-
86
-
87
-
88
-
89
-
90
-
91
-
92
-
93
-
94
-
95
-
96
-
97
-
98
-
99
-
100
-
101
-
102
-
103
-
104
-
105
-
106
-
107
-
108
-
109
-
110
-
111
-
112
-
113
-
114
-
115
-
116
-
117
-
118
-
119
-
120
-
121
-
122
-
123
-
124
-
125
-
126
-
127
-
128
-
129
-
130
-
131
-
132
-
133
-
134
-
135
-
136
-
137
-
138
-
139
-
140
-
141
-
142
-
143
-
144
-
145
-
146
-
147
-
148
-
149
-
150
-
151
-
152
-
153
-
154
-
155
-
156
-
157
-
158
-
159
-
160
-
161
-
162
-
163
-
164
-
165
-
166
-
167
-
168
-
169
-
170
-
171
-
172
-
173
-
174
-
175
-
176
-
177
-
178
-
179
-
180
-
181
-
182
-
183
-
184
-
185
-
186
-
187
-
188
-
189
-
190
-
191
-
192
-
193
-
194
-
195
-
196
-
197
-
198
-
199
-
200
-
201
-
202
-
203
-
204
-
205
-
206
-
207
-
208
-
209
-
210
-
211
-
212
-
213
-
214
-
215
-
216
-
217
-
218
-
219
-
220
-
221
-
222
-
223
-
224
-
225
-
226
-
227
-
228
-
229
-
230
-
231
-
232
-
233
-
234
-
235
-
236
-
237
-
238
-
239
-
240
-
241
-
242
-
243
-
244
-
245
-
246
-
247
-
248
-
249
-
250
-
251
-
252
-
253
-
254
-
255
-
256
-
257
-
258
-
259
-
260
-
261
-
262
-
263
-
264
-
265
-
266
-
267
-
268
-
269
-
270
-
 271
271 -
 272
272 -
 273
273 -
 274
274 -
 275
275 -
 276
276 -
 277
277 -
 278
278 -
 279
279 -
 280
280 -
 281
281 -
282
-
283
-
284
-
285
-
286
-
287
-
288
-
289
-
290
-
291
-
292
-
293
-
294
-
295
-
296
-
297
-
298
-
299
-
300
-
301
-
302
-
303
-
304
-
305
-
306
-
307
-
308
-
309
-
310
-
311
-
312
-
313
-
314
-
315
-
316
-
317
-
318
-
319
-
320
-
321
-
322
-
323
-
324
-
325
-
326
-
327
-
328
-
329
-
330
-
331
-
332
-
333
-
334
-
335
-
336
-
337
-
338
-
339
-
340
-
341
-
342
-
343
-
344
-
345
-
346
-
347
-
348
-
349
-
350
-
351
-
352
-
353
-
354
-
355
-
356
-
357
-
358
-
359
-
360
-
361
-
362
-
363
-
364
 |
 |