| Section |
Page |
| Jacket - <GRAPHIK> |
1 |
| Cover - <GRAPHIK> |
1 |
| Graphic - <GRAPHIK> |
1 |
| Graphic - <GRAPHIK> |
1 |
| Title - |
1 |
| CapLetter - |
1 |
| Intro - <GRAPHIK> |
2 |
| Para - <GRAPHIK> |
2 |
| Para - C�240 C�320 |
2 |
| Para - Our company and staff congratulate you on the purchase of your new Mercedes-Benz. |
3 |
| Para - Your selection of our product is a demonstration of your trust in our company name. Furthe... |
3 |
| Para - Your Mercedes-Benz represents the efforts of many skilled engineers and craftsmen. To ensu... |
3 |
| ItemizedList - • Please read this manual carefully before putting it aside. Then return it to you... |
3 |
| Item - • Please read this manual carefully before putting it aside. Then return it to your vehicl... |
3 |
| Item - • Please abide by the recommendations contained in this manual. They are designed to acqua... |
3 |
| Item - • Please abide by the warnings and cautions contained in this manual. They are designed to... |
3 |
| Para - We extend our best wishes for many miles of safe, pleasurable driving. |
3 |
| Para - Daimler |
3 |
| ToC - Introduction |
4 |
| Title - Introduction |
4 |
| ToCEntry - Product information 1 |
4 |
| ToCEntry - Operator’s manual 2 |
4 |
| ToCEntry - Where to find it 7 |
4 |
| ToCEntry - Reporting Safety Defects 9 |
4 |
| Title - Instruments and controls |
4 |
| ToCEntry - Instruments and controls 12 |
4 |
| ToCEntry - Door control panel 14 |
4 |
| ToCSubEntry - Door control panel 14 |
4 |
| ToCSubEntry - Overhead control panel 15 |
4 |
| ToCSubEntry - Dashboard 16 |
4 |
| ToCSubEntry - Center console 18 |
4 |
| Title - Operation |
4 |
| ToCEntry - Vehicle keys 22 |
4 |
| ToCEntry - Start lock-out 24 |
4 |
| ToCEntry - General notes on the central locking system 24 |
4 |
| ToCEntry - Central locking system 25 |
4 |
| ToCEntry - Radio frequency and infrared remote control 25 |
4 |
| ToCSubEntry - Radio frequency and infrared remote control 25 |
4 |
| ToCSubEntry - Locking and unlocking 27 |
4 |
| ToCSubEntry - Choosing global or selective mode on remote control 27 |
4 |
| ToCSubEntry - Opening the trunk 28 |
4 |
| ToCSubEntry - Opening and closing windows and sliding / pop-up roof from outside 29 |
4 |
| ToCSubEntry - Panic button 30 |
4 |
| ToCSubEntry - Mechanical keys 30 |
4 |
| ToCEntry - Doors 31 |
4 |
| ToCEntry - Central locking switch 33 |
4 |
| ToCEntry - Automatic central locking 34 |
4 |
| ToCEntry - Emergency unlocking in case of accident 34 |
4 |
| ToCEntry - Trunk 35 |
4 |
| ToCEntry - Trunk lid release switch 37 |
4 |
| ToCEntry - Antitheft alarm system 38 |
4 |
| ToCEntry - Tow-away alarm 39 |
4 |
| ToCEntry - Easy-entry/exit feature 41 |
4 |
| ToCEntry - Front seat adjustment 42 |
4 |
| ToCEntry - Removal and installation of front seat head restraints 47 |
4 |
| ToCEntry - Multicontour seat 49 |
4 |
| ToCEntry - Heated seats 50 |
4 |
| ToCEntry - Rear seat head restraints 52 |
4 |
| ToCEntry - Seat belts and integrated restraint system 55 |
4 |
| ToCEntry - Seat belts 55 |
4 |
| ToCEntry - Seat belt nonusage warning system 56 |
4 |
| ToCEntry - BabySmart |
4 |
| ToCEntry - Supplemental Restraint System (SRS) 63 |
4 |
| ToCEntry - Emergency tensioning retractor (ETR) 64 |
4 |
| ToCEntry - Airbags 65 |
4 |
| ToCEntry - Safety guidelines for the seat belt, emergency tensioning retractor and airbag 72 |
4 |
| ToCEntry - Infant and child restraint systems 73 |
4 |
| ToCEntry - Steering wheel adjustment (manual) 77 |
4 |
| ToCEntry - Steering wheel adjustment (electrical) 79 |
4 |
| ToCEntry - Rear view mirrors 80 |
4 |
| ToCEntry - Instrument cluster 88 |
4 |
| ToCEntry - Multifunction steering wheel, multifunction display 92 |
4 |
| ToCEntry - Trip and main odometer, FSS, coolant temperature, vehicle speed, engine oil level indi... |
5 |
| ToCEntry - Audio systems 98 |
5 |
| ToCEntry - Radio 98 |
5 |
| ToCSubEntry - Radio 98 |
5 |
| ToCSubEntry - CD player 99 |
5 |
| ToCSubEntry - Cassette player 100 |
5 |
| ToCEntry - Telephone 101 |
5 |
| ToCEntry - Navigation system 106 |
5 |
| ToCEntry - Trip computer 107 |
5 |
| ToCEntry - Malfunction/warning message memory 109 |
5 |
| ToCEntry - Individual settings 111 |
5 |
| ToCEntry - Setting the audio volume 123 |
5 |
| ToCEntry - Coolant temperature gauge 124 |
5 |
| ToCEntry - Flexible service system (FSS) 125 |
5 |
| ToCEntry - Engine oil level indicator 128 |
5 |
| ToCEntry - Engine oil consumption 129 |
5 |
| ToCEntry - Exterior lamp switch 130 |
5 |
| ToCEntry - Headlamp mode 131 |
5 |
| ToCEntry - Night security illumination 132 |
5 |
| ToCEntry - Locator lighting 133 |
5 |
| ToCSubEntry - Locator lighting 133 |
5 |
| ToCEntry - Headlamp cleaning system 133 |
5 |
| ToCEntry - Combination switch 134 |
5 |
| ToCEntry - Hazard warning flasher switch 137 |
5 |
| ToCEntry - Climate control 138 |
5 |
| ToCEntry - Automatic climate control 146 |
5 |
| ToCEntry - Front center console storage compartment ventilation 158 |
5 |
| ToCEntry - Rear passenger compartment adjustable air outlets 159 |
5 |
| ToCEntry - Operation Audio and telephone 160 |
5 |
| ToCEntry - Operating safety 160 |
5 |
| ToCEntry - Operating and display elements 161 |
5 |
| ToCEntry - Button and soft key operation 163 |
5 |
| ToCEntry - Operation 163 |
5 |
| ToCEntry - Power windows 184 |
5 |
| ToCEntry - Sliding/pop-up roof 187 |
5 |
| ToCEntry - Interior lighting 189 |
5 |
| ToCEntry - Rear window sunshade 191 |
5 |
| ToCEntry - Sun visors 192 |
5 |
| ToCEntry - Vanity mirrors 192 |
5 |
| ToCEntry - Interior 193 |
5 |
| ToCEntry - Storage compartments and armrests 193 |
5 |
| ToCEntry - Glove box 194 |
5 |
| ToCSubEntry - Glove box 194 |
5 |
| ToCEntry - Cup holder 197 |
5 |
| ToCEntry - Ashtrays 199 |
5 |
| ToCEntry - Lighter 201 |
5 |
| ToCEntry - Parcel net in front passenger footwell 202 |
5 |
| ToCEntry - Ski sack 202 |
5 |
| ToCEntry - Enlarged cargo area 207 |
5 |
| ToCEntry - Split folding rear seat bench 207 |
5 |
| ToCEntry - Loading instructions (vehicle with enlarged cargo area) 209 |
5 |
| ToCEntry - Cellular telephone 210 |
5 |
| ToCEntry - Telephone, general 211 |
5 |
| ToCEntry - Garage door opener 212 |
5 |
| Title - Driving |
6 |
| ToCEntry - Control and operation of radio transmitters 218 |
6 |
| ToCEntry - The first 1 000 miles (1 500 km) 219 |
6 |
| ToCEntry - Maintenance 219 |
6 |
| ToCEntry - Tele Aid 220 |
6 |
| ToCEntry - Catalytic converter 228 |
6 |
| ToCEntry - Emission control 229 |
6 |
| ToCEntry - Starter switch 230 |
6 |
| ToCEntry - Starting and turning off the engine 232 |
6 |
| ToCEntry - Manual transmission 233 |
6 |
| ToCEntry - Automatic transmission 234 |
6 |
| ToCEntry - Parking brake 243 |
6 |
| ToCEntry - Driving instructions 244 |
6 |
| ToCEntry - Drive sensibly – Save Fuel 244 |
6 |
| ToCSubEntry - Drive sensibly – Save Fuel 244 |
6 |
| ToCSubEntry - Drinking and driving 244 |
6 |
| ToCSubEntry - Pedals 244 |
6 |
| ToCSubEntry - Power assistance 245 |
6 |
| ToCSubEntry - Brakes 245 |
6 |
| ToCSubEntry - Driving off 246 |
6 |
| ToCSubEntry - Parking 246 |
6 |
| ToCSubEntry - Tires 247 |
6 |
| ToCSubEntry - Snow chains 250 |
6 |
| ToCSubEntry - Winter driving instructions 250 |
6 |
| ToCSubEntry - Deep water 252 |
6 |
| ToCSubEntry - Passenger compartment 253 |
6 |
| ToCSubEntry - Traveling abroad 253 |
6 |
| ToCEntry - Cruise control 254 |
6 |
| ToCEntry - Brake assist system (BAS) 257 |
6 |
| ToCEntry - Antilock brake system (ABS) 258 |
6 |
| ToCEntry - Electronic stability program (ESP) 260 |
6 |
| ToCEntry - What you should know at the gas station 264 |
6 |
| ToCEntry - Check regularly and before a long trip 266 |
6 |
| Title - Instrument cluster display |
6 |
| ToCEntry - Malfunction and indicator lamps in the instrument cluster 268 |
6 |
| ToCEntry - On-board diagnostic system 268 |
6 |
| ToCEntry - Check engine malfunction indicator lamp 268 |
6 |
| ToCSubEntry - Check engine malfunction indicator lamp 268 |
6 |
| ToCSubEntry - Brake warning lamp 270 |
6 |
| ToCSubEntry - Supplemental restraint system (SRS) indicator lamp 271 |
6 |
| ToCSubEntry - Fuel reserve warning 271 |
6 |
| ToCSubEntry - ABS malfunction indicator lamp 272 |
6 |
| ToCSubEntry - Electronic stability program (ESP) — warning lamp 273 |
6 |
| ToCEntry - Seat belt nonusage warning lamp 273 |
6 |
| ToCEntry - Malfunction and indicator lamp in the center console 273 |
6 |
| ToCEntry - AIRBAG OFF indicator lamp 273 |
6 |
| ToCSubEntry - AIRBAG OFF indicator lamp 273 |
6 |
| ToCEntry - Malfunction and warning messages in the multifunction display 274 |
7 |
| ToCEntry - DISPLAY DEFECTIVE 275 |
7 |
| ToCSubEntry - DISPLAY DEFECTIVE 275 |
7 |
| ToCSubEntry - BATTERY / ALTERNATOR 276 |
7 |
| ToCSubEntry - ANTILOCK BRAKE SYSTEM 277 |
7 |
| ToCSubEntry - BRAKE ASSIST 277 |
7 |
| ToCSubEntry - BRAKE LINING WEAR 278 |
7 |
| ToCSubEntry - BRAKE FLUID 278 |
7 |
| ToCSubEntry - PARKING BRAKE 279 |
7 |
| ToCSubEntry - SEAT BELT SYSTEM 279 |
7 |
| ToCSubEntry - ELEC. STABIL. PROG. (Electronic stability program) 280 |
7 |
| ToCSubEntry - COOLANT (coolant level) 281 |
7 |
| ToCSubEntry - COOLANT (coolant temperature) 282 |
7 |
| ToCSubEntry - ENGINE OIL LEVEL 283 |
7 |
| ToCSubEntry - LIGHTING SYSTEM 284 |
7 |
| ToCSubEntry - LIGHT SENSOR 286 |
7 |
| ToCSubEntry - DOOR 286 |
7 |
| ToCSubEntry - TRUNK OPEN 287 |
7 |
| ToCSubEntry - HOOD 287 |
7 |
| ToCSubEntry - TELEPHONE – FUNCTION 288 |
7 |
| ToCSubEntry - TELE AID 288 |
7 |
| ToCSubEntry - WASHER FLUID 289 |
7 |
| ToCSubEntry - RESTRAINT SYSTEM 290 |
7 |
| ToCSubEntry - KEY 290 |
7 |
| ToCSubEntry - FUEL RESERVE 291 |
7 |
| ToCSubEntry - UNDERVOLTAGE 291 |
7 |
| ToCSubEntry - STEER. WHEEL ADJUST. 292 |
7 |
| ToCSubEntry - ENTRANCE POSITION 292 |
7 |
| Title - Practical hints |
7 |
| ToCEntry - First aid kit 294 |
7 |
| ToCEntry - Stowing things in the vehicle 294 |
7 |
| ToCEntry - Fuses 295 |
7 |
| ToCEntry - Hood 297 |
7 |
| ToCEntry - Checking engine oil level 300 |
7 |
| ToCEntry - Automatic transmission fluid level 301 |
7 |
| ToCEntry - Coolant level 301 |
7 |
| ToCEntry - Adding coolant 302 |
7 |
| ToCSubEntry - Adding coolant 302 |
7 |
| ToCEntry - Windshield and headlamp washer system 302 |
7 |
| ToCEntry - Spare wheel, vehicle tools, storage compartment 304 |
7 |
| ToCEntry - Vehicle jack 305 |
7 |
| ToCEntry - Wheels 306 |
8 |
| ToCEntry - Tire replacement 306 |
8 |
| ToCSubEntry - Tire replacement 306 |
8 |
| ToCSubEntry - Rotating wheels 307 |
8 |
| ToCEntry - Spare wheel 308 |
8 |
| ToCEntry - Changing wheels 309 |
8 |
| ToCEntry - Tire inflation pressure 315 |
8 |
| ToCEntry - Battery 316 |
8 |
| ToCEntry - Jump starting 318 |
8 |
| ToCEntry - Towing the vehicle 321 |
8 |
| ToCEntry - Transmission selector lever, manually unlocking 325 |
8 |
| ToCSubEntry - Transmission selector lever, manually unlocking 325 |
8 |
| ToCEntry - Exterior lamps 326 |
8 |
| ToCEntry - Replacing bulbs 326 |
8 |
| ToCSubEntry - Replacing bulbs 326 |
8 |
| ToCEntry - Trunk lamp 331 |
8 |
| ToCEntry - Changing batteries in the electronic main key 332 |
8 |
| ToCEntry - Synchronizing remote control 334 |
8 |
| ToCSubEntry - Synchronizing remote control 334 |
8 |
| ToCEntry - Emergency engine shut-down 334 |
8 |
| ToCEntry - Fuel filler flap, manual release 335 |
8 |
| ToCEntry - Replacing wiper blade insert 337 |
8 |
| ToCEntry - Roof rack 338 |
8 |
| Title - Vehicle care |
8 |
| ToCEntry - Cleaning and care of the vehicle 340 |
8 |
| ToCEntry - Power washer 341 |
8 |
| ToCSubEntry - Power washer 341 |
8 |
| ToCSubEntry - Tar stains 341 |
8 |
| ToCSubEntry - Paintwork, painted body components 341 |
8 |
| ToCSubEntry - Engine cleaning 342 |
8 |
| ToCSubEntry - Vehicle washing 342 |
8 |
| ToCSubEntry - Ornamental moldings 343 |
8 |
| ToCSubEntry - Headlamps, taillamps, turn signal lenses 343 |
8 |
| ToCSubEntry - Window cleaning 343 |
8 |
| ToCSubEntry - Wiper blade 343 |
8 |
| ToCSubEntry - Light alloy wheels 344 |
8 |
| ToCSubEntry - Instrument cluster 344 |
8 |
| ToCSubEntry - Steering wheel and gear selector lever 344 |
8 |
| ToCSubEntry - Cup holder 344 |
8 |
| ToCSubEntry - Seat belts 345 |
8 |
| ToCSubEntry - Headliner and shelf below rear window 345 |
8 |
| ToCSubEntry - Leather upholstery 345 |
8 |
| ToCSubEntry - Hard plastic trim items 345 |
8 |
| ToCSubEntry - Plastic and rubber parts 345 |
8 |
| Title - Technical data |
9 |
| ToCEntry - Spare parts service 348 |
9 |
| ToCEntry - Warranty coverage 348 |
9 |
| ToCEntry - Identification labels 349 |
9 |
| ToCEntry - Layout of poly-V-belt drive 350 |
9 |
| ToCEntry - Technical data 351 |
9 |
| ToCEntry - Fuels, coolants, lubricants etc. - capacities 355 |
9 |
| ToCEntry - Engine oils 357 |
9 |
| ToCEntry - Engine oil additives 357 |
9 |
| ToCEntry - Air conditioner refrigerant 357 |
9 |
| ToCEntry - Brake fluid 357 |
9 |
| ToCEntry - Premium unleaded gasoline 358 |
9 |
| ToCEntry - Fuel requirements 358 |
9 |
| ToCEntry - Gasoline additives 359 |
9 |
| ToCEntry - Coolants 359 |
9 |
| ToCEntry - Consumer information 361 |
9 |
| ToCEntry - Uniform tire quality grading 361 |
9 |
| Title - Index |
9 |
| ToCEntry - Index 364 |
9 |
| Intro - Introduction |
10 |
| Section - Introduction |
10 |
| Title - Introduction |
10 |
| Hypertext - Introduction |
10 |
| Marker - Product information |
10 |
| Para - Kindly observe the following in your own best interest: |
10 |
| Para - We recommend using Mercedes-Benz original parts as well as conversion parts and accessorie... |
10 |
| Para - We have tested these parts to determine their reliability, safety and their special suitab... |
10 |
| Para - We are unable to make an assessment for other products and therefore cannot be held respon... |
10 |
| Para - Mercedes-Benz original parts as well as conversion parts and accessories approved by us ar... |
10 |
| Section - Operator’s manual |
11 |
| Title - Operator’s manual |
11 |
| Marker - Operator’s manual |
11 |
| Para - This Operator’s Manual contains a great deal of useful information. We urge you to read it... |
11 |
| Para - For your own safety and longer service life of the vehicle, we urge you to follow the inst... |
11 |
| Para - Your vehicle may have some or all of the equipment described in this manual. Therefore, yo... |
11 |
| Subtitle - Service and warranty information |
11 |
| Bold - Service and warranty information |
11 |
| Para - The Service and Warranty Information Booklet contains detailed information about the warra... |
11 |
| ItemizedList - • New Car Limited Warranty, |
11 |
| Item - • New Car Limited Warranty, |
11 |
| Item - • Emission System Warranty, |
11 |
| Item - • Emission Performance Warranty, |
11 |
| Item - • California, Massachusetts, and Vermont Emission Control System Warranty (California, Mas... |
11 |
| Item - • State Warranty Enforcement Laws (Lemon Laws). |
11 |
| Subtitle - Important notice for California retail buyers of Mercedes-Benz automobiles |
12 |
| Bold - Important notice for California retail buyers of Mercedes-Benz automobiles |
12 |
| Para - Under California law you may be entitled to a replacement of your vehicle or a refund of t... |
12 |
| Subtitle - Maintenance |
12 |
| Bold - Maintenance |
12 |
| Para - The Service Booklet describes all the necessary maintenance work which should be performed... |
12 |
| Para - Always have the Service Booklet with you when you take the vehicle to your authorized Merc... |
12 |
| Subtitle - Roadside assistance |
13 |
| Bold - Roadside assistance |
13 |
| Para - The Mercedes-Benz Roadside Assistance Program provides factory trained technical help in t... |
13 |
| ItemizedList - 1-800-FOR-MERCedes (in the USA) 1-800-387-0100 (in Canada) |
13 |
| Item - 1-800-FOR-MERCedes (in the USA) 1-800-387-0100 (in Canada) |
13 |
| Bold - 1-800-FOR-MERCedes (in the USA) 1-800-387-0100 (in Canada) |
13 |
| Para - will be answered by Mercedes-Benz Client Assistance Representatives 24�hours a day, 365�da... |
13 |
| Para - For additional information refer to the Mercedes-Benz Roadside Assistance Program brochure... |
13 |
| Subtitle - Change of address or ownership |
13 |
| Bold - Change of address or ownership |
13 |
| Para - If you change your address, be sure to send in the |
13 |
| Para - If you sell your Mercedes, please leave all literature with the vehicle to make it availab... |
13 |
| Para - If you bought this vehicle used, be sure to send in the |
13 |
| Subtitle - Operating your vehicle outside the USA or Canada |
14 |
| Bold - Operating your vehicle outside the USA or Canada |
14 |
| Para - If you plan to operate your vehicle in foreign countries, please be aware that: |
14 |
| ItemizedList - • Service facilities or replacement parts may not be readily available, |
14 |
| Item - • Service facilities or replacement parts may not be readily available, |
14 |
| Item - • unleaded gasoline for vehicles with catalytic converters may not be available; the use o... |
14 |
| Item - • gasoline may have a considerably lower octane rating, and improper fuel can cause engine... |
14 |
| Para - Certain Mercedes-Benz models are available for delivery in Europe under our European Deliv... |
14 |
| Table - <TABELLE> |
14 |
| TBody - <TABELLENHAUPTTEXT> |
14 |
| Row - <TABELLENREIHE> |
14 |
| Entry - In the USA: |
14 |
| Entry - In Canada: |
14 |
| Row - <TABELLENREIHE> |
14 |
| Entry - Mercedes-Benz usa, LLC European Delivery Department One Mercedes Drive Montvale, NJ 07645... |
14 |
| Entry - Mercedes-Benz Canada, Inc. European Delivery Department 849 Eglinton Avenue East Toronto,... |
14 |
| Para - We continuously strive to improve our product, and ask for your understanding that we rese... |
15 |
| Para - Optional equipment is also described in this manual, including operating instructions wher... |
15 |
| Para - If there are any equipment details that are not shown or described in this Operator’s Manu... |
15 |
| Para - The Operator’s Manual and Service Booklet are important documents and should be kept with ... |
15 |
| Section - Where to find it |
16 |
| Title - Where to find it |
16 |
| Marker - Where to find it |
16 |
| Para - The Operator’s Manual is divided into eight sections: |
16 |
| ItemizedList - • Instruments and controls: |
16 |
| Item - • Instruments and controls: |
16 |
| Bold - • Instruments and controls: |
16 |
| Item - • Operation: |
16 |
| Bold - • Operation: |
16 |
| Item - • Driving: |
16 |
| Bold - • Driving: |
16 |
| Item - • Instrument cluster display: |
16 |
| Bold - • Instrument cluster display: |
16 |
| Item - • Practical hints: |
16 |
| Bold - • Practical hints: |
16 |
| Item - • Car care: |
16 |
| Bold - • Car care: |
16 |
| Item - • Technical data: |
16 |
| Bold - • Technical data: |
16 |
| Item - • Index: |
16 |
| Bold - • Index: |
16 |
| Para - Other documents may also be supplied, depending on your vehicle’s equipment. |
16 |
| Para - Explanation of color used: |
16 |
| Table - <TABELLE> |
16 |
| TBody - <TABELLENHAUPTTEXT> |
16 |
| Row - <TABELLENREIHE> |
16 |
| Entry - Warning notices for the protection of yourself and others appear on red background. |
16 |
| SpecSection - Problems with your vehicle |
17 |
| Title - Problems with your vehicle |
17 |
| Marker - Problems with your vehicle |
17 |
| SimplePara - If you should experience a problem with your vehicle, particularly one that you beli... |
17 |
| DefinitionList - In the |
17 |
| Definition - In the |
17 |
| Item - Client Assistance Center Mercedes-Benz |
17 |
| Definition - In Canada: |
17 |
| Item - Customer Relations Department Mercedes-Benz Canada, Inc. 849 Eglinton Avenue East Toronto,... |
17 |
| Code - For the |
18 |
| SpecSection - Reporting Safety Defects |
18 |
| Title - Reporting Safety Defects |
18 |
| Marker - Reporting Safety Defects |
18 |
| SimplePara - If you believe that your vehicle has a defect which could cause a crash or could cau... |
18 |
| SimplePara - If |
18 |
| SimplePara - To contact |
18 |
| ToC - Contents - Instruments and controls |
20 |
| Title - Contents - Instruments and controls |
20 |
| Marker - Contents - Instruments and controls |
20 |
| ToCEntry - Instruments and controls 12 |
20 |
| ToCEntry - Door control panel 14 |
20 |
| ToCSubEntry - Door control panel 14 |
20 |
| ToCSubEntry - Overhead control panel 15 |
20 |
| ToCSubEntry - Dashboard 16 |
20 |
| ToCSubEntry - Center console 18 |
20 |
| Part - Instruments and controls |
21 |
| Section - Instruments and controls |
21 |
| Title - Instruments and controls |
21 |
| Hypertext - Instruments and controls |
21 |
| Marker - Instruments and controls |
21 |
| Figure - <GRAPHIK> |
21 |
| OrderedList - 1 Door control panel, see page� |
22 |
| Item - 1 Door control panel, see page� |
22 |
| Item - 2 Overhead control panel, see page� |
22 |
| Item - 3 Dashboard, see page� |
22 |
| Item - 4 Center console, see page� |
22 |
| Subsection - Door control panel |
23 |
| Title - Door control panel |
23 |
| Marker - Door control panel |
23 |
| Figure - <GRAPHIK> |
23 |
| OrderedList - 1 Door handle, pull to open, see page� |
23 |
| Item - 1 Door handle, pull to open, see page� |
23 |
| Item - 2 Memory function (for storing seat, steering wheel and exterior rear view mirror settings... |
23 |
| Item - 3 Front seat adjustment, see page� |
23 |
| Item - 4 Steering wheel adjustment, see page� |
23 |
| Item - 5 Power windows, see page� |
23 |
| Item - 6 Switch for rear door window override, see page� |
23 |
| Item - 7 Trunk lid release switch, see page� |
23 |
| Subsection - Overhead control panel |
24 |
| Title - Overhead control panel |
24 |
| Marker - Overhead control panel |
24 |
| Bold - Overhead control panel |
24 |
| Figure - <GRAPHIK> |
24 |
| OrderedList - 1 Interior lighting, see page� |
24 |
| Item - 1 Interior lighting, see page� |
24 |
| Item - 2 Tele Aid (emergency call system), see page� |
24 |
| Item - 3 Sliding�/�pop-up roof, see page� |
24 |
| Item - 4 Hands-free microphone for Tele Aid and optional telephone with voice recognition system |
24 |
| Item - 5 Rear view mirror, see page� |
24 |
| Item - 6 Garage door opener, see page� |
24 |
| Subsection - Dashboard |
25 |
| Title - Dashboard |
25 |
| Marker - Dashboard |
25 |
| Bold - Dashboard |
25 |
| Figure - <GRAPHIK> |
25 |
| OrderedList - 1 Hood lock release, see page� |
26 |
| Item - 1 Hood lock release, see page� |
26 |
| Item - 2 Parking brake pedal, see page� |
26 |
| Item - 3 Steering wheel adjustment (manual), see page� |
26 |
| Item - 4 Parking brake release, see page� |
26 |
| Item - 5 Exterior lamp switch, see page� |
26 |
| Item - 6 Combination switch, see page� |
26 |
| Item - 7 Exterior mirror adjustment, see page� |
26 |
| Item - 8 Headlamp washer button, see page� |
26 |
| Item - 9 Cruise control switch, see page� |
26 |
| Item - 10 Multifunction steering wheel, see page� |
26 |
| Item - 11 Instrument cluster, see page� |
26 |
| Item - 12 Voice recognition system switch, see separate operating instructions |
26 |
| Item - 13 Starter switch, see page� |
26 |
| Item - 14 Glove box lid release, see page� |
26 |
| Item - 15 Glove box lock, see page� |
26 |
| Subsection - Center console |
27 |
| Title - Center console |
27 |
| Marker - Center console |
27 |
| Figure - <GRAPHIK> |
27 |
| OrderedList - 1 Left front seat heater switch, see page� |
27 |
| Item - 1 Left front seat heater switch, see page� |
27 |
| Item - 2 Rear window sunshade (optional), see page� |
27 |
| Item - 3 ESP (electronic stability program) control switch, see page� |
27 |
| Item - 4 Hazard warning flasher switch, see page� |
27 |
| Item - 5 Central locking switch, see page� |
27 |
| Item - 6 Rear seat head restraints, see page� |
27 |
| Item - 7 Antitheft alarm system, see page� |
27 |
| Item - 8 Right front seat heater switch, see page� |
27 |
| Item - 9 AIRBAG OFF |
27 |
| CapLetter - 9 AIRBAG OFF |
27 |
| Item - 10 COMAND system (optional), see separate operating�instructions, or audio system, see page� |
27 |
| Item - 11 Climate control (C�240), see page� |
27 |
| Item - 12 Ashtray, see page� |
28 |
| Item - 13 Automatic transmission, see page� |
28 |
| Item - 14 Storage compartment, see page� |
28 |
| Item - 15 Armrest, see page� |
28 |
| ToC - Contents - Operation |
29 |
| Title - Contents - Operation |
29 |
| Marker - Contents - Operation |
29 |
| ToCEntry - Vehicle keys 22 |
29 |
| ToCEntry - Start lock-out 24 |
29 |
| ToCEntry - General notes on the central locking system 24 |
29 |
| ToCEntry - Central locking system 25 |
29 |
| ToCEntry - Radio frequency and infrared remote control 25 |
29 |
| ToCSubEntry - Radio frequency and infrared remote control 25 |
29 |
| ToCSubEntry - Locking and unlocking 27 |
29 |
| ToCSubEntry - Choosing global or selective mode on remote control 27 |
29 |
| ToCSubEntry - Opening the trunk 28 |
29 |
| ToCSubEntry - Opening and closing windows and sliding / pop-up roof from outside 29 |
29 |
| ToCSubEntry - Panic button 30 |
29 |
| ToCSubEntry - Mechanical keys 30 |
29 |
| ToCEntry - Doors 31 |
29 |
| ToCEntry - Central locking switch 33 |
29 |
| ToCEntry - Automatic central locking 34 |
29 |
| ToCEntry - Emergency unlocking in case of accident 34 |
29 |
| ToCEntry - Trunk 35 |
29 |
| ToCEntry - Trunk lid release switch 37 |
29 |
| ToCEntry - Antitheft alarm system 38 |
29 |
| ToCEntry - Tow-away alarm 39 |
29 |
| ToCEntry - Easy-entry/exit feature 41 |
29 |
| ToCEntry - Front seat adjustment 42 |
29 |
| ToCEntry - Removal and installation of front seat head restraints 47 |
29 |
| ToCEntry - Multicontour seat 49 |
29 |
| ToCEntry - Heated seats 50 |
29 |
| ToCEntry - Rear seat head restraints 52 |
29 |
| ToCEntry - Seat belts and integrated restraint system 55 |
29 |
| ToCEntry - Seat belts 55 |
29 |
| ToCEntry - Seat belt nonusage warning system 56 |
29 |
| ToCEntry - BabySmart |
29 |
| ToCEntry - Supplemental Restraint System (SRS) 63 |
29 |
| ToCEntry - Emergency tensioning retractor (ETR) 64 |
29 |
| ToCEntry - Airbags 65 |
29 |
| ToCEntry - Safety guidelines for the seat belt, emergency tensioning retractor and airbag 72 |
29 |
| ToCEntry - Infant and child restraint systems 73 |
29 |
| ToCEntry - Steering wheel adjustment (manual) 77 |
29 |
| ToCEntry - Steering wheel adjustment (electrical) 79 |
29 |
| ToCEntry - Rear view mirrors 80 |
29 |
| ToCEntry - Instrument cluster 88 |
29 |
| ToCEntry - Multifunction steering wheel, multifunction display 92 |
29 |
| ToCEntry - Trip and main odometer, FSS, coolant temperature, vehicle speed, engine oil level indi... |
29 |
| ToCEntry - Audio systems 98 |
29 |
| ToCEntry - Radio 98 |
29 |
| ToCSubEntry - Radio 98 |
29 |
| ToCSubEntry - CD player 99 |
29 |
| ToCSubEntry - Cassette player 100 |
29 |
| ToCEntry - Telephone 101 |
29 |
| ToCEntry - Navigation system 106 |
29 |
| ToCEntry - Trip computer 107 |
29 |
| ToCEntry - Malfunction/warning message memory 109 |
29 |
| ToCEntry - Individual settings 111 |
29 |
| ToCEntry - Setting the audio volume 123 |
29 |
| ToCEntry - Coolant temperature gauge 124 |
30 |
| ToCEntry - Flexible service system (FSS) 125 |
30 |
| ToCEntry - Engine oil level indicator 128 |
30 |
| ToCEntry - Engine oil consumption 129 |
30 |
| ToCEntry - Exterior lamp switch 130 |
30 |
| ToCEntry - Headlamp mode 131 |
30 |
| ToCEntry - Night security illumination 132 |
30 |
| ToCEntry - Locator lighting 133 |
30 |
| ToCSubEntry - Locator lighting 133 |
30 |
| ToCEntry - Headlamp cleaning system 133 |
30 |
| ToCEntry - Combination switch 134 |
30 |
| ToCEntry - Hazard warning flasher switch 137 |
30 |
| ToCEntry - Climate control 138 |
30 |
| ToCEntry - Automatic climate control 146 |
30 |
| ToCEntry - Front center console storage compartment ventilation 158 |
30 |
| ToCEntry - Rear passenger compartment adjustable air outlets 159 |
30 |
| ToCEntry - Operation Audio and telephone 160 |
30 |
| ToCEntry - Operating safety 160 |
30 |
| ToCEntry - Operating and display elements 161 |
30 |
| ToCEntry - Button and soft key operation 163 |
30 |
| ToCEntry - Operation 163 |
30 |
| ToCEntry - Power windows 184 |
30 |
| ToCEntry - Sliding/pop-up roof 187 |
30 |
| ToCEntry - Interior lighting 189 |
30 |
| ToCEntry - Rear window sunshade 191 |
30 |
| ToCEntry - Sun visors 192 |
30 |
| ToCEntry - Vanity mirrors 192 |
30 |
| ToCEntry - Interior 193 |
30 |
| ToCEntry - Storage compartments and armrests 193 |
30 |
| ToCEntry - Glove box 194 |
30 |
| ToCSubEntry - Glove box 194 |
30 |
| ToCEntry - Cup holder 197 |
30 |
| ToCEntry - Ashtrays 199 |
30 |
| ToCEntry - Lighter 201 |
30 |
| ToCEntry - Parcel net in front passenger footwell 202 |
30 |
| ToCEntry - Ski sack 202 |
30 |
| ToCEntry - Enlarged cargo area 207 |
30 |
| ToCEntry - Split folding rear seat bench 207 |
30 |
| ToCEntry - Loading instructions (vehicle with enlarged cargo area) 209 |
30 |
| ToCEntry - Cellular telephone 210 |
30 |
| ToCEntry - Telephone, general 211 |
30 |
| ToCEntry - Garage door opener 212 |
30 |
| Part - Operation |
31 |
| Section - Operation |
31 |
| Title - Operation |
31 |
| Hypertext - Operation |
31 |
| Marker - Vehicle keys |
31 |
| Para - Included with your vehicle are 2�electronic main keys with integrated radio frequency and ... |
31 |
| Para - The locking tabs for the mechanical key portion of the two electronic main keys are a diff... |
31 |
| Warning - <TABELLE> |
31 |
| TBody - <TABELLENHAUPTTEXT> |
31 |
| Row - <TABELLENREIHE> |
31 |
| Entry - |
31 |
| Row - <TABELLENREIHE> |
31 |
| Entry - Warning! |
31 |
| Para - Warning! |
31 |
| Para - When leaving the vehicle always remove the electronic key from the starter switch, and loc... |
31 |
| Subsection - Electronic main key |
32 |
| Title - Electronic main key |
32 |
| Marker - Electronic main key |
32 |
| Figure - <GRAPHIK> |
32 |
| Para - The electronic main key has an integrated radio frequency and infrared remote control, plu... |
32 |
| Para - The remote control�(1) operates all locks on the vehicle. |
32 |
| Para - The mechanical key�(2) works only in the driver’s door, trunk, and storage compartment locks. |
32 |
| Para - When using the mechanical key�(2) for lock operations, it can be removed by sliding it out... |
32 |
| Para - The remote control transmitter is located in the electronic main key. |
32 |
| Para - The infrared receivers are located in the front door handles. |
32 |
| Note - Note: |
32 |
| BlockTitle - Note: |
32 |
| Para - Remove the mechanical key from the electronic main key when using valet parking service. T... |
32 |
| Para - See page� |
32 |
| Subtitle - Central locking system:Obtaining replacement keys |
32 |
| Marker - Central locking system:Obtaining replacement keys |
32 |
| Bold - Obtaining replacement keys |
32 |
| Para - Your vehicle is equipped with a theft deterrent locking system requiring a special key man... |
32 |
| Section - Start lock-out |
33 |
| Title - Start lock-out |
33 |
| Marker - Start lock-out |
33 |
| Important - Important! |
33 |
| BlockTitle - Important! |
33 |
| Para - Removing the electronic key from the starter switch activates the start lock-out. The engi... |
33 |
| Para - Inserting the electronic key in the starter switch deactivates the start lock-out. |
33 |
| Note - Note: |
33 |
| BlockTitle - Note: |
33 |
| Para - In case the engine cannot be started (vehicle’s battery is in order), the system is not op... |
33 |
| Section - General notes on the central locking system |
33 |
| Title - General notes on the central locking system |
33 |
| Marker - General notes on the central locking system |
33 |
| ItemizedList - • If the electronic key is inserted in the starter switch, the vehicle cannot be l... |
33 |
| Item - • If the electronic key is inserted in the starter switch, the vehicle cannot be locked or... |
33 |
| Para - If the vehicle cannot be locked or unlocked: |
33 |
| ItemizedList - • Aim transmitter eye at a receiver of either front door handle. Check the batteri... |
33 |
| Item - • Aim transmitter eye at a receiver of either front door handle. Check the batteries of th... |
33 |
| Item - • Use the mechanical key to unlock the vehicle. To start engine, insert the electronic key... |
33 |
| Important - Important! |
33 |
| BlockTitle - Important! |
33 |
| Para - When unlocking the driver’s door with the mechanical key, the exterior lamps will flash an... |
33 |
| Para - To cancel the alarm, insert the electronic key in the starter switch or press button� |
33 |
| Section - Central locking system |
34 |
| Title - Central locking system |
34 |
| Marker - Central locking system |
34 |
| Subsection - Radio frequency and infrared remote control |
34 |
| Title - Radio frequency and infrared remote control |
34 |
| Marker - Radio frequency and infrared remote control |
34 |
| Para - The electronic main key has an integrated radio frequency and infrared remote control. |
34 |
| Para - Due to the extended operational range of the remote control, it could be possible to unint... |
34 |
| Para - The vehicle doors, trunk and fuel filler flap can be centrally locked and unlocked via rem... |
34 |
| Para - Opening and closing the windows and sliding/pop-up roof can only be done with the infrared... |
34 |
| Para - With vehicle centrally locked, the trunk can also be opened by using the remote control. |
34 |
| Para - If the electronic key is inserted in starter switch, the vehicle cannot be locked or unloc... |
34 |
| OrderedList - <GRAPHIK> |
34 |
| Item - <GRAPHIK> |
34 |
| Graphic - <GRAPHIK> |
34 |
| Marker - P80.xx-xxxx-26 |
34 |
| ItemPara - ‹ |
34 |
| SpecialChar - ‹ |
34 |
| ItemPara - Π|
34 |
| SpecialChar - Π|
34 |
| ItemPara - ³ |
34 |
| SpecialChar - ³ |
34 |
| Item - 2 Lamp for battery check (see page� |
34 |
| Item - 3 panic |
34 |
| CapLetter - 3 panic |
34 |
| Item - 4 Transmitter eye |
34 |
| Item - 5 Locking tab for mechanical key |
34 |
| OrderedList - <GRAPHIK> |
35 |
| Item - <GRAPHIK> |
35 |
| Graphic - <GRAPHIK> |
35 |
| Marker - P80.30-2095-26 (4c) |
35 |
| OrderedList - <GRAPHIK> |
35 |
| Item - <GRAPHIK> |
35 |
| Graphic - <GRAPHIK> |
35 |
| Marker - P80.30-2096-26 (4c) |
35 |
| Subsection - Locking and unlocking |
36 |
| Title - Locking and unlocking |
36 |
| Marker - Locking and unlocking |
36 |
| Subtitle - Unlocking: |
36 |
| Para - Press transmit button |
36 |
| Para - The remote control can be programmed for two kinds of unlocking modes (see below): |
36 |
| Para - Selective unlocking mode – Press transmit button |
36 |
| Para - Global unlocking mode – Press transmit button |
36 |
| Note - Notes: |
36 |
| BlockTitle - Notes: |
36 |
| Para - If the trunk was previously locked separately, it will remain locked, see page� |
36 |
| Para - The presently active unlocking mode (selective or global) can only be determined by unlock... |
36 |
| Para - If within 40 seconds of unlocking with the remote control, neither door or trunk is opened... |
36 |
| Subtitle - Locking: |
36 |
| Para - Press transmit button |
36 |
| Note - Note: |
36 |
| BlockTitle - Note: |
36 |
| Para - If the vehicle cannot be locked or unlocked by pressing the transmit button, then it may b... |
36 |
| Subsection - Choosing global or selective mode on remote control |
36 |
| Title - Choosing global or selective mode on remote control |
36 |
| Marker - Choosing global or selective mode on remote control |
36 |
| Para - Press and hold transmit buttons� |
36 |
| Subsection - Opening the trunk |
37 |
| Title - Opening the trunk |
37 |
| Marker - Opening the trunk |
37 |
| Para - The trunk lid will swing open automatically. You should always make sure there is sufficie... |
37 |
| Para - A minimum height clearance of 5.75�ft. (1.75�m) is required to open the trunk lid. |
37 |
| Para - Press transmit button� |
37 |
| Important - Important! |
37 |
| BlockTitle - Important! |
37 |
| Para - Do not place remote control in trunk since trunk is locked when the lid is closed if the v... |
37 |
| Note - Notes: |
37 |
| BlockTitle - Notes: |
37 |
| Para - If the trunk was previously locked separately, it will remain locked |
37 |
| Subsection - Central locking system:Summer opening/convenience feature |
38 |
| Title - Central locking system:Summer opening/convenience feature |
38 |
| Marker - Central locking system:Summer opening/convenience feature |
38 |
| Para - Aim transmitter eye of remote control at the door receiver. |
38 |
| Subtitle - Summer opening: |
38 |
| Bold - Summer opening: |
38 |
| Para - The sliding�/�pop-up roof and all side windows can be opened automatically. |
38 |
| Para - Continue to press transmit button |
38 |
| Para - The windows and sliding/pop-up roof begin to open after approximately 1�second. |
38 |
| Para - To interrupt opening procedure, release transmit button. |
38 |
| Subtitle - Convenience feature: |
38 |
| Bold - Convenience feature: |
38 |
| Para - The sliding�/�pop-up roof and the side windows can be closed. |
38 |
| Para - Continue to press transmit button |
38 |
| Para - The windows and sliding�/�pop-up roof begin to close after approximately 1�second. |
38 |
| Para - To interrupt closing procedure, release transmit button. |
38 |
| Para - Ensure that all side windows and the sliding�/�pop-up roof are properly closed before leav... |
38 |
| Warning - <TABELLE> |
38 |
| TBody - <TABELLENHAUPTTEXT> |
38 |
| Row - <TABELLENREIHE> |
38 |
| Entry - Warning! |
38 |
| Para - Warning! |
38 |
| Para - Never operate the windows or sliding�/�pop-up roof if there is the possibility of anyone b... |
38 |
| Row - <TABELLENREIHE> |
38 |
| Entry - In case the procedure causes potential danger, the procedure can be immediately halted by... |
38 |
| Para - In case the procedure causes potential danger, the procedure can be immediately halted by ... |
38 |
| Note - Note: |
38 |
| BlockTitle - Note: |
38 |
| Para - If the windows and sliding�/�pop-up roof cannot be operated automatically by pressing the ... |
38 |
| Subsection - Panic button |
39 |
| Title - Panic button |
39 |
| Marker - Panic button |
39 |
| Figure - <GRAPHIK> |
39 |
| Para - To activate press and hold button�(1) for at least one second. An audible alarm and blinki... |
39 |
| Para - To deactivate press button�(1) again, or insert electronic key in starter switch. |
39 |
| Note - Note: |
39 |
| BlockTitle - Note: |
39 |
| Para - For operation in the USA only: This device complies with Part�15 of the FCC Rules. Operati... |
39 |
| Para - (1)�This device may not cause harmful interference, and |
39 |
| Para - (2)�this device must accept any interference received, including interference that may cau... |
39 |
| Para - Any unauthorized modification to this device could void the user’s authority to operate th... |
39 |
| Subsection - Central locking system:Mechanical keys |
39 |
| Title - Central locking system:Mechanical keys |
39 |
| Marker - Central locking system:Mechanical keys |
39 |
| Para - The mechanical keys work only in driver’s door, trunk, and storage compartment locks. |
39 |
| Note - Notes: |
39 |
| BlockTitle - Notes: |
39 |
| Para - The mechanical key does not operate the central locking system or antitheft alarm system. |
39 |
| Para - The fuel filler flap cannot be locked or unlocked with the mechanical key. |
39 |
| Para - If the fuel filler flap cannot be opened, see page� |
39 |
| Section - P80.30-????-26 |
40 |
| Title - P80.30-????-26 |
40 |
| Marker - P80.30-????-26 |
40 |
| Figure - <GRAPHIK> |
40 |
| OrderedList - 1 Opening – pull handle |
40 |
| Item - 1 Opening – pull handle |
40 |
| Item - 2 Unlocking driver’s door |
40 |
| Item - 3 Locking driver’s door |
40 |
| Important - Important! |
40 |
| BlockTitle - Important! |
40 |
| Para - The mechanical key does not operate the central locking system or antitheft alarm system. |
40 |
| Subsection - P80.30-2098-26 (4c) |
40 |
| Title - P80.30-2098-26 (4c) |
40 |
| Marker - P80.30-2098-26 (4c) |
40 |
| Figure - <GRAPHIK> |
40 |
| OrderedList - 4 Individual door from inside: Push lock button down to lock. |
40 |
| Item - 4 Individual door from inside: Push lock button down to lock. |
40 |
| Item - 5 Front door from inside: Pull handle to unlock. |
40 |
| Para - When you lock the driver’s door with the mechanical key, the door lock button should move ... |
40 |
| Para - Each individual door must be locked with the respective door lock button – the driver’s do... |
40 |
| Para - If the vehicle has previously been locked from the outside, opening a door from the inside... |
41 |
| ItemizedList - • selective unlocking mode, only that individual door is unlocked. The remaining d... |
41 |
| Item - • selective unlocking mode, only that individual door is unlocked. The remaining doors, th... |
41 |
| Item - • global unlocking mode, all doors, the trunk and fuel filler flap are unlocked. |
41 |
| Note - Notes: |
41 |
| BlockTitle - Notes: |
41 |
| Para - In case of a malfunction in the central locking system the doors can be locked and unlocke... |
41 |
| Para - To lock, push down lock buttons or turn mechanical key in driver’s door lock to position�3... |
41 |
| Para - To unlock, pull inside door handles or turn mechanical key in driver’s door lock to positi... |
41 |
| Para - Rear doors can only be opened from inside by first pulling up the door lock button. |
41 |
| Para - When unlocking the driver’s door with the mechanical key, the exterior lamps will flash an... |
41 |
| Para - To cancel the alarm, insert the electronic key in the starter switch or press button� |
41 |
| Section - P82.50-0757-26 (2c) |
42 |
| Title - P82.50-0757-26 (2c) |
42 |
| Marker - P82.50-0757-26 (2c) |
42 |
| Figure - <GRAPHIK> |
42 |
| OrderedList - 1 Locking |
42 |
| Item - 1 Locking |
42 |
| Item - 2 Unlocking |
42 |
| Para - The central locking switch is located in the center console. |
42 |
| Para - The doors and trunk can only be locked with the central locking switch, if both front door... |
42 |
| Para - If the vehicle was previously locked with the central locking switch, while in the selecti... |
42 |
| Para - If the vehicle was previously locked with the central locking switch, while in the global ... |
42 |
| Note - Notes: |
42 |
| BlockTitle - Notes: |
42 |
| Para - If the vehicle was previously locked with the remote control, the doors and trunk cannot b... |
42 |
| Para - The fuel filler flap cannot be locked or unlocked with the central locking switch. |
42 |
| Para - If the vehicle has previously been locked from the outside, opening a door from the inside... |
42 |
| Warning - <TABELLE> |
42 |
| TBody - <TABELLENHAUPTTEXT> |
42 |
| Row - <TABELLENREIHE> |
42 |
| Entry - Warning! |
42 |
| Para - Warning! |
42 |
| Para - When leaving the vehicle always remove the electronic key from the starter switch, and loc... |
42 |
| Section - Central locking system:Automatic central locking |
43 |
| Title - Central locking system:Automatic central locking |
43 |
| Marker - Central locking system:Automatic central locking |
43 |
| Para - With the automatic central locking system activated, the doors and trunk are locked at veh... |
43 |
| Para - The automatic central locking function can be switched on or off. See page� |
43 |
| Note - Notes: |
43 |
| BlockTitle - Notes: |
43 |
| Para - If doors are unlocked with the central locking switch after activating the automatic centr... |
43 |
| Para - If a door is opened from the inside at speeds of approximately 9�mph (15�km�/�h) or less w... |
43 |
| Important - Important! |
43 |
| BlockTitle - Important! |
43 |
| Para - When towing the vehicle, or with the vehicle on a dynamometer test stand, please, note the... |
43 |
| Para - With the automatic central locking activated and the electronic key in starter switch posi... |
43 |
| Para - To prevent the vehicle door locks from locking, deactivate the automatic central locking. ... |
43 |
| Section - Emergency unlocking in case of accident |
43 |
| Title - Emergency unlocking in case of accident |
43 |
| Marker - Emergency unlocking in case of accident |
43 |
| Para - The doors unlock automatically a short time after an accident in which an airbag or emerge... |
43 |
| Section - Trunk |
44 |
| Title - Trunk |
44 |
| Marker - Trunk |
44 |
| Para - The lock is located next to the recessed handle. |
44 |
| Para - When the trunk is separately locked, it remains locked when centrally unlocking the vehicle. |
44 |
| Para - To deny any unauthorized person access to the trunk, lock it separately with the mechanica... |
44 |
| Note - Notes: |
44 |
| BlockTitle - Notes: |
44 |
| Para - In case of a malfunction in the central locking system the trunk can be unlocked individua... |
44 |
| Para - To unlock and open the trunk lid, turn mechanical key to position�2, hold and push to open. |
44 |
| Para - The mechanical key does not operate the central locking system or antitheft alarm system. |
44 |
| Para - When unlocking the trunk with the mechanical key, the exterior lamps will flash and the al... |
44 |
| Para - To cancel the alarm, insert the electronic key in the starter switch or press button� |
44 |
| Para - If the fuel filler flap cannot be opened, see page� |
44 |
| OrderedList - <GRAPHIK> |
44 |
| Item - <GRAPHIK> |
44 |
| Graphic - <GRAPHIK> |
44 |
| Marker - P54.25-????-26 |
44 |
| Item - 1 Separate locking of trunk – remove mechanical key in this position. |
44 |
| Item - 2 Unlocking |
44 |
| Important - Important! |
44 |
| BlockTitle - Important! |
44 |
| Para - Do not place mechanical key inside trunk, since trunk is locked again when closing the lid... |
44 |
| Para - <GRAPHIK> |
45 |
| Graphic - <GRAPHIK> |
45 |
| Marker - P88.50-2027-26 (4c) |
45 |
| Para - The trunk lid will swing open automatically. You should always make sure there is sufficie... |
45 |
| Para - A minimum height clearance of 5.75�ft. (1.75�m) is required to open the trunk lid. |
45 |
| Para - <GRAPHIK> |
45 |
| Graphic - <GRAPHIK> |
45 |
| Marker - P88.50-2027-26 (4c) |
45 |
| Section - Trunk:Release switch |
46 |
| Title - Trunk:Release switch |
46 |
| Marker - Trunk:Release switch |
46 |
| Figure - <GRAPHIK> |
46 |
| Para - The switch is located on the driver’s door. |
46 |
| Para - The trunk lid will swing open automatically. You should always make sure there is sufficie... |
46 |
| Para - A minimum height clearance of 5.75�ft. (1.75�m) is required to open the trunk lid. |
46 |
| Para - To open the trunk, the vehicle must be at standstill. Press switch until trunk lid is open. |
46 |
| Para - The indicator lamp in the switch remains on with trunk lid open. |
46 |
| Note - Notes: |
46 |
| BlockTitle - Notes: |
46 |
| Para - The trunk can also be opened by using the remote control. Press |
46 |
| Para - The trunk lid cannot be opened by the switch or the remote control when previously locked ... |
46 |
| Para - The trunk lid cannot be opened with the trunk lid release switch when the vehicle was prev... |
46 |
| Section - Antitheft alarm system |
47 |
| Title - Antitheft alarm system |
47 |
| Marker - Antitheft alarm system |
47 |
| Figure - <GRAPHIK> |
47 |
| OrderedList - 1 Indicator lamp in switch located in center console |
47 |
| Item - 1 Indicator lamp in switch located in center console |
47 |
| Para - The antitheft alarm is automatically armed or disarmed with the remote control by locking ... |
47 |
| Para - The antitheft alarm is armed within approximately 10�seconds after locking the vehicle. |
47 |
| Para - A blinking lamp�(1) indicates that the alarm is armed. |
47 |
| Subtitle - Operation: |
47 |
| Para - Once the alarm system has been armed, the exterior vehicle lamps will flash and an alarm w... |
47 |
| ItemizedList - • opens a door, |
47 |
| Item - • opens a door, |
47 |
| Item - • opens the trunk, |
47 |
| Item - • opens the hood, |
47 |
| Item - • attempts to raise the vehicle. |
47 |
| Para - The alarm will last approximately 3�minutes in form of flashing exterior lamps. At the sam... |
47 |
| Note - Notes: |
47 |
| BlockTitle - Notes: |
47 |
| Para - When you unlock the driver’s door with the mechanical key, the exterior lamps will flash a... |
47 |
| Para - To cancel the alarm, insert the electronic key in the starter switch or press button� |
48 |
| Section - Tow-away alarm |
48 |
| Title - Tow-away alarm |
48 |
| Marker - Tow-away alarm |
48 |
| Figure - <GRAPHIK> |
48 |
| Para - The switch is located in the center console. |
48 |
| OrderedList - 1 Press to switch off tow-away alarm |
48 |
| Item - 1 Press to switch off tow-away alarm |
48 |
| Item - 2 Indicator lamp |
48 |
| Para - Once the alarm system has been armed, the exterior vehicle lamps will flash and an alarm w... |
48 |
| Para - The alarm will last approximately 3�minutes in form of flashing exterior lamps. At the sam... |
49 |
| Para - If the alarm stays on for more than 20 seconds, an emergency call is initiated automatical... |
49 |
| Para - To prevent triggering the tow-away alarm feature, switch off the tow-away alarm before tow... |
49 |
| Para - To do so, turn electronic key in starter switch to position�1 or�0, or remove electronic k... |
49 |
| Para - Exit vehicle, and lock vehicle with the electronic main key. |
49 |
| Para - The tow-away alarm remains switched off until the vehicle is locked again with the electro... |
49 |
| Section - Easy-entry/exit feature |
50 |
| Title - Easy-entry/exit feature |
50 |
| Marker - Easy-entry/exit feature |
50 |
| Para - With the easy-entry/exit feature activated, the steering wheel tilts upwards and the drive... |
50 |
| Para - This allows easier entry into and exit from the vehicle when the driver’s door is opened. ... |
50 |
| Para - See page� |
50 |
| Para - When the electronic key is inserted in the starter switch and the driver’s door is closed,... |
50 |
| Warning - <TABELLE> |
50 |
| TBody - <TABELLENHAUPTTEXT> |
50 |
| Row - <TABELLENREIHE> |
50 |
| Entry - Warning! |
50 |
| Para - Warning! |
50 |
| Para - You must ensure that no one can become trapped or injured by the moving steering wheel and... |
50 |
| Section - Front seat adjustment |
51 |
| Title - Front seat adjustment |
51 |
| Marker - Front seat adjustment |
51 |
| Warning - <TABELLE> |
51 |
| TBody - <TABELLENHAUPTTEXT> |
51 |
| Row - <TABELLENREIHE> |
51 |
| Entry - Warning! |
51 |
| Para - Warning! |
51 |
| Para - Do not adjust the driver’s seat while driving. Adjusting the seat while driving could caus... |
51 |
| Row - <TABELLENREIHE> |
51 |
| Entry - Never ride in a moving vehicle with the seat back reclined. Sitting in an excessively rec... |
51 |
| Para - Never ride in a moving vehicle with the seat back reclined. Sitting in an excessively recl... |
51 |
| Row - <TABELLENREIHE> |
51 |
| Entry - Never place hands under seat or near any moving parts while a seat is being adjusted. |
51 |
| Para - Never place hands under seat or near any moving parts while a seat is being adjusted. |
51 |
| Row - <TABELLENREIHE> |
51 |
| Entry - |
51 |
| Para - |
51 |
| Para - |
51 |
| Para - |
51 |
| Para - |
51 |
| Para - |
51 |
| Para - |
51 |
| Row - <TABELLENREIHE> |
51 |
| Entry - When leaving the vehicle always remove the electronic key from the starter switch, and lo... |
51 |
| Para - When leaving the vehicle always remove the electronic key from the starter switch, and loc... |
51 |
| Row - <TABELLENREIHE> |
51 |
| Entry - The power seats can also be operated with the driver’s or front passenger door open. Do n... |
51 |
| Para - The power seats can also be operated with the driver’s or front passenger door open. Do no... |
51 |
| Para - To operate the front power seat adjustment switches, turn the electronic key in starter sw... |
51 |
| Subtitle - Power seat |
52 |
| Bold - Power seat |
52 |
| Graphic - <GRAPHIK> |
52 |
| Marker - Seats:Power seat |
52 |
| Para - P54.00-1521-26 |
52 |
| Marker - P54.00-1521-26 |
52 |
| Para - We recommend to adjust the power seat in the following order: |
52 |
| OrderedList - 1 Seat, up�/�down |
52 |
| Item - 1 Seat, up�/�down |
52 |
| Bold - 1 Seat, up�/�down |
52 |
| Item - 2 Seat adjustment, fore�/�aft |
52 |
| Bold - 2 Seat adjustment, fore�/�aft |
52 |
| Item - 3 Seat cushion tilt |
52 |
| Bold - 3 Seat cushion tilt |
52 |
| Item - 4 Backrest tilt |
52 |
| Bold - 4 Backrest tilt |
52 |
| Item - 5 Head restraint |
53 |
| Bold - 5 Head restraint |
53 |
| ItemPara - Only minor personal adjustments, as described below, should then be required. For exte... |
53 |
| Para - <GRAPHIK> |
53 |
| Graphic - <GRAPHIK> |
53 |
| Marker - P91.16-2010-26 |
53 |
| Subtitle - Storing seat positions |
53 |
| Marker - Storing seat positions |
53 |
| Para - The head restraint, steering wheel and exterior rear view mirror position are stored toget... |
53 |
| Para - See page� |
53 |
| Subsection - Manual seat |
54 |
| Title - Manual seat |
54 |
| Figure - <GRAPHIK> |
54 |
| Para - (Standard equipment on Model C�240) |
54 |
| Para - We recommend to adjust the seat in the following order: |
54 |
| OrderedList - 1 Fore/aft adjustment |
54 |
| Item - 1 Fore/aft adjustment |
54 |
| Bold - 1 Fore/aft adjustment |
54 |
| Item - 2 Seat cushion tilt |
54 |
| Bold - 2 Seat cushion tilt |
54 |
| Item - 3 Seat height adjustment |
54 |
| Bold - 3 Seat height adjustment |
54 |
| Item - 4 Backrest tilt |
54 |
| Bold - 4 Backrest tilt |
54 |
| OrderedList - <GRAPHIK> |
55 |
| Item - <GRAPHIK> |
55 |
| Graphic - <GRAPHIK> |
55 |
| Bold - 5 Head restraint height |
55 |
| Para - Raising: |
55 |
| Para - Pull up on head restraint. |
55 |
| Para - Lowering: |
55 |
| Para - Push button�(5) and push down on head restraint. |
55 |
| Para - Adjust head restraint to support the back of the head approximately at ear level. The head... |
55 |
| Subtitle - P91.10-2116-26 |
55 |
| Marker - P91.10-2116-26 |
55 |
| Graphic - <GRAPHIK> |
55 |
| Bold - Head restraint inclination |
55 |
| Para - Push or pull the head restraint in direction of arrow. |
55 |
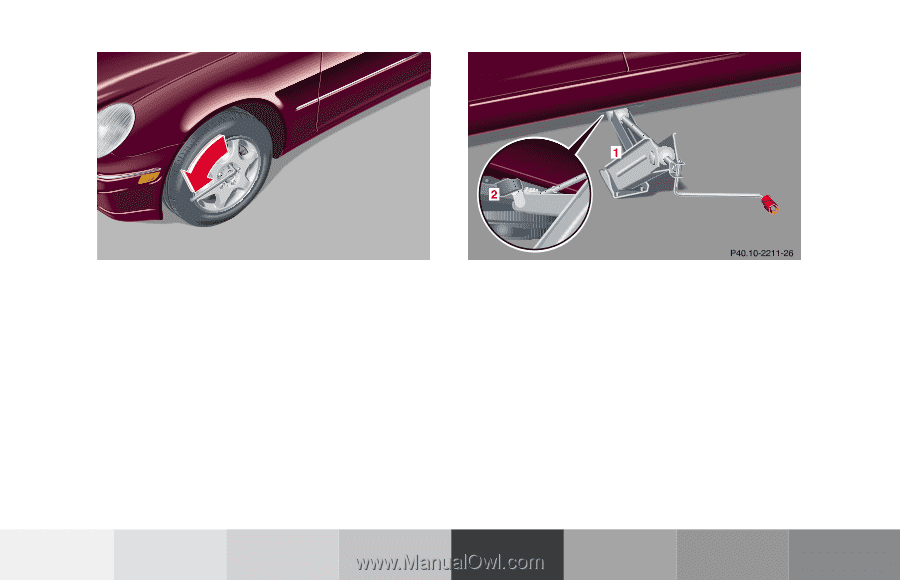
| Section - Removal and installation of front seat head restraints |
56 |
| Title - Removal and installation of front seat head restraints |
56 |
| Marker - Removal and installation of front seat head restraints |
56 |
| Subsection - Power seat |
56 |
| Title - Power seat |
56 |
| Figure - <GRAPHIK> |
56 |
| Caution - Caution! |
56 |
| BlockTitle - Caution! |
56 |
| Para - Do not remove head restraints except when mounting seat covers. Whenever restraints have b... |
56 |
| Note - Note: |
56 |
| BlockTitle - Note: |
56 |
| Para - Tilt the backrest rearward for easier removal and installation of the head restraints. |
56 |
| Para - To remove: Press switch�(1) upwards and hold until the head restraint is fully extended. P... |
56 |
| Para - To install: Press switch�(1) upwards and hold for about 5�seconds. |
56 |
| Para - Press the head restraint down until it engages. |
56 |
| Para - Adjust head restraint to the desired position. |
56 |
| Warning - <TABELLE> |
56 |
| TBody - <TABELLENHAUPTTEXT> |
56 |
| Row - <TABELLENREIHE> |
56 |
| Entry - Warning! |
56 |
| Para - Warning! |
56 |
| Para - For your protection, drive only with properly positioned head restraints. |
56 |
| Row - <TABELLENREIHE> |
56 |
| Entry - Adjust head restraint to support the back of the head approximately at ear level. |
56 |
| Para - Adjust head restraint to support the back of the head approximately at ear level. |
56 |
| Row - <TABELLENREIHE> |
56 |
| Entry - Do not drive the vehicle without the seat head restraints. Head restraints are intended t... |
56 |
| Para - Do not drive the vehicle without the seat head restraints. Head restraints are intended to... |
56 |
| Subsection - Manual seat |
57 |
| Title - Manual seat |
57 |
| Marker - Manual seat |
57 |
| Figure - <GRAPHIK> |
57 |
| Para - To remove: Pull head restraint to its highest position. Push button�(1) and pull out head ... |
57 |
| Para - To install: Insert head restraint and push it down to the stop. Push button�(1) and adjust... |
57 |
| Warning - <TABELLE> |
57 |
| TBody - <TABELLENHAUPTTEXT> |
57 |
| Row - <TABELLENREIHE> |
57 |
| Entry - |
57 |
| Row - <TABELLENREIHE> |
57 |
| Entry - Warning! |
57 |
| Para - Warning! |
57 |
| Para - For your protection, drive only with properly positioned head restraints. |
57 |
| Row - <TABELLENREIHE> |
57 |
| Entry - Adjust head restraint to support the back of the head approximately at ear level. |
57 |
| Para - Adjust head restraint to support the back of the head approximately at ear level. |
57 |
| Row - <TABELLENREIHE> |
57 |
| Entry - Do not drive the vehicle without the seat head restraints. Head restraints are intended t... |
57 |
| Para - Do not drive the vehicle without the seat head restraints. Head restraints are intended to... |
57 |
| Section - Multicontour seat |
58 |
| Title - Multicontour seat |
58 |
| Marker - Multicontour seat |
58 |
| Figure - <GRAPHIK> |
58 |
| Para - We recommend to adjust the multicontour seat in the following order: |
58 |
| OrderedList - 1 Seat cushion depth |
58 |
| Item - 1 Seat cushion depth |
58 |
| Item - 2 Backrest bottom |
58 |
| Item - 3 Backrest center |
58 |
| Item - 4 Side bolster adjustment |
58 |
| Para - Some models may be equipped with driver’s multicontour seat. These seats have movable seat... |
58 |
| Para - The seat cushion movement and amount of backrest cushion height and curvature can be conti... |
58 |
| ItemizedList - • press to the left�– increase side support, |
58 |
| Item - • press to the left�– increase side support, |
58 |
| Item - • press to the right�– decrease side support. |
58 |
| Para - If the engine is turned off, the last cushion setting is retained in memory, and automatic... |
58 |
| Section - Heated seats |
59 |
| Title - Heated seats |
59 |
| Figure - <GRAPHIK> |
59 |
| Para - The front seat heaters can be switched on with the electronic key in starter switch positi... |
59 |
| Para - The switch is located in the center console. |
59 |
| Para - Press switch to turn on seat heater: |
59 |
| OrderedList - 1 Normal seat heating mode. One indicator lamp in the switch lights up. |
59 |
| Item - 1 Normal seat heating mode. One indicator lamp in the switch lights up. |
59 |
| Item - 2 Rapid seat heating mode. Both indicator lamps in the switch light up. After approximatel... |
59 |
| Para - Turning off seat heater: |
59 |
| Para - If one indicator lamp is on, press upper half of switch. |
59 |
| Para - If both indicator lamps are on, press lower half of switch. |
59 |
| Para - If left on, the seat heater automatically turns off after approximately 30�minutes of oper... |
59 |
| Para - Note: |
60 |
| Para - When in operation, the seat heater consumes a large amount of electrical power. It is not ... |
60 |
| Para - The seat heaters may automatically switch off if too many power consumers are switched on ... |
60 |
| Para - If the blinking of the indicator lamps is distracting to you, the seat heaters can be swit... |
60 |
| Section - Head restraints:Rear seat |
61 |
| Title - Head restraints:Rear seat |
61 |
| Marker - Head restraints:Rear seat |
61 |
| Figure - <GRAPHIK> |
61 |
| Para - Folding head restraints back with switch in the center console: |
61 |
| Para - Turn the electronic key in starter switch to position�1 or�2. |
61 |
| Para - Folding head restraints back: Press the symbol-side on the rocker switch to release the he... |
61 |
| Subsection - |
61 |
| Title - |
61 |
| Figure - <GRAPHIK> |
61 |
| Para - Folding head restraints back in the rear passenger compartment: |
61 |
| Para - Push lock button�(1). The head restraints will fold backward. |
61 |
| Subsection - Place head restraints upright |
62 |
| Title - Place head restraints upright |
62 |
| Bold - Place head restraints upright |
62 |
| Figure - <GRAPHIK> |
62 |
| Subtitle - Placing head restraints upright: |
62 |
| Para - Pull the head restraint forward until it locks into position. |
62 |
| Subtitle - Angle of head restraints: |
62 |
| Para - The head restraint angle can be adjusted manually. |
62 |
| Important - Important! |
62 |
| BlockTitle - Important! |
62 |
| Para - For safety reasons, always drive with the rear head restraints in the upright position whe... |
62 |
| Para - Keep the area around head restraints clear of articles (e.g. clothing) to not obstruct the... |
62 |
| Subsection - Head restraint height |
63 |
| Title - Head restraint height |
63 |
| Figure - <GRAPHIK> |
63 |
| Para - Raising: |
63 |
| Para - Pull up on head restraint. |
63 |
| Para - Lowering: |
63 |
| Para - Push button�(2) and push down on head restraint. |
63 |
| Para - Adjust head restraint to support the back of the head approximately at ear level. The head... |
63 |
| Note - Note: |
63 |
| BlockTitle - Note: |
63 |
| Para - The center rear seat head restraint cannot be adjusted or removed. |
63 |
| Section - Restraint systems |
64 |
| Title - Restraint systems |
64 |
| Marker - Restraint systems |
64 |
| Para - Your vehicle is equipped with seat belts for all seats, emergency tensioning retractors fo... |
64 |
| Section - Seat belts |
64 |
| Title - Seat belts |
64 |
| Marker - Seat belts |
64 |
| Important - Important! |
64 |
| BlockTitle - Important! |
64 |
| Para - Laws in most states and all Canadian provinces require seat belt use. |
64 |
| Para - All states and provinces require use of child restraints that comply with U.S. Federal Mot... |
64 |
| Para - All child restraints systems are designed to be secured in vehicle seats by lap belts or t... |
64 |
| Para - For your safety and that of your passengers we strongly recommend their use. |
64 |
| Warning - <TABELLE> |
64 |
| TBody - <TABELLENHAUPTTEXT> |
64 |
| Row - <TABELLENREIHE> |
64 |
| Entry - |
64 |
| Row - <TABELLENREIHE> |
64 |
| Entry - Warning! |
64 |
| Para - Warning! |
64 |
| Para - Children 12�years old and under must never ride in the front seat, except in a Mercedes-Be... |
64 |
| Row - <TABELLENREIHE> |
64 |
| Entry - According to accident statistics, children are safer when properly restrained in the rear... |
64 |
| Para - According to accident statistics, children are safer when properly restrained in the rear ... |
64 |
| Row - <TABELLENREIHE> |
64 |
| Entry - A child’s risk of serious or fatal injuries is significantly increased if the child restr... |
64 |
| Para - A child’s risk of serious or fatal injuries is significantly increased if the child restra... |
64 |
| Warning - <TABELLE> |
65 |
| TBody - <TABELLENHAUPTTEXT> |
65 |
| Row - <TABELLENREIHE> |
65 |
| Entry - Warning! |
65 |
| Para - Warning! |
65 |
| Para - Never ride in a moving vehicle with the backrest reclined. Sitting in an excessively recli... |
65 |
| Section - Seat belt nonusage warning system |
65 |
| Title - Seat belt nonusage warning system |
65 |
| Marker - Seat belt nonusage warning system |
65 |
| Para - With the electronic key in starter switch position�2, a warning sounds for a short time if... |
65 |
| Para - Automatic comfort-fit seat belt: |
65 |
| Para - An automatic comfort-fit feature for driver and front passenger seat belt is activated whe... |
65 |
| Para - The retraction force of the inertia reel is reduced, increasing the level of seat belt com... |
65 |
| Note - Note: |
65 |
| BlockTitle - Note: |
65 |
| Para - For cleaning and care of the seat belts see page� |
65 |
| Para - |
65 |
| Para - |
65 |
| Para - |
65 |
| Para - |
65 |
| Warning - <TABELLE> |
65 |
| TBody - <TABELLENHAUPTTEXT> |
65 |
| Row - <TABELLENREIHE> |
65 |
| Entry - |
65 |
| Row - <TABELLENREIHE> |
66 |
| Entry - Warning! |
66 |
| Para - Warning! |
66 |
| Para - Failure to wear and properly fasten and position your seat belt greatly increases your ris... |
66 |
| Row - <TABELLENREIHE> |
66 |
| Entry - If you are ever in an accident, your injuries can be considerably more severe without you... |
66 |
| Para - If you are ever in an accident, your injuries can be considerably more severe without your... |
66 |
| Row - <TABELLENREIHE> |
66 |
| Entry - In the same crash, the possibility of injury or death is lessened if you are wearing your... |
66 |
| Para - In the same crash, the possibility of injury or death is lessened if you are wearing your ... |
66 |
| Para - |
66 |
| Para - |
66 |
| Para - |
66 |
| Para - |
66 |
| Warning - <TABELLE> |
66 |
| TBody - <TABELLENHAUPTTEXT> |
66 |
| Row - <TABELLENREIHE> |
66 |
| Entry - |
66 |
| Row - <TABELLENREIHE> |
66 |
| Entry - Warning! |
66 |
| Para - Warning! |
66 |
| Para - Never let more people ride in the vehicle than there are seat belts available. Be sure eve... |
66 |
| Subsection - Seat belts:Fastening |
67 |
| Title - Seat belts:Fastening |
67 |
| Marker - Seat belts:Fastening |
67 |
| Figure - <GRAPHIK> |
67 |
| OrderedList - 1 Latch plate |
67 |
| Item - 1 Latch plate |
67 |
| Item - 2 Buckle |
67 |
| Item - 3 Release button |
67 |
| Para - Push latch plate (1) into buckle (2) until it clicks. Do not twist the belt. A twisted sea... |
67 |
| Para - The lap belt should be positioned as low as possible on your hips and not across the abdomen. |
67 |
| Warning - <TABELLE> |
67 |
| TBody - <TABELLENHAUPTTEXT> |
67 |
| Row - <TABELLENREIHE> |
67 |
| Entry - Warning! |
67 |
| Para - Warning! |
67 |
| Para - Always fasten your seat belt before driving off. Always make sure your passengers are prop... |
67 |
| Para - Tighten the lap portion to a snug fit by pulling shoulder portion up. |
67 |
| Para - The shoulder portion of the seat belt must be pulled snug and checked for snugness immedia... |
67 |
| Para - Adjust seat belt so that shoulder portion is located as close as possible to the middle of... |
67 |
| OrderedList - <GRAPHIK> |
68 |
| Item - <GRAPHIK> |
68 |
| Graphic - <GRAPHIK> |
68 |
| Para - To raise, slide belt outlet upward. |
68 |
| Para - To lower, press button�(4) and slide belt outlet downward. |
68 |
| Para - Seat belts:Operation |
68 |
| Marker - Seat belts:Operation |
68 |
| Bold - Operation of seat belts |
68 |
| Para - The inertia reel stops the belt from unwinding during sudden stops or when quickly pulling... |
68 |
| Para - The locking function of the reel may be checked by quickly pulling out the belt. |
68 |
| Para - Adjust seat belt so that shoulder portion is located as close as possible to the middle of... |
68 |
| Caution - Caution! |
68 |
| BlockTitle - Caution! |
68 |
| Para - For safety reasons, avoid adjusting the seat or seat back into positions which could affec... |
68 |
| Subsection - Seat belts:Unfastening |
68 |
| Title - Seat belts:Unfastening |
68 |
| Marker - Seat belts:Unfastening |
68 |
| Para - Press release button�(3) in the belt buckle�(2). |
68 |
| Para - Allow the retractor to completely rewind the seat belt by guiding the latch plate�(1). |
68 |
| Warning - <TABELLE> |
68 |
| TBody - <TABELLENHAUPTTEXT> |
68 |
| Row - <TABELLENREIHE> |
68 |
| Entry - |
68 |
| Row - <TABELLENREIHE> |
69 |
| Entry - Warning! |
69 |
| Para - Warning! |
69 |
| Para - USE SEAT BELTS PROPERLY. |
69 |
| Row - <TABELLENREIHE> |
69 |
| Entry - • Seat belts can only work when used properly. Never wear seat belts in any other way tha... |
69 |
| ItemizedList - • Seat belts can only work when used properly. Never wear seat belts in any other ... |
69 |
| Item - • Seat belts can only work when used properly. Never wear seat belts in any other way than... |
69 |
| Row - <TABELLENREIHE> |
69 |
| Entry - • Each occupant should wear their seat belt at all times, because seat belts help reduce ... |
69 |
| ItemizedList - • Each occupant should wear their seat belt at all times, because seat belts help ... |
69 |
| Item - • Each occupant should wear their seat belt at all times, because seat belts help reduce t... |
69 |
| Row - <TABELLENREIHE> |
69 |
| Entry - • Never wear the shoulder belt under your arm, against your neck or off your shoulder. In... |
69 |
| ItemizedList - • Never wear the shoulder belt under your arm, against your neck or off your shoul... |
69 |
| Item - • Never wear the shoulder belt under your arm, against your neck or off your shoulder. In ... |
69 |
| Row - <TABELLENREIHE> |
69 |
| Entry - • Never wear belts over rigid or breakable objects in or on your clothing, such as eyegla... |
69 |
| ItemizedList - • Never wear belts over rigid or breakable objects in or on your clothing, such as... |
69 |
| Item - • Never wear belts over rigid or breakable objects in or on your clothing, such as eyeglas... |
69 |
| Row - <TABELLENREIHE> |
69 |
| Entry - • Position the lap belt as low as possible on your hips and not across the abdomen. If th... |
69 |
| ItemizedList - • Position the lap belt as low as possible on your hips and not across the abdomen... |
69 |
| Item - • Position the lap belt as low as possible on your hips and not across the abdomen. If the... |
69 |
| Row - <TABELLENREIHE> |
69 |
| Entry - • Each seat belt should never be used for more than one person at a time. Do not fasten a... |
69 |
| ItemizedList - • Each seat belt should never be used for more than one person at a time. Do not f... |
69 |
| Item - • Each seat belt should never be used for more than one person at a time. Do not fasten a ... |
69 |
| Row - <TABELLENREIHE> |
69 |
| Entry - • Belts should not be worn twisted. In a crash, you wouldn’t have the full width of the b... |
69 |
| ItemizedList - • Belts should not be worn twisted. In a crash, you wouldn’t have the full width o... |
69 |
| Item - • Belts should not be worn twisted. In a crash, you wouldn’t have the full width of the be... |
69 |
| Row - <TABELLENREIHE> |
70 |
| Entry - • Pregnant women should also use a lap- shoulder belt. The lap belt portion should be pos... |
70 |
| ItemizedList - • Pregnant women should also use a lap- shoulder belt. The lap belt portion should... |
70 |
| Item - • Pregnant women should also use a lap- shoulder belt. The lap belt portion should be posi... |
70 |
| Row - <TABELLENREIHE> |
70 |
| Entry - • Never place your feet on the instrument panel or on the seat. Always keep both feet on ... |
70 |
| ItemizedList - • Never place your feet on the instrument panel or on the seat. Always keep both f... |
70 |
| Item - • Never place your feet on the instrument panel or on the seat. Always keep both feet on t... |
70 |
| Para - |
70 |
| Warning - <TABELLE> |
70 |
| TBody - <TABELLENHAUPTTEXT> |
70 |
| Row - <TABELLENREIHE> |
70 |
| Entry - Warning! |
70 |
| Para - Warning! |
70 |
| Para - USE CHILD RESTRAINTS PROPERLY. |
70 |
| Row - <TABELLENREIHE> |
70 |
| Entry - Children 12 years old and under must never ride in the front seat, except in a Mercedes-B... |
70 |
| Para - Children 12 years old and under must never ride in the front seat, except in a Mercedes-Be... |
70 |
| Row - <TABELLENREIHE> |
70 |
| Entry - Otherwise they will be struck by the airbag when it inflates in a crash. If this happens,... |
70 |
| Para - Otherwise they will be struck by the airbag when it inflates in a crash. If this happens, ... |
70 |
| Row - <TABELLENREIHE> |
70 |
| Entry - According to accident statistics, children are safer when properly restrained in the rear... |
70 |
| Para - According to accident statistics, children are safer when properly restrained in the rear ... |
70 |
| Row - <TABELLENREIHE> |
70 |
| Entry - A child’s risk of serious or fatal injuries is significantly increased if the child restr... |
70 |
| Para - A child’s risk of serious or fatal injuries is significantly increased if the child restra... |
70 |
| Row - <TABELLENREIHE> |
70 |
| Entry - Children too big for child restraint systems must ride in back seats using regular seat b... |
70 |
| Para - Children too big for child restraint systems must ride in back seats using regular seat be... |
70 |
| Section - BabySmartTM airbag deactivation system |
71 |
| Title - BabySmartTM airbag deactivation system |
71 |
| Marker - BabySmartTM airbag deactivation system |
71 |
| Para - Special BabySmart |
71 |
| Para - The |
71 |
| Section - Self-test BabySmart |
71 |
| Title - Self-test BabySmart |
71 |
| Para - After turning electronic key in starter switch to position�1 or�2, the |
71 |
| Para - If the indicator lamp should not come on or is continuously lit, the system is not functio... |
71 |
| Warning - <TABELLE> |
71 |
| TBody - <TABELLENHAUPTTEXT> |
71 |
| Row - <TABELLENREIHE> |
71 |
| Entry - |
71 |
| Row - <TABELLENREIHE> |
71 |
| Entry - Warning! |
71 |
| Para - Warning! |
71 |
| Para - The BabySmart |
71 |
| Row - <TABELLENREIHE> |
71 |
| Entry - Never place anything between seat cushion and child seat (e.g. pillow), since it reduces ... |
71 |
| Para - Never place anything between seat cushion and child seat (e.g. pillow), since it reduces t... |
71 |
| Row - <TABELLENREIHE> |
71 |
| Entry - Follow the manufacturer’s instructions for installation of special child seats. |
71 |
| Para - Follow the manufacturer’s instructions for installation of special child seats. |
71 |
| Row - <TABELLENREIHE> |
71 |
| Entry - The passenger front airbag will not deploy only if the ü indicator lamp remains illuminated. |
71 |
| Para - The passenger front airbag will not deploy only if the |
71 |
| Row - <TABELLENREIHE> |
71 |
| Entry - Please be sure to check the indicator every time you use the special system child seat. S... |
71 |
| Para - Please be sure to check the indicator every time you use the special system child seat. Sh... |
71 |
| Para - |
71 |
| Para - |
71 |
| Para - |
71 |
| Footnote - BabySmart |
71 |
| Section - Supplemental Restraint System (SRS) |
72 |
| Title - Supplemental Restraint System (SRS) |
72 |
| Marker - Supplemental Restraint System (SRS) |
72 |
| Para - Airbags are intended as a supplement to seat belts. Airbags alone cannot protect as well a... |
72 |
| Para - The SRS uses two crash severity levels (thresholds) to activate either the emergency tensi... |
72 |
| Para - Seat belt fastened |
72 |
| ItemizedList - • first threshold exceeded: ETR activates |
72 |
| Item - • first threshold exceeded: ETR activates |
72 |
| Item - • second threshold exceeded: airbag also activates |
72 |
| Para - Seat belt not fastened |
72 |
| Para - Front seats: |
72 |
| ItemizedList - • first threshold exceeded: airbag activates, not ETR |
72 |
| Item - • first threshold exceeded: airbag activates, not ETR |
72 |
| Para - Rear outer seats: |
72 |
| ItemizedList - • first threshold exceeded: ETR activates |
72 |
| Item - • first threshold exceeded: ETR activates |
72 |
| Para - Driver and front passenger and rear outer seat systems operate independently of each other. |
72 |
| Section - Emergency tensioning retractor (ETR) |
73 |
| Title - Emergency tensioning retractor (ETR) |
73 |
| Marker - Emergency tensioning retractor (ETR) |
73 |
| Para - The seat belts for the front and rear outer seats are equipped with emergency tensioning r... |
73 |
| Para - The emergency tensioning retractors are designed to activate only when the seat belts are ... |
73 |
| Para - They remove slack from the belts in such a way that the seat belts fit more snugly against... |
73 |
| Para - In cases of other frontal impacts, angled impacts, roll- overs, certain side impacts, or o... |
73 |
| Section - Airbags |
74 |
| Title - Airbags |
74 |
| Marker - Airbags |
74 |
| Subsection - Front airbags |
74 |
| Title - Front airbags |
74 |
| Marker - Front airbags |
74 |
| Figure - <GRAPHIK> |
74 |
| OrderedList - 1 Driver airbag |
74 |
| Item - 1 Driver airbag |
74 |
| Item - 2 Front passenger airbag |
74 |
| Para - The most effective occupant restraint system yet developed for use in production vehicles ... |
74 |
| Para - In conjunction with wearing the seat belts, the driver and front passenger airbags can pro... |
74 |
| Para - Side impact and head protection window curtain airbags can provide increased protection to... |
74 |
| Para - The operational readiness of the airbag system is verified by the indicator lamp |
74 |
| Para - The following system components are monitored or undergo a self-check: crash-sensor(s), ai... |
75 |
| Para - Initially, when the electronic key is turned from starter switch position�0 to position�1 ... |
75 |
| Para - Have the system checked at your authorized Mercedes�Benz Center immediately |
75 |
| Para - In the operational mode, after the indicator lamp has gone out following the initial check... |
75 |
| Warning - <TABELLE> |
75 |
| TBody - <TABELLENHAUPTTEXT> |
75 |
| Row - <TABELLENREIHE> |
75 |
| Entry - Warning! |
75 |
| Para - Warning! |
75 |
| Para - In the event a malfunction of the |
75 |
| Note - Note: |
75 |
| BlockTitle - Note: |
75 |
| Para - See page� |
75 |
| Para - The driver and passenger front airbags are designed to activate only in certain frontal im... |
76 |
| Note - Note: |
76 |
| BlockTitle - Note: |
76 |
| Para - Heavy objects on the front passenger seat can appear to the |
76 |
| Subsection - Side impact airbags |
77 |
| Title - Side impact airbags |
77 |
| Marker - Side impact airbags |
77 |
| Figure - <GRAPHIK> |
77 |
| OrderedList - 3 Side impact airbags |
77 |
| Item - 3 Side impact airbags |
77 |
| Item - 4 Window curtain airbags |
77 |
| Subsection - Side impact airbags |
77 |
| Title - Side impact airbags |
77 |
| Marker - Side impact airbags |
77 |
| Para - The side impact airbags are designed to activate only in certain side impacts exceeding a ... |
77 |
| Para - The side impact airbag for the front passenger deploys only if the front passenger seat is... |
77 |
| Para - Side impact airbags operate best in conjunction with a properly positioned and fastened se... |
77 |
| Note - Note: |
77 |
| BlockTitle - Note: |
77 |
| Para - Heavy objects on front passenger seat can cause the front passenger side impact airbag to ... |
77 |
| Subsection - Window curtain airbag |
77 |
| Title - Window curtain airbag |
77 |
| Marker - Window curtain airbag |
77 |
| Para - The head protection window curtain airbags afford greater protection against injuries to t... |
77 |
| Para - The window curtain airbags are designed to activate only in certain side impacts exceeding... |
78 |
| Important - Important! |
78 |
| BlockTitle - Important! |
78 |
| Para - Airbags are designed to activate only in certain frontal (front airbags) impacts, or side ... |
78 |
| Bold - Airbags are designed to activate only in certain frontal (front airbags) impacts, or side ... |
78 |
| Para - Only during these types of impacts, if of sufficient severity to meet the deployment thres... |
78 |
| Bold - Only during these types of impacts, if of sufficient severity to meet the deployment thres... |
78 |
| Para - The driver and passenger should always wear their seat belts, otherwise it is not possible... |
78 |
| Bold - The driver and passenger should always wear their seat belts, otherwise it is not possible... |
78 |
| Para - In cases of other frontal impacts, angled impacts, roll-overs, other side impacts, rear co... |
78 |
| Bold - In cases of other frontal impacts, angled impacts, roll-overs, other side impacts, rear co... |
78 |
| Para - We caution you not to rely on the presence of the airbags in order to avoid wearing your s... |
78 |
| Bold - We caution you not to rely on the presence of the airbags in order to avoid wearing your s... |
78 |
| Warning - <TABELLE> |
78 |
| TBody - <TABELLENHAUPTTEXT> |
78 |
| Row - <TABELLENREIHE> |
78 |
| Entry - |
78 |
| Row - <TABELLENREIHE> |
79 |
| Entry - Warning! |
79 |
| Para - Warning! |
79 |
| Para - Airbags are designed to reduce the potential of injury in certain frontal (front airbags) ... |
79 |
| Row - <TABELLENREIHE> |
79 |
| Entry - The activation of the “SRS” temporarily releases a small amount of dust from the airbags.... |
79 |
| Para - The activation of the |
79 |
| Row - <TABELLENREIHE> |
79 |
| Entry - The service life of the airbags extends to the date indicated on the label located on the... |
79 |
| Para - The service life of the airbags extends to the date indicated on the label located on the ... |
79 |
| Para - Your vehicle was originally equipped with airbags which are designed to activate in certai... |
79 |
| Bold - Your vehicle was originally equipped with airbags which are designed to activate in certai... |
79 |
| Warning - <TABELLE> |
79 |
| TBody - <TABELLENHAUPTTEXT> |
79 |
| Row - <TABELLENREIHE> |
79 |
| Entry - Warning! |
79 |
| Para - Warning! |
79 |
| Para - To reduce the risk of injury when the front airbags inflate, it is very important for the ... |
79 |
| Row - <TABELLENREIHE> |
79 |
| Entry - For maximum protection in the event of a collision always be in normal seated position wi... |
79 |
| Para - For maximum protection in the event of a collision always be in normal seated position wit... |
79 |
| Row - <TABELLENREIHE> |
79 |
| Entry - Since the airbag inflates with considerable speed and force, a proper seating and hands o... |
79 |
| Para - Since the airbag inflates with considerable speed and force, a proper seating and hands on... |
79 |
| Row - <TABELLENREIHE> |
80 |
| Entry - • Sit properly belted in an upright position with your back against the backrest. |
80 |
| ItemizedList - • Sit properly belted in an upright position with your back against the backrest. |
80 |
| Item - • Sit properly belted in an upright position with your back against the backrest. |
80 |
| Row - <TABELLENREIHE> |
80 |
| Entry - • Adjust the driver seat as far as possible rearward, still permitting proper operation o... |
80 |
| ItemizedList - • Adjust the driver seat as far as possible rearward, still permitting proper oper... |
80 |
| Item - • Adjust the driver seat as far as possible rearward, still permitting proper operation of... |
80 |
| Row - <TABELLENREIHE> |
80 |
| Entry - • Do not lean with your head or chest close to the steering wheel or dashboard. |
80 |
| ItemizedList - • Do not lean with your head or chest close to the steering wheel or dashboard. |
80 |
| Item - • Do not lean with your head or chest close to the steering wheel or dashboard. |
80 |
| Row - <TABELLENREIHE> |
80 |
| Entry - • Keep hands on the outside of steering wheel rim. Placing hands and arms inside the rim ... |
80 |
| ItemizedList - • Keep hands on the outside of steering wheel rim. Placing hands and arms inside t... |
80 |
| Item - • Keep hands on the outside of steering wheel rim. Placing hands and arms inside the rim c... |
80 |
| Row - <TABELLENREIHE> |
80 |
| Entry - • Adjust the front passenger seat as far as possible rearward from the dashboard when the... |
80 |
| ItemizedList - • Adjust the front passenger seat as far as possible rearward from the dashboard w... |
80 |
| Item - • Adjust the front passenger seat as far as possible rearward from the dashboard when the ... |
80 |
| Row - <TABELLENREIHE> |
80 |
| Entry - • Occupants, especially children, should never lean their heads in the area of the door w... |
80 |
| ItemizedList - • Occupants, especially children, should never lean their heads in the area of the... |
80 |
| Item - • Occupants, especially children, should never lean their heads in the area of the door wh... |
80 |
| Row - <TABELLENREIHE> |
80 |
| Entry - • Children 12 years old and under must never ride in the front seat, except in a Mercedes... |
80 |
| ItemizedList - • Children 12 years old and under must never ride in the front seat, except in a M... |
80 |
| Item - • Children 12 years old and under must never ride in the front seat, except in a Mercedes�... |
80 |
| Row - <TABELLENREIHE> |
80 |
| Entry - Failure to follow these instructions can result in severe injuries to you or other occupa... |
80 |
| Para - Failure to follow these instructions can result in severe injuries to you or other occupants. |
80 |
| Subsection - Safety guidelines for the seat belt, emergency tensioning retractor and airbag |
81 |
| Title - Safety guidelines for the seat belt, emergency tensioning retractor and airbag |
81 |
| Marker - Safety guidelines for the seat belt, emergency tensioning retractor and airbag |
81 |
| Warning - <TABELLE> |
81 |
| TBody - <TABELLENHAUPTTEXT> |
81 |
| Row - <TABELLENREIHE> |
81 |
| Entry - Warning! |
81 |
| Para - Warning! |
81 |
| ItemizedList - • Damaged seat belts or belts that were highly stressed in an accident must be rep... |
81 |
| Item - • Damaged seat belts or belts that were highly stressed in an accident must be replaced an... |
81 |
| Row - <TABELLENREIHE> |
81 |
| Entry - • Airbags and “ETR’s” are designed to function on a one-time-only basis. An airbag or eme... |
81 |
| ItemizedList - • Airbags and |
81 |
| Item - • Airbags and |
81 |
| Row - <TABELLENREIHE> |
81 |
| Entry - • No modifications of any kind may be made to any components or wiring of the “SRS”. This... |
81 |
| ItemizedList - • No modifications of any kind may be made to any components or wiring of the |
81 |
| Item - • No modifications of any kind may be made to any components or wiring of the |
81 |
| Row - <TABELLENREIHE> |
81 |
| Entry - • Do not pass belts over sharp edges. |
81 |
| ItemizedList - • Do not pass belts over sharp edges. |
81 |
| Item - • Do not pass belts over sharp edges. |
81 |
| Row - <TABELLENREIHE> |
81 |
| Entry - • Do not make any modification that could change the effectiveness of the belts. |
81 |
| ItemizedList - • Do not make any modification that could change the effectiveness of the belts. |
81 |
| Item - • Do not make any modification that could change the effectiveness of the belts. |
81 |
| Row - <TABELLENREIHE> |
81 |
| Entry - • Do not use handles above doors for placing such items as coat hangers etc. |
81 |
| ItemizedList - • Do not use handles above doors for placing such items as coat hangers etc. |
81 |
| Item - • Do not use handles above doors for placing such items as coat hangers etc. |
81 |
| Row - <TABELLENREIHE> |
81 |
| Entry - • An airbag system component within the steering wheel gets hot after the airbag has infl... |
81 |
| ItemizedList - • An airbag system component within the steering wheel gets hot after the airbag h... |
81 |
| Item - • An airbag system component within the steering wheel gets hot after the airbag has infla... |
81 |
| Row - <TABELLENREIHE> |
81 |
| Entry - • Improper work on the system, including incorrect installation and removal, can lead to ... |
81 |
| ItemizedList - • Improper work on the system, including incorrect installation and removal, can l... |
81 |
| Item - • Improper work on the system, including incorrect installation and removal, can lead to p... |
81 |
| Row - <TABELLENREIHE> |
81 |
| Entry - • In addition, through improper work there is a risk of rendering the “SRS” inoperative o... |
81 |
| ItemizedList - • In addition, through improper work there is a risk of rendering the |
81 |
| Item - • In addition, through improper work there is a risk of rendering the |
81 |
| Row - <TABELLENREIHE> |
81 |
| Entry - |
81 |
| Row - <TABELLENREIHE> |
82 |
| Entry - • For your protection and the protection of others, when scrapping the airbag unit or eme... |
82 |
| ItemizedList - • For your protection and the protection of others, when scrapping the airbag unit... |
82 |
| Item - • For your protection and the protection of others, when scrapping the airbag unit or emer... |
82 |
| Row - <TABELLENREIHE> |
82 |
| Entry - • Given the considerable deployment speed and the textile structure of the airbags, there... |
82 |
| ItemizedList - • Given the considerable deployment speed and the textile structure of the airbags... |
82 |
| Item - • Given the considerable deployment speed and the textile structure of the airbags, there ... |
82 |
| Para - When you sell your vehicle we strongly urge you to give notice to the subsequent owner tha... |
82 |
| Subsection - Infant and child restraint systems |
82 |
| Title - Infant and child restraint systems |
82 |
| Marker - Infant and child restraint systems |
82 |
| Para - We recommend all infants and children be properly restrained at all times while the vehicl... |
82 |
| Para - To activate, pull shoulder belt out completely and let it retract. During the seat belt re... |
82 |
| Para - To deactivate, release seat belt buckle and let seat belt retract completely. The seat bel... |
82 |
| Note - Note: |
82 |
| BlockTitle - Note: |
82 |
| Para - For child seats with mounting fittings for tether anchorages refer to page� |
82 |
| Warning - <TABELLE> |
82 |
| TBody - <TABELLENHAUPTTEXT> |
82 |
| Row - <TABELLENREIHE> |
82 |
| Entry - Warning! |
82 |
| Para - Warning! |
82 |
| Para - Never release the seat belt buckle while vehicle is in motion, since the special seat belt... |
82 |
| Important - Important! |
83 |
| BlockTitle - Important! |
83 |
| Para - The use of infant or child restraints is required by law in all 50�states and all Canadian... |
83 |
| Para - Infants and small children should be seated in an appropriate infant or child restraint sy... |
83 |
| Para - When using any infant or child restraint system, be sure to carefully read and follow all ... |
83 |
| Para - Please read and observe warning labels affixed to the inside of the vehicle and to infant ... |
83 |
| Warning - <TABELLE> |
83 |
| TBody - <TABELLENHAUPTTEXT> |
83 |
| Row - <TABELLENREIHE> |
83 |
| Entry - |
83 |
| Row - <TABELLENREIHE> |
83 |
| Entry - Warning! |
83 |
| Para - Warning! |
83 |
| Para - Children 12 years old and under must never ride in the front seat, except in a Mercedes-Be... |
83 |
| Row - <TABELLENREIHE> |
83 |
| Entry - According to accident statistics, children are safer when properly restrained in the rear... |
83 |
| Para - According to accident statistics, children are safer when properly restrained in the rear ... |
83 |
| Row - <TABELLENREIHE> |
83 |
| Entry - |
83 |
| Row - <TABELLENREIHE> |
84 |
| Entry - Infants and small children should never share a seat belt with another occupant. During a... |
84 |
| Para - Infants and small children should never share a seat belt with another occupant. During an... |
84 |
| Row - <TABELLENREIHE> |
84 |
| Entry - Children too big for child restraint systems must ride in back seats using regular seat b... |
84 |
| Para - Children too big for child restraint systems must ride in back seats using regular seat be... |
84 |
| Row - <TABELLENREIHE> |
84 |
| Entry - When the child restraint is not in use, remove it from the vehicle or secure it with the ... |
84 |
| Para - When the child restraint is not in use, remove it from the vehicle or secure it with the s... |
84 |
| Subsection - Infant and child restraint systems:Installation |
84 |
| Title - Infant and child restraint systems:Installation |
84 |
| Marker - Infant and child restraint systems:Installation |
84 |
| Figure - <GRAPHIK> |
84 |
| Para - This vehicle is provided with tether anchorages for a top tether strap at each of the rear... |
84 |
| Para - Prior to installing a tether strap, remove cover�(1) from anchorage ring�(2) and store in ... |
84 |
| Subsection - |
85 |
| Title - |
85 |
| Figure - <GRAPHIK> |
85 |
| Para - To secure a tether strap to the anchorage, securely fasten the hook�(3), which is part of ... |
85 |
| Para - After removing the tether strap, reinstall the cover�(1). |
85 |
| Subsection - Infant and child restraint systems:Child seat mounts |
85 |
| Title - Infant and child restraint systems:Child seat mounts |
85 |
| Marker - Infant and child restraint systems:Child seat mounts |
85 |
| Figure - <GRAPHIK> |
85 |
| Para - This vehicle is provided with two mounts (at each of the outer rear seats) for the install... |
85 |
| Para - To install a child seat, the mounts�(1) must be folded forward until they lock in place. T... |
85 |
| Para - To fold mounts�(1) back, press down button (2) on each mount and return mount into its catch. |
86 |
| Note - Note: |
86 |
| BlockTitle - Note: |
86 |
| Para - With a child seat installed in the left rear seat, the seat belt for the center seat occup... |
86 |
| Section - Steering wheel adjustment |
86 |
| Title - Steering wheel adjustment |
86 |
| Figure - <GRAPHIK> |
86 |
| Warning - <TABELLE> |
86 |
| TBody - <TABELLENHAUPTTEXT> |
86 |
| Row - <TABELLENREIHE> |
86 |
| Entry - Warning! |
86 |
| Para - Warning! |
86 |
| Para - Do not adjust the steering wheel while driving. Adjusting the steering wheel while driving... |
86 |
| Para - Unlocking: |
87 |
| Para - Pull handle�(1) out to its stop. |
87 |
| Para - Adjusting: |
87 |
| Para - Move steering wheel to the desired position. |
87 |
| Para - Locking: |
87 |
| Para - Push handle�(1) in until it engages. |
87 |
| Important - Important! |
87 |
| BlockTitle - Important! |
87 |
| Para - Do not drive the vehicle until you have properly locked the steering column. |
87 |
| Para - See |
87 |
| Section - Steering wheel adjustment |
88 |
| Title - Steering wheel adjustment |
88 |
| Marker - Steering wheel adjustment |
88 |
| Warning - <TABELLE> |
88 |
| TBody - <TABELLENHAUPTTEXT> |
88 |
| Row - <TABELLENREIHE> |
88 |
| Entry - Warning! |
88 |
| Para - Warning! |
88 |
| Para - Do not adjust the steering wheel while driving. Adjusting the steering wheel while driving... |
88 |
| Row - <TABELLENREIHE> |
88 |
| Entry - When leaving the vehicle always remove the electronic key from the starter switch and loc... |
88 |
| Para - When leaving the vehicle always remove the electronic key from the starter switch and lock... |
88 |
| Row - <TABELLENREIHE> |
88 |
| Entry - The steering wheel adjustment feature can also be operated with the driver’s door open. D... |
88 |
| Para - The steering wheel adjustment feature can also be operated with the driver’s door open. Do... |
88 |
| Para - To adjust the steering wheel position, turn the electronic key in starter switch to positi... |
88 |
| Para - <GRAPHIK> |
88 |
| Graphic - <GRAPHIK> |
88 |
| Marker - P68.00-2011-26 |
88 |
| OrderedList - 1 Steering column, lengthen or shorten column |
88 |
| Item - 1 Steering column, lengthen or shorten column |
88 |
| Bold - 1 Steering column, lengthen or shorten column |
88 |
| ItemPara - Move the switch to the front or rear. |
88 |
| Item - 2 Steering column, height |
88 |
| Bold - 2 Steering column, height |
88 |
| ItemPara - Move the switch up or down. |
88 |
| Note - Note: |
88 |
| BlockTitle - Note: |
88 |
| Para - The steering wheel adjustment can be stored together with the seat and exterior mirror adj... |
88 |
| Section - Rear view mirrors |
89 |
| Title - Rear view mirrors |
89 |
| Marker - Rear view mirrors |
89 |
| Subsection - Inside rear view mirror |
89 |
| Title - Inside rear view mirror |
89 |
| Para - Manually adjust the mirror. |
89 |
| Subtitle - Rear view mirror, automatic antiglare |
89 |
| Bold - Rear view mirror, automatic antiglare |
89 |
| Para - Antiglare mode: With the electronic key in starter switch position�2, the mirror reflectio... |
89 |
| Para - With the gear selector lever in position |
89 |
| Note - Note: |
89 |
| BlockTitle - Note: |
89 |
| Para - The automatic antiglare function does not react, if incoming light is not aimed directly a... |
89 |
| Warning - <TABELLE> |
89 |
| TBody - <TABELLENHAUPTTEXT> |
89 |
| Row - <TABELLENREIHE> |
89 |
| Entry - Warning! |
89 |
| Para - Warning! |
89 |
| Para - In the case of an accident liquid electrolyte may escape the mirror housing when the mirro... |
89 |
| Row - <TABELLENREIHE> |
89 |
| Entry - Electrolyte has an irritating effect. Do not allow the liquid come into contact with eyes... |
89 |
| Para - Electrolyte has an irritating effect. Do not allow the liquid come into contact with eyes,... |
89 |
| Subsection - P88.70-0279-26 |
90 |
| Title - P88.70-0279-26 |
90 |
| Marker - P88.70-0279-26 |
90 |
| Figure - <GRAPHIK> |
90 |
| Para - The buttons are located above the exterior lamp switch. The memory button�(4) is located o... |
90 |
| Warning - <TABELLE> |
90 |
| TBody - <TABELLENHAUPTTEXT> |
90 |
| Row - <TABELLENREIHE> |
90 |
| Entry - Warning! |
90 |
| Para - Warning! |
90 |
| Para - Exercise care when using the passenger side exterior mirror. The mirror surface is convex ... |
90 |
| Subtitle - Exterior mirror adjustment |
90 |
| Bold - Exterior mirror adjustment |
90 |
| Para - Turn the electronic key in starter switch to position�1 or�2. |
90 |
| Para - Push button to select mirror to be adjusted: Driver’s side – Push button (1). Passenger si... |
90 |
| Para - Push the adjustment button (3) up, down, left or right according to the setting desired. |
90 |
| Note - Notes: |
90 |
| BlockTitle - Notes: |
90 |
| Para - The exterior rear view mirrors have electrically heated glass. The heater switches on auto... |
90 |
| Para - If an exterior mirror housing is forcibly pivoted from its normal position, it must be rep... |
90 |
| Subtitle - Storing mirror positions in memory |
90 |
| Bold - Storing mirror positions in memory |
90 |
| Para - The exterior rear view mirror positions are stored in memory with the seat�/�steering whee... |
90 |
| Subtitle - Parking position exterior mirror |
91 |
| Bold - Parking position exterior mirror |
91 |
| Para - The passenger side exterior mirror can be adjusted and programmed to assist the driver dur... |
91 |
| Para - With the electronic key in starter switch position�2, and the exterior rear view mirror sw... |
91 |
| Note - Note: |
91 |
| BlockTitle - Note: |
91 |
| Para - The mirror adjustment is only active if you select |
91 |
| Para - The mirror position can now be adjusted as desired. |
91 |
| Para - At speeds above approximately 6�mph (10�km�/�h), upon shifting gear selector lever from |
91 |
| Para - To store passenger mirror parking position: |
92 |
| OrderedList - 1. Turn the electronic key in starter switch to position�1 or�2. |
92 |
| Item - 1. Turn the electronic key in starter switch to position�1 or�2. |
92 |
| ItemPara - The vehicle must be stationary. |
92 |
| Item - 2. Select passenger side mirror and adjust the mirror to view the curb. |
92 |
| Item - 3. Push the memory button� |
92 |
| Item - 4. Within 3�seconds push bottom of adjustment button�(3). The mirror should not move. |
92 |
| ItemPara - Repeat the memory procedure if the mirror moves. |
92 |
| Item - 5. Select driver side mirror. The passenger side mirror will return to its previous position. |
92 |
| Note - Note: |
92 |
| BlockTitle - Note: |
92 |
| Para - One stored parking position is available for each of the two electronic main keys. |
92 |
| Para - This is only possible if you select |
92 |
| Subtitle - Driver’s side exterior mirror, antiglare mode |
93 |
| Bold - Driver’s side exterior mirror, antiglare mode |
93 |
| Para - Antiglare mode: With the electronic key in starter switch position�2, the mirror reflectio... |
93 |
| Para - With the gear selector lever in position� |
93 |
| Note - Note: |
93 |
| BlockTitle - Note: |
93 |
| Para - The automatic antiglare function does not react, if incoming light is not aimed directly a... |
93 |
| Para - |
93 |
| Para - |
93 |
| Para - |
93 |
| Para - |
93 |
| Para - |
93 |
| Warning - <TABELLE> |
93 |
| TBody - <TABELLENHAUPTTEXT> |
93 |
| Row - <TABELLENREIHE> |
93 |
| Entry - |
93 |
| Row - <TABELLENREIHE> |
93 |
| Entry - Warning! |
93 |
| Para - Warning! |
93 |
| Para - In the case of an accident liquid electrolyte may escape the mirror housing when the mirro... |
93 |
| Row - <TABELLENREIHE> |
93 |
| Entry - Electrolyte has an irritating effect. Do not allow the liquid come into contact with eyes... |
93 |
| Para - Electrolyte has an irritating effect. Do not allow the liquid come into contact with eyes,... |
93 |
| Important - Important! |
93 |
| BlockTitle - Important! |
93 |
| Para - Electrolyte drops coming into contact with the vehicle paint finish can only be completely... |
93 |
| Section - Memory function |
94 |
| Title - Memory function |
94 |
| Marker - Memory function |
94 |
| Figure - <GRAPHIK> |
94 |
| Para - The memory and stored position buttons are located on the doors. |
94 |
| OrderedList - 1 Memory button, used to store selected positions which can be retrieved by pressing |
94 |
| Item - 1 Memory button, used to store selected positions which can be retrieved by pressing |
94 |
| Item - 2 Stored position button Turn to position� |
94 |
| Para - Together with the driver’s seat position you can store the positions for steering wheel an... |
94 |
| Para - For the front passenger you can store the seat position. |
94 |
| Para - Three stored positions for the driver’s seat are available for each of the two electronic ... |
94 |
| Subsection - Storing positions into memory: |
95 |
| Title - Storing positions into memory: |
95 |
| Para - With the electronic key in starter switch position�1 or�2 or with the relevant door open a... |
95 |
| Para - Adjust the seat to the desired position. |
95 |
| Para - Driver’s seat: You can also adjust the steering wheel and the exterior mirrors electricall... |
95 |
| Para - Turn button (2) to selected memory position. |
95 |
| Para - Push memory button�(1), release and push the position button�(2) within 3�seconds. |
95 |
| Subsection - Recalling positions from memory: |
95 |
| Title - Recalling positions from memory: |
95 |
| Para - To recall a seat��/�steering wheel and exterior rear view mirror position, turn button (2)... |
95 |
| Para - The seat�/��steering wheel and exterior rear view mirror movement stops when the button is... |
95 |
| Caution - Caution! |
95 |
| BlockTitle - Caution! |
95 |
| Para - Do not operate the power seats using the memory button if the backrest is in an excessivel... |
95 |
| Para - First move backrest to an upright position. |
95 |
| Important - Important! |
96 |
| BlockTitle - Important! |
96 |
| Para - Prior to operating the vehicle, the driver should check and adjust if necessary the seat h... |
96 |
| Para - In addition, also adjust the steering wheel to ensure adequate control, reach, operation a... |
96 |
| Para - Fasten seat belts. Infants and small children should be seated in a properly secured restr... |
96 |
| Para - All seat, head restraint, steering wheel, and rear view mirror adjustments as well as fast... |
96 |
| Warning - <TABELLE> |
96 |
| TBody - <TABELLENHAUPTTEXT> |
96 |
| Row - <TABELLENREIHE> |
96 |
| Entry - |
96 |
| Row - <TABELLENREIHE> |
96 |
| Entry - Warning! |
96 |
| Para - Warning! |
96 |
| Para - Children 12�years old and under must never ride in the front seat, except in a Mercedes-Be... |
96 |
| Row - <TABELLENREIHE> |
96 |
| Entry - According to accident statistics, children are safer when properly restrained in the rear... |
96 |
| Para - According to accident statistics, children are safer when properly restrained in the rear ... |
96 |
| Row - <TABELLENREIHE> |
96 |
| Entry - A child’s risk of serious or fatal injuries is significantly increased if the child restr... |
96 |
| Para - A child’s risk of serious or fatal injuries is significantly increased if the child restra... |
96 |
| Section - Instrument cluster |
97 |
| Title - Instrument cluster |
97 |
| Marker - Instrument cluster |
97 |
| Figure - <GRAPHIK> |
97 |
| OrderedList - 1 Knob for instrument cluster illumination, see�page� |
98 |
| Item - 1 Knob for instrument cluster illumination, see�page� |
98 |
| Item - 2 Tachometer |
98 |
| Item - 3 Antilock brake system (ABS) malfunction indicator lamp, see page� |
98 |
| Item - 4 Brake fluid low or parking brake engaged, see�page� |
98 |
| Item - 5 Speedometer |
98 |
| Item - 6 Left turn signal indicator lamp, see�combination switch on�page� |
98 |
| Item - 7 Electronic stability program (ESP) warning lamp, system is adjusting to road conditions,... |
98 |
| Item - 8 Indicator lamp without function. It illuminates with the electronic key in starter switc... |
98 |
| Item - 9 CHECK ENGINE |
98 |
| CapLetter - 9 CHECK ENGINE |
98 |
| Item - 10 High beam headlamp indicator, see�exterior lamp switch, page� |
98 |
| Item - 11 High beam headlamp indicator, exterior lamp switch, see page� |
98 |
| Item - 12 Multifunction display, see page� |
98 |
| Item - 13 Trip odometer, see page� |
98 |
| Item - 14 Main odometer, see page� |
98 |
| Item - 15 Display for program mode and gear range indicators, page� |
98 |
| Item - 16 Malfunction/warning message memory, see�page� |
98 |
| Item - 17 Outside temperature indicator, see page� |
98 |
| Item - 18 Digital clock To set the time, see individual settings on page� |
98 |
| Item - 19 Right turn signal indicator lamp, see�combination switch on page� |
98 |
| Item - 20 Fasten seat belts, see page� |
98 |
| Item - 21 Supplemental�restraint�system (SRS) malfunction indicator lamp, see page� |
98 |
| Item - 22 Fuel gauge with reserve and fuel cap placement warning lamp, see page� |
98 |
| Subsection - Activating instrument cluster display |
99 |
| Title - Activating instrument cluster display |
99 |
| Para - The instrument cluster is activated by: |
99 |
| ItemizedList - • Opening the door |
99 |
| Item - • Opening the door |
99 |
| Item - • Pressing button�(1) on the instrument cluster |
99 |
| Item - • Turning the electronic key in starter switch to position�1 or�2. |
99 |
| Item - • Switching on the exterior lamps. |
99 |
| Footnote - 1 The instrument cluster is activated for approximately 30�seconds. |
99 |
| Subsection - Instrument cluster illumination |
99 |
| Title - Instrument cluster illumination |
99 |
| Para - The instrument cluster illumination is dimmed or brightened automatically to suit daylight... |
99 |
| Para - The instrument cluster illumination will also be adjusted when the vehicle’s exterior lamp... |
99 |
| Para - Display illumination, changing basic settings for driving at dusk or in darkness: |
99 |
| Para - Rotate adjusting knob (1) clockwise – instrument lamp intensity increases. |
99 |
| Para - Rotate adjusting knob (1) counterclockwise – instrument lamp intensity decreases. |
99 |
| Note - Note: |
99 |
| BlockTitle - Note: |
99 |
| Para - It is not possible to select a basic brightness setting in daylight – the intensity is adj... |
99 |
| Subsection - Outside temperature indicator (17) |
100 |
| Title - Outside temperature indicator (17) |
100 |
| Warning - <TABELLE> |
100 |
| TBody - <TABELLENHAUPTTEXT> |
100 |
| Row - <TABELLENREIHE> |
100 |
| Entry - Warning! |
100 |
| Para - Warning! |
100 |
| Para - The outside temperature indicator is not designed to serve as an Ice-Warning Device and is... |
100 |
| Para - The temperature sensor is located in the front bumper area. Due to its location, the senso... |
100 |
| Para - Adaption to ambient temperature takes place in steps and depends on the prevailing driving... |
100 |
| Note - Note: |
100 |
| BlockTitle - Note: |
100 |
| Para - The temperature indicator display can be set to read out in either Fahrenheit or Celsius. ... |
100 |
| Subsection - Trip odometer (13) |
100 |
| Title - Trip odometer (13) |
100 |
| Para - To reset to |
100 |
| Para - Activate the instrument cluster if it is not already activated, see page� |
100 |
| Para - Press button |
100 |
| Para - Press button�(1) on the instrument cluster, see page� |
100 |
| Subsection - Tachometer (2) |
100 |
| Title - Tachometer (2) |
100 |
| Para - The red marking on the tachometer denotes excessive engine speed. |
100 |
| Para - Avoid this engine speed, as it may result in serious engine damage that is not covered by ... |
100 |
| Para - To help protect the engine, the fuel supply is interrupted if the engine is operated withi... |
100 |
| Section - Multifunction steering wheel |
101 |
| Title - Multifunction steering wheel |
101 |
| Marker - Multifunction steering wheel |
101 |
| Figure - <GRAPHIK> |
101 |
| Para - Depending on your vehicle’s equipment, you may use the buttons on the multifunction steeri... |
102 |
| OrderedList - 1 Trip odometer and main odometer, see page� |
102 |
| Item - 1 Trip odometer and main odometer, see page� |
102 |
| ItemPara - Flexible service system (FSS), see�page� |
102 |
| Item - 2 Audio systems, see�page� |
102 |
| ItemPara - Radio, see�page� |
102 |
| Item - 3 Navigation system, see�page� |
102 |
| Item - 4 Malfunction message memory, see page� |
102 |
| Item - 5 Individual settings, see page� |
102 |
| Item - 6 Trip computer, see�page� |
102 |
| ItemPara - After start After reset Fuel tank content |
102 |
| Item - 7 Telephone, see�page� |
102 |
| Para - Press the |
102 |
| Para - The display advances by one system each time the button is pressed. |
102 |
| Para - You may call up additional displays within some of these categories by pressing the |
102 |
| Warning - <TABELLE> |
102 |
| TBody - <TABELLENHAUPTTEXT> |
102 |
| Row - <TABELLENREIHE> |
102 |
| Entry - |
102 |
| Row - <TABELLENREIHE> |
103 |
| Entry - Warning! |
103 |
| Para - Warning! |
103 |
| Para - A driver’s attention to the road must always be his�/ her primary focus when driving. |
103 |
| Row - <TABELLENREIHE> |
103 |
| Entry - For your safety and the safety of others, selecting features through the multifunction st... |
103 |
| Para - For your safety and the safety of others, selecting features through the multifunction ste... |
103 |
| Note - Note: |
103 |
| BlockTitle - Note: |
103 |
| Para - The displays in the multifunction display can be set to German, English, French, Italian o... |
103 |
| Para - The displays for the audio systems (radio, CD player, cassette player) will appear in Engl... |
103 |
| OrderedList - <GRAPHIK> |
104 |
| Item - <GRAPHIK> |
104 |
| Graphic - <GRAPHIK> |
104 |
| Item - 2 Multifunction steering wheel |
104 |
| Para - Turn the electronic key in starter switch to position�1 or�2. |
104 |
| Para - Press button: |
104 |
| OrderedList - 3 è |
104 |
| Item - 3 è |
104 |
| SpecialChar - 3 è |
104 |
| Item - 4 Ø |
104 |
| SpecialChar - 4 Ø |
104 |
| Item - 5 j |
104 |
| SpecialChar - 5 j |
104 |
| Item - 6 k |
104 |
| SpecialChar - 6 k |
104 |
| Item - 7 æ |
104 |
| SpecialChar - 7 æ |
104 |
| Item - 8 ç |
104 |
| SpecialChar - 8 ç |
104 |
| Item - 9 í |
104 |
| SpecialChar - 9 í |
104 |
| Item - 10 ì |
104 |
| SpecialChar - 10 ì |
104 |
| ItemPara - See page� |
104 |
| Item - 11 Horn pad |
104 |
| Para - Press the |
104 |
| Para - The display advances by one system each time the button is pressed. |
104 |
| Para - You may call up additional displays in some systems by pressing the |
104 |
| Section - Trip and main odometer, FSS, coolant temperature, vehicle speed, engine oil level indicato |
105 |
| Title - Trip and main odometer, FSS, coolant temperature, vehicle speed, engine oil level indicator |
105 |
| Marker - Trip and main odometer, FSS, coolant temperature, vehicle speed, engine oil level indicator |
105 |
| Figure - <GRAPHIK> |
105 |
| OrderedList - 1 Trip odometer and main odometer See page� |
106 |
| Item - 1 Trip odometer and main odometer See page� |
106 |
| Item - 2 Coolant temperature gauge, see page� |
106 |
| Item - 3 Vehicle speed if |
106 |
| ItemPara - Outside temperature if |
106 |
| Item - 4 FSS (Flexible service system), see page� |
106 |
| Item - 5 Engine oil level indicator, see�page� |
106 |
| Para - Press |
106 |
| Para - Press the |
106 |
| Para - Pressing the |
106 |
| Section - Audio systems |
107 |
| Title - Audio systems |
107 |
| Marker - Audio systems |
107 |
| Subsection - Audio systems:Radio |
107 |
| Title - Audio systems:Radio |
107 |
| Marker - Audio systems:Radio |
107 |
| Figure - <GRAPHIK> |
107 |
| OrderedList - 1 Audio system is switched off. |
107 |
| Item - 1 Audio system is switched off. |
107 |
| Item - 2 The radio is switched on. |
107 |
| Item - 3 Wave band setting and memory location number, where appropriate. |
107 |
| Item - 4 Station name setting or station frequency. |
107 |
| Item - 5 This only appears when |
107 |
| Para - The radio must be switched on. |
107 |
| Para - Press the |
107 |
| Para - Press button |
107 |
| Para - Use the |
107 |
| Para - Pressing the |
107 |
| Subsection - Audio systems:CD Player |
108 |
| Title - Audio systems:CD Player |
108 |
| Marker - Audio systems:CD Player |
108 |
| Figure - <GRAPHIK> |
108 |
| OrderedList - 1 Radio system is switched off. |
108 |
| Item - 1 Radio system is switched off. |
108 |
| Item - 2 The CD player is switched on. |
108 |
| Item - 3 The number of the CD currently playing is displayed if you are using a CD changer. |
108 |
| Item - 4 Track number. |
108 |
| Para - TITLE |
108 |
| Quotes - TITLE |
108 |
| Para - TRACK |
108 |
| Quotes - TRACK |
108 |
| Para - The radio must be switched on. |
108 |
| Para - The CD player must be switched on. |
108 |
| Para - Press the |
108 |
| Para - Press the |
108 |
| Para - Pressing the |
108 |
| Note - Note: |
108 |
| BlockTitle - Note: |
108 |
| Para - To select a |
108 |
| Subsection - Audio systems:Cassette player |
109 |
| Title - Audio systems:Cassette player |
109 |
| Marker - Audio systems:Cassette player |
109 |
| Figure - <GRAPHIK> |
109 |
| OrderedList - 1 Audio system is switched off. |
109 |
| Item - 1 Audio system is switched off. |
109 |
| Item - 2 The cassette player is switched on. |
109 |
| Item - 3 Side being played. |
109 |
| Para - The radio must be switched on. |
109 |
| Para - The cassette player must be switched on. |
109 |
| Para - Press the |
109 |
| Para - Pressing the |
109 |
| Para - Pressing the |
109 |
| Para - Pressing the |
109 |
| Note - Notes: |
109 |
| BlockTitle - Notes: |
109 |
| Para - To select the reverse side of the tape, press button below track number on the audio syste... |
109 |
| Section - Telephone |
110 |
| Title - Telephone |
110 |
| Marker - Telephone |
110 |
| Subsection - Telephone:Telephone book |
110 |
| Title - Telephone:Telephone book |
110 |
| Marker - Telephone:Telephone book |
110 |
| Figure - <GRAPHIK> |
110 |
| OrderedList - 1 The telephone is switched off. |
110 |
| Item - 1 The telephone is switched off. |
110 |
| Item - 2 The vehicle is currently outside the transmitter or receiver range. |
110 |
| Item - 3 The telephone is ready for use. |
110 |
| Item - 4 Name selected from the telephone book. |
110 |
| Item - 5 Number for the name selected. The dialing commences. |
110 |
| Item - 6 Dialing is completed. The name is displayed. The display remains for the duration of the... |
110 |
| Item - 7 Duration of call |
110 |
| Item - 8 Memory location number |
110 |
| Item - 9 Signal strength (in top right corner): Vehicles with audio system: the higher the number... |
110 |
| Para - The telephone must be switched on. |
111 |
| Para - Press the |
111 |
| Para - Pressing |
111 |
| Note - Note: |
111 |
| BlockTitle - Note: |
111 |
| Para - Press the |
111 |
| Para - The procedure is cancelled and display�(4) appears. |
111 |
| Para - Press the |
111 |
| Para - The name will be displayed when dialing is completed. Display (6) remains for the duration... |
111 |
| Para - Pressing the |
111 |
| Para - Pressing the |
111 |
| Subsection - Telephone:Redialing |
112 |
| Title - Telephone:Redialing |
112 |
| Marker - Telephone:Redialing |
112 |
| Figure - <GRAPHIK> |
112 |
| OrderedList - 1 The telephone is ready for use. |
112 |
| Item - 1 The telephone is ready for use. |
112 |
| Item - 2 Number or name stored in the redial memory. |
112 |
| Item - 3 Number in the redial memory — redialing has commenced. |
112 |
| Item - 4 Dialing is complete and the name stored in the telephone book is displayed or the number... |
112 |
| Item - 5 Signal strength: Vehicles with audio system (in top right corner): the higher the number... |
112 |
| Item - 6 Memory location numbers — the 10 most recently dialed numbers are stored. L0, most recen... |
112 |
| Item - 7 Duration of call. |
112 |
| Para - The telephone must be switched on. |
113 |
| Para - Press the |
113 |
| Para - Pressing the |
113 |
| Para - Pressing the |
113 |
| Note - Note: |
113 |
| BlockTitle - Note: |
113 |
| Para - Press the |
113 |
| Para - The procedure is cancelled and display�(1) appears. |
113 |
| Para - Press the |
113 |
| Para - Once dialing is complete the name�(4) is displayed if the name is stored in the telephone ... |
113 |
| Para - Pressing the |
113 |
| Para - Pressing the |
113 |
| Subsection - Telephone:Incoming call |
114 |
| Title - Telephone:Incoming call |
114 |
| Marker - Telephone:Incoming call |
114 |
| Figure - <GRAPHIK> |
114 |
| Para - The telephone must be switched on. |
114 |
| OrderedList - call |
114 |
| Item - call |
114 |
| DisplayMess - call |
114 |
| Item - 2 Signal strength: Vehicles with audio system (in top right corner): the higher the number... |
114 |
| Para - Press the |
114 |
| Para - Press the |
114 |
| Section - Navigation system |
115 |
| Title - Navigation system |
115 |
| Marker - Navigation system |
115 |
| Figure - <GRAPHIK> |
115 |
| OrderedList - 1 The navigation system is switched off. |
115 |
| Item - 1 The navigation system is switched off. |
115 |
| Item - 2 The navigation system is switched on but no destination has been specified. |
115 |
| Item - 3 The navigation system is switched on and destination guidance is active. |
115 |
| Para - Press the |
115 |
| Para - See the separate |
115 |
| Para - Pressing the |
115 |
| Section - Trip computer |
116 |
| Title - Trip computer |
116 |
| Marker - Trip computer |
116 |
| Figure - <GRAPHIK> |
116 |
| OrderedList - After�start |
116 |
| Item - After�start |
116 |
| DisplayMess - After�start |
116 |
| Item - After�reset |
116 |
| DisplayMess - After�reset |
116 |
| Item - 3 Estimated range remaining |
116 |
| Item - 4 Distance covered |
116 |
| Item - 5 Elapsed time |
116 |
| Item - 6 Average speed |
116 |
| Item - 7 Average fuel consumption |
116 |
| Para - Press the button |
116 |
| Para - Press the |
116 |
| Para - Pressing the |
116 |
| Note - Note: |
116 |
| BlockTitle - Note: |
116 |
| Para - The display (1) always appears the next time the trip computer is called up. |
116 |
| Subsection - To reset the short |
117 |
| Title - To reset the short |
117 |
| Para - Call up the relevant display�(1�or�2) using the |
117 |
| Note - Note: |
117 |
| BlockTitle - Note: |
117 |
| Para - The |
117 |
| Section - Malfunction/warning message memory |
118 |
| Title - Malfunction/warning message memory |
118 |
| Marker - Malfunction/warning message memory |
118 |
| Figure - <GRAPHIK> |
118 |
| OrderedList - 1 There are no messages stored in the system. |
118 |
| Item - 1 There are no messages stored in the system. |
118 |
| Item - 2 Number of messages stored in the system. |
118 |
| Item - 3 There are messages stored in the system. |
118 |
| Para - Press the |
118 |
| Para - Press the |
118 |
| Para - See page� |
118 |
| Para - Display�(2) will reappear after you have scanned all the malfunction and warning messages. |
118 |
| Para - Should any malfunction or warning messages be stored while driving, they will reappear in ... |
118 |
| Para - The malfunction or warning messages will now be displayed for approximately 5�seconds each. |
118 |
| Para - Pressing the reset knob on the instrument cluster (see�page� |
118 |
| Para - The message memory will be cleared when the electronic key is turned in the starter switch... |
119 |
| Para - Pressing the |
119 |
| Important - Important! |
119 |
| BlockTitle - Important! |
119 |
| Para - Malfunction and warning messages are only indicated for certain systems and displayed to a... |
119 |
| Section - Individual settings |
120 |
| Title - Individual settings |
120 |
| Marker - Individual settings |
120 |
| Figure - <GRAPHIK> |
120 |
| OrderedList - 1 Preliminary display of the individual settings. |
120 |
| Item - 1 Preliminary display of the individual settings. |
120 |
| Item - SETTINGS |
120 |
| DisplayMess - SETTINGS |
120 |
| ItemPara - INSTRUMENT�CLUSTER |
120 |
| DisplayMess - INSTRUMENT�CLUSTER |
120 |
| ItemPara - LIGHTING |
120 |
| DisplayMess - LIGHTING |
120 |
| ItemPara - VEHICLE |
120 |
| DisplayMess - VEHICLE |
120 |
| ItemPara - CONVENIENCE |
120 |
| Quotes - CONVENIENCE |
120 |
| ItemPara - The four menus contain additional submenus. Individual settings can be selected in the... |
120 |
| Item - 3 See below for instructions on returning the setting menus to the factory settings. |
120 |
| Item - 4 Acknowledgment. |
120 |
| Note - Note: |
120 |
| BlockTitle - Note: |
120 |
| Para - The displayed menu |
120 |
| Para - Press the |
121 |
| Para - Press the |
121 |
| Para - Pressing the |
121 |
| Para - INSTRUMENT�CLUSTER |
121 |
| DisplayMess - INSTRUMENT�CLUSTER |
121 |
| Para - LIGHTING |
121 |
| DisplayMess - LIGHTING |
121 |
| Para - VEHICLE |
121 |
| DisplayMess - VEHICLE |
121 |
| Para - CONVENIENCE |
121 |
| Quotes - CONVENIENCE |
121 |
| Para - Pressing the |
121 |
| Note - Notes: |
121 |
| BlockTitle - Notes: |
121 |
| Para - These settings may only be performed with the vehicle at standstill and with the electroni... |
121 |
| Para - The individual setting preliminary display�(1) will appear if you speed up. |
121 |
| Para - The setting menu previously called up will reappear when the vehicle stops, providing no o... |
121 |
| Subsection - To return menu� |
121 |
| Title - To return menu� |
121 |
| ItemizedList - • Call up the individual setting preliminary display�(1) or display�(2). |
121 |
| Item - • Call up the individual setting preliminary display�(1) or display�(2). |
121 |
| Item - • Press the reset knob on the instrument cluster (see�page� |
121 |
| Item - • Press the reset knob on the instrument cluster once more. The menu |
121 |
| ItemPara - The individual setting preliminary display�(1) will appear if you do not press the res... |
121 |
| Subsection - Individual settings:"INSTRUMENT CLUSTER" |
122 |
| Title - Individual settings:"INSTRUMENT CLUSTER" |
122 |
| Marker - Individual settings:"INSTRUMENT CLUSTER" |
122 |
| Quotes - INSTRUMENT�CLUSTER |
122 |
| Figure - <GRAPHIK> |
122 |
| OrderedList - 1 Preliminary display of the individual settings |
123 |
| Item - 1 Preliminary display of the individual settings |
123 |
| Item - SETTINGS |
123 |
| DisplayMess - SETTINGS |
123 |
| Item - SET TIME |
123 |
| DisplayMess - SET TIME |
123 |
| Item - SET TIME |
123 |
| DisplayMess - SET TIME |
123 |
| Item - 12/24 o’clock |
123 |
| DisplayMess - 12/24 o’clock |
123 |
| Item - TEMP.�INDICATOR |
123 |
| DisplayMess - TEMP.�INDICATOR |
123 |
| Item - display values in |
123 |
| DisplayMess - display values in |
123 |
| Item - TEXT |
123 |
| DisplayMess - TEXT |
123 |
| Item - select display |
123 |
| DisplayMess - select display |
123 |
| Item - 10 See page� |
123 |
| Item - 11 Acknowledgment. |
123 |
| Note - Note: |
123 |
| BlockTitle - Note: |
123 |
| Para - Vehicles with COMAND: For setting clock and speedometer units, see separate |
123 |
| Para - Press the |
124 |
| Para - Press the |
124 |
| Para - Press button� |
124 |
| Para - Press the |
124 |
| Para - Pressing the |
124 |
| Para - The settings made are stored and applied immediately. |
124 |
| Para - The individual setting preliminary display�(1) will appear again after you have run throug... |
124 |
| Subsection - To return menu� |
125 |
| Title - To return menu� |
125 |
| ItemizedList - • Call up one of the setting menus(3�to�9). |
125 |
| Item - • Call up one of the setting menus(3�to�9). |
125 |
| Item - • Press the reset knob on the instrument cluster, see page� |
125 |
| Item - • Press the reset knob on the instrument cluster once more. The menu |
125 |
| Subsection - Individual settings:"LIGHTING" |
126 |
| Title - Individual settings:"LIGHTING" |
126 |
| Marker - Individual settings:"LIGHTING" |
126 |
| Quotes - LIGHTING |
126 |
| Figure - <GRAPHIK> |
126 |
| OrderedList - 1 Preliminary display of the individual settings |
127 |
| Item - 1 Preliminary display of the individual settings |
127 |
| Item - SETTINGS |
127 |
| DisplayMess - SETTINGS |
127 |
| Item - light�circuit�HEADLAMP�MODE |
127 |
| DisplayMess - light�circuit�HEADLAMP�MODE |
127 |
| Superscript - 1 |
127 |
| Item - LOCATOR LIGHTING |
127 |
| DisplayMess - LOCATOR LIGHTING |
127 |
| Item - HEADLAMPS DELAYED SWITCH�OFF |
127 |
| DisplayMess - HEADLAMPS DELAYED SWITCH�OFF |
127 |
| Item - INT. ILLUMINATION DELAYED SWITCH�OFF |
127 |
| DisplayMess - INT. ILLUMINATION DELAYED SWITCH�OFF |
127 |
| Item - 7 Returning the setting menu� |
127 |
| Item - 8 Acknowledgment. |
127 |
| Footnote - 1 Except Canada |
127 |
| Para - Press the |
127 |
| Para - Press the |
127 |
| Para - Press button� |
127 |
| Para - Press the |
127 |
| Para - The individual setting preliminary display�(1) will appear again after you have run throug... |
127 |
| Subsection - To return menu� |
127 |
| Title - To return menu� |
127 |
| ItemizedList - • Call up menu�(3 to�6). |
127 |
| Item - • Call up menu�(3 to�6). |
127 |
| Item - • Press the reset knob on the instrument cluster (see page� |
127 |
| Item - • Press the reset knob on the instrument cluster once more. The menu |
127 |
| Subsection - Individual settings:"VEHICLE" |
128 |
| Title - Individual settings:"VEHICLE" |
128 |
| Marker - Individual settings:"VEHICLE" |
128 |
| Quotes - VEHICLE |
128 |
| Figure - <GRAPHIK> |
128 |
| OrderedList - 1 Preliminary display of the individual settings |
129 |
| Item - 1 Preliminary display of the individual settings |
129 |
| Item - SETTINGS |
129 |
| DisplayMess - SETTINGS |
129 |
| Item - press button in audio mode |
129 |
| DisplayMess - press button in audio mode |
129 |
| Superscript - |
129 |
| Item - AUTOMATIC�DOOR�LOCK |
129 |
| DisplayMess - AUTOMATIC�DOOR�LOCK |
129 |
| Item - 5 Returning the setting menu� |
129 |
| Item - 6 Acknowledgment. |
129 |
| Para - Press the |
129 |
| Para - Press the |
129 |
| Para - Press button� |
129 |
| Para - Press the |
129 |
| Para - The individual setting preliminary display�(1) will appear again after you have run throug... |
129 |
| Subsection - To return menu� |
129 |
| Title - To return menu� |
129 |
| ItemizedList - • Call up menu�(3 or 4). |
129 |
| Item - • Call up menu�(3 or 4). |
129 |
| Item - • Press the reset knob on the instrument cluster (see page� |
129 |
| Item - • Press the reset knob on the instrument cluster once more. The menu |
129 |
| Subsection - Individual settings:"CONVENIENCE" |
130 |
| Title - Individual settings:"CONVENIENCE" |
130 |
| Marker - Individual settings:"CONVENIENCE" |
130 |
| Quotes - CONVENIENCE |
130 |
| Figure - <GRAPHIK> |
130 |
| OrderedList - 1 Preliminary display of the individual settings |
131 |
| Item - 1 Preliminary display of the individual settings |
131 |
| Item - SETTINGS |
131 |
| DisplayMess - SETTINGS |
131 |
| Item - easy-entry feature activate |
131 |
| DisplayMess - easy-entry feature activate |
131 |
| Superscript - |
131 |
| Item - 4 |
131 |
| Item - mirror setting when parking |
131 |
| DisplayMess - mirror setting when parking |
131 |
| Item - 6 Returning the setting menu� |
131 |
| Item - 7 Acknowledgment. |
131 |
| Para - Press the |
131 |
| Para - Press the |
131 |
| Para - Press button� |
131 |
| Para - Press the |
131 |
| Para - The individual setting preliminary display�(1) will appear again after you have run throug... |
131 |
| Subsection - To return menu� |
132 |
| Title - To return menu� |
132 |
| ItemizedList - • Call up menu�(3 to 5). |
132 |
| Item - • Call up menu�(3 to 5). |
132 |
| Item - • Press the reset knob on the instrument cluster, see page� |
132 |
| Item - • Press the reset knob on the instrument cluster once more. The menu |
132 |
| Section - Setting the audio volume |
132 |
| Title - Setting the audio volume |
132 |
| Marker - Setting the audio volume |
132 |
| Para - You can only adjust the volume of the system currently in use. |
132 |
| Para - Vehicles with COMAND system: |
132 |
| Para - The volume setting for each system (audio, telephone, navigation and voice recognition sys... |
132 |
| Para - Setting button: |
132 |
| Para - æ |
132 |
| SpecialChar - æ |
132 |
| Para - ç |
132 |
| SpecialChar - ç |
132 |
| Section - Coolant temperature gauge |
133 |
| Title - Coolant temperature gauge |
133 |
| Marker - Coolant temperature gauge |
133 |
| Figure - <GRAPHIK> |
133 |
| Para - Turn the electronic key in starter switch to position�1 or�2. |
133 |
| Para - Call up the trip odometer and main odometer by pressing button |
133 |
| Para - During severe operating conditions and stop-and-go city traffic, the coolant temperature m... |
133 |
| Para - The engine should not be operated with the coolant temperature above 120 |
133 |
| Warning - <TABELLE> |
133 |
| TBody - <TABELLENHAUPTTEXT> |
133 |
| Row - <TABELLENREIHE> |
133 |
| Entry - Warning! |
133 |
| Para - Warning! |
133 |
| ItemizedList - • Driving when your engine is badly overheated can cause some fluids which may hav... |
133 |
| Item - • Driving when your engine is badly overheated can cause some fluids which may have leaked... |
133 |
| Bold - • Driving when your engine is badly overheated can cause some fluids which may have leaked... |
133 |
| Row - <TABELLENREIHE> |
133 |
| Entry - • Steam from an overheated engine can cause serious burns and can occur just by opening t... |
133 |
| ItemizedList - • Steam from an overheated engine can cause serious burns and can occur just by op... |
133 |
| Item - • Steam from an overheated engine can cause serious burns and can occur just by opening th... |
133 |
| Bold - • Steam from an overheated engine can cause serious burns and can occur just by opening th... |
133 |
| Row - <TABELLENREIHE> |
133 |
| Entry - Turn off the engine, get out of the vehicle and do not stand near the vehicle until it co... |
133 |
| Para - Turn off the engine, get out of the vehicle and do not stand near the vehicle until it coo... |
133 |
| Note - Note: |
133 |
| BlockTitle - Note: |
133 |
| Para - Excessive coolant temperatures trigger a warning in the multifunction display. See page� |
133 |
| Section - Flexible service system (FSS) |
134 |
| Title - Flexible service system (FSS) |
134 |
| Marker - Flexible service system (FSS) |
134 |
| Figure - <GRAPHIK> |
134 |
| Para - The FSS permits a flexible service schedule that is directly related to the operating cond... |
134 |
| Para - The symbol |
134 |
| Para - Depending on operating conditions throughout the year, the next service is calculated and ... |
134 |
| Para - The message is displayed for approximately 10�seconds when turning the electronic key in s... |
134 |
| Para - The symbols and messages indicate the type of service to be performed: |
134 |
| DefinitionList - 9 |
134 |
| Definition - 9 |
134 |
| SpecialChar - 9 |
134 |
| Item - Service�A |
134 |
| Definition - º |
134 |
| SpecialChar - º |
134 |
| Item - Service�B |
134 |
| Para - One of the following messages will appear in the display (e.g. Service�A): |
134 |
| Para - service�A�–�in |
134 |
| DisplayMess - service�A�–�in |
134 |
| DisplayMess - service�A�–�in |
134 |
| Para - The next service due date is displayed either in days or in miles, depending on your drivi... |
134 |
| Para - Once the suggested service term has passed, the symbol and message appear for approximatel... |
134 |
| Para - The service indicator disappears automatically after 30�seconds or if the knob for instrum... |
135 |
| Para - Calling up service indicator manually: |
135 |
| Para - Turn the electronic key in starter switch to position�1. |
135 |
| Para - Call up the trip odometer and main odometer by pressing button |
135 |
| Para - Press button |
135 |
| Para - The next or previous system is displayed by pressing button |
135 |
| Important - Important! |
135 |
| BlockTitle - Important! |
135 |
| Para - The FSS indicator is not an engine oil level indicator. See page� |
135 |
| Note - Note: |
135 |
| BlockTitle - Note: |
135 |
| Para - When disconnecting vehicle battery for one or more days at a time, such days will not be c... |
135 |
| Para - The interval between services is determined by the type of driving for which the vehicle i... |
135 |
| Para - Following a completed A or B service the Mercedes�Benz Center sets the counter mileage to ... |
136 |
| Para - The counter can also be set by any individual. To do so: |
136 |
| Para - Turn the electronic key in starter switch to position�1. |
136 |
| Para - To call up the trip odometer and main odometer, press button |
136 |
| Para - Press button |
136 |
| Para - Press the reset knob on the instrument cluster, see page� |
136 |
| Para - The multifunction display will show the question: |
136 |
| Para - Press the reset knob on the instrument cluster again to reset the service indicator. |
136 |
| Para - The new service indicator is displayed with the reset distance of 10�000�miles (Canada 15�... |
136 |
| Para - If the FSS counter was inadvertently reset, have a Mercedes�Benz Center correct it. |
136 |
| Para - However you choose to set your reference numbers, the scheduled services as posted in the ... |
136 |
| Section - Engine oil level indicator |
137 |
| Title - Engine oil level indicator |
137 |
| Marker - Engine oil level indicator |
137 |
| Figure - <GRAPHIK> |
137 |
| Para - To check the engine oil level, park vehicle on level ground, with engine at normal operati... |
137 |
| Para - Check oil level approximately 5�minutes after stopping the engine, allowing for the oil to... |
137 |
| Para - The message |
137 |
| ItemizedList - • with engine at operational temperature approximately 5�minutes. |
137 |
| Item - • with engine at operational temperature approximately 5�minutes. |
137 |
| Item - • with engine not at operational temperature up to approximately 30�minutes. |
137 |
| Para - The engine oil level check can be repeated after a short time. |
137 |
| Para - Turn the electronic key in starter switch to position�2. |
137 |
| Para - To call up the trip odometer and main odometer, press button |
137 |
| Para - Press button |
137 |
| Para - The electronic key in starter switch is not in position�2 if the |
137 |
| Para - The |
137 |
| Para - One of the following messages will subsequently appear on the indicator: |
138 |
| Para - ENGINE OIL LEVEL�–�O.K. |
138 |
| DisplayMess - ENGINE OIL LEVEL�–�O.K. |
138 |
| Para - ENGINE OIL LEVEL�–�ADD 1.0�QUART |
138 |
| DisplayMess - ENGINE OIL LEVEL�–�ADD 1.0�QUART |
138 |
| Para - ENGINE OIL LEVEL�–�ADD 1.5�QUART |
138 |
| DisplayMess - ENGINE OIL LEVEL�–�ADD 1.5�QUART |
138 |
| Para - ENGINE OIL LEVEL�–�ADD 2.0�QUART |
138 |
| DisplayMess - ENGINE OIL LEVEL�–�ADD 2.0�QUART |
138 |
| Para - See |
138 |
| Para - ENGINE OIL LEVEL�–�REDUCE OIL LEVEL |
138 |
| DisplayMess - ENGINE OIL LEVEL�–�REDUCE OIL LEVEL |
138 |
| Underline - Do not overfill the engine. |
138 |
| Para - The |
138 |
| Para - Perform the engine oil level check with the dipstick, if it cannot be completed via the mu... |
138 |
| Note - Notes: |
138 |
| BlockTitle - Notes: |
138 |
| Para - See malfunction and warning messages on page� |
138 |
| Para - The engine oil level cannot be checked while the engine is running. The |
138 |
| Section - Engine oil consumption |
138 |
| Title - Engine oil consumption |
138 |
| Marker - Engine oil consumption |
138 |
| Para - Engine oil consumption checks should only be made after the break-in period. During the br... |
138 |
| Section - Exterior lamp switch |
139 |
| Title - Exterior lamp switch |
139 |
| Marker - Exterior lamp switch |
139 |
| Figure - <GRAPHIK> |
139 |
| DefinitionList - M |
139 |
| Definition - M |
139 |
| SpecialChar - M |
139 |
| Item - Off |
139 |
| Definition - U |
139 |
| SpecialChar - U |
139 |
| Item - Automatic headlamp mode, see below. |
139 |
| Definition - C |
139 |
| SpecialChar - C |
139 |
| Item - Parking lamps (also side marker lamps, taillamps, licence plate lamps, instrument panel la... |
139 |
| Definition - B |
139 |
| SpecialChar - B |
139 |
| Item - Parking lamps plus low beam or high beam headlamps (combination switch pushed forward). |
139 |
| Definition - ˆ |
139 |
| SpecialChar - ˆ |
139 |
| Item - Standing lamps, right (turn left one stop) |
139 |
| Definition - ‚ |
139 |
| SpecialChar - ‚ |
139 |
| Item - Standing lamps, left (turn left two stops) |
139 |
| Definition - ‡ |
139 |
| SpecialChar - ‡ |
139 |
| Item - Front fog lamps (pull out one stop) with parking lamps and/or low beam headlamps on. Green... |
139 |
| Definition - † |
139 |
| SpecialChar - † |
139 |
| Item - Rear fog lamp (pull out to second detent) in addition to the front fog lamps. Yellow indic... |
139 |
| Note - Note: |
139 |
| BlockTitle - Note: |
139 |
| Para - With the electronic key removed and the driver’s door open, a warning sounds if the vehicl... |
139 |
| Para - Fog lamps will operate with the parking lamps and�/�or the low beam headlamps on. Fog lamp... |
139 |
| Para - Fog lamps are automatically switched off when the exterior lamp switch is turned to position |
139 |
| Section - Headlamp mode (HEADLAMPS) |
140 |
| Title - Headlamp mode (HEADLAMPS) |
140 |
| Marker - Headlamp mode (HEADLAMPS) |
140 |
| Para - The headlamps can be switched on and off manually or automatically, or switched to daytime... |
140 |
| Para - Manual operation: |
140 |
| Para - The low beam headlamps, parking lamps and license plate lamps can be switched on and off w... |
140 |
| Warning - <TABELLE> |
140 |
| TBody - <TABELLENHAUPTTEXT> |
140 |
| Row - <TABELLENREIHE> |
140 |
| Entry - Warning! |
140 |
| Para - Warning! |
140 |
| Para - The driver is responsible for the operation of the vehicle’s lights at all times. The auto... |
140 |
| Para - Automatic operation: |
140 |
| Para - With electronic key in starter switch in position�1 turn exterior lamp switch to position� |
140 |
| Para - The parking lamps switch on and off automatically depending on the brightness of the ambie... |
140 |
| Subtitle - With the engine running and exterior lamp switch in position� |
140 |
| Para - The low beam headlamps, parking lamps and license plate lamps are switched on and off auto... |
140 |
| Para - The low beam headlamps, parking lamps and license plate lamps can still be switched on and... |
140 |
| Note - Note: |
140 |
| BlockTitle - Note: |
140 |
| Para - The headlamps will not be automatically switched on under foggy conditions. |
140 |
| Subsection - Exterior lamp switch:Daytime running lamp mode |
141 |
| Title - Exterior lamp switch:Daytime running lamp mode |
141 |
| Marker - Exterior lamp switch:Daytime running lamp mode |
141 |
| Para - Turn exterior lamp switch to position� |
141 |
| Para - When the engine is running, the low beam headlamps (includes parking lamps and license pla... |
141 |
| Para - Canada only: When shifting from a driving position to position� |
141 |
| Para - For nighttime driving the exterior lamp switch should be turned to position |
141 |
| Para - USA only: The high beam headlamps can also be activated when driving with the daytime runn... |
141 |
| Para - See page� |
141 |
| Para - To activate the daytime running lamp mode, see |
141 |
| Section - Night security illumination |
141 |
| Title - Night security illumination |
141 |
| Marker - Night security illumination |
141 |
| Para - When turning off the engine, the exterior lamps switch on for added illumination, if they ... |
141 |
| Para - The lamp-on time period for night security illumination can be set at several different ti... |
141 |
| Note - Notes: |
141 |
| BlockTitle - Notes: |
141 |
| Para - Within 10�minutes after closing the last door the night security illumination can be react... |
141 |
| Para - See “Individual settings”�–� |
141 |
| Subtitle - Deactivating night security illumination temporarily: |
141 |
| Para - Turn the electronic key in starter switch to position�0 then to position�2 and back to pos... |
141 |
| Subsection - Locator lighting |
142 |
| Title - Locator lighting |
142 |
| Marker - Locator lighting |
142 |
| Para - After unlocking the vehicle with the electronic main key during darkness, the fog lamps, p... |
142 |
| Para - The exterior lamps will be switched off when opening the driver’s door. |
142 |
| Para - See “Individual settings”�–� |
142 |
| Section - Headlamp cleaning system |
142 |
| Title - Headlamp cleaning system |
142 |
| Marker - Headlamp cleaning system |
142 |
| Figure - <GRAPHIK> |
142 |
| Para - Turn the electronic key in starter switch to position�1. |
142 |
| Para - The headlamps will be cleaned with a high-pressure water jet when you press the headlamp w... |
142 |
| Para - See page� |
142 |
| Section - Combination switch |
143 |
| Title - Combination switch |
143 |
| Marker - Combination switch |
143 |
| Figure - <GRAPHIK> |
143 |
| OrderedList - 1 Low beam (exterior lamp switch position |
143 |
| Item - 1 Low beam (exterior lamp switch position |
143 |
| Item - 2 High beam (exterior lamp switch position |
143 |
| Item - 3 High beam flasher (high beam available independent of exterior lamp switch position) |
143 |
| Item - 4 Turn signals, right |
143 |
| Item - 5 Turn signals, left |
143 |
| Para - To signal minor directional changes, such as changing lanes on a highway, move combination... |
143 |
| Para - To operate the turn signals continuously, move the combination switch past the point of re... |
143 |
| Para - Turn signal failure |
143 |
| Bold - Turn signal failure |
143 |
| Para - If one of the turn signals fails, the turn signal indicator system flashes and sounds at a... |
143 |
| OrderedList - <GRAPHIK> |
144 |
| Item - <GRAPHIK> |
144 |
| Graphic - <GRAPHIK> |
144 |
| Marker - P54.20-2001-26 |
144 |
| ItemPara - Push switch past resistance point: Windshield washer system, windshield wipers. |
144 |
| ItemPara - See page� |
144 |
| Item - 7 Windshield wipers |
144 |
| Item - 0 |
144 |
| DefinitionList - 0 |
144 |
| Definition - 0 |
144 |
| Item - Off |
144 |
| Definition - I |
144 |
| Item - Intermittent wiping |
144 |
| ItemPara - Rain sensor |
144 |
| Marker - Rain sensor |
144 |
| ItemPara - Notes: |
144 |
| ItemPara - With switch in this position, one wipe occurs when turning the electronic key in start... |
144 |
| ItemPara - Do not leave in intermittent setting when vehicle is taken to an automatic car wash or... |
144 |
| Definition - II |
144 |
| Item - Normal wiper speed |
144 |
| Definition - III |
144 |
| Item - Fast wiper speed |
144 |
| Subsection - Blocked windshield wipers |
145 |
| Title - Blocked windshield wipers |
145 |
| Para - If the windshield wipers become blocked (for example, due to snow), switch off the wipers. |
145 |
| Para - For safety reasons before removing ice or snow, remove electronic key from starter switch.... |
145 |
| Para - Activate combination switch again (electronic key in starter switch position�1). |
145 |
| Subsection - Emergency operation of windshield wipers |
145 |
| Title - Emergency operation of windshield wipers |
145 |
| Para - In case of windshield wiper malfunction in switch positions�I or�III, turn combination swi... |
145 |
| Subsection - Windshield wipers smear |
145 |
| Title - Windshield wipers smear |
145 |
| Para - If the windshield wipers smear the windshield, even during rain, activate the washer syste... |
145 |
| Para - See page� |
145 |
| Subsection - Windshield and headlamp washer fluid mixing ratio |
145 |
| Title - Windshield and headlamp washer fluid mixing ratio |
145 |
| Para - For temperatures above freezing: MB Windshield Washer Concentrate |
145 |
| Para - 1 part |
145 |
| Para - For temperature below freezing: |
145 |
| Para - MB Windshield Washer Concentrate |
145 |
| Para - 1 part |
145 |
| Section - Hazard warning flasher |
146 |
| Title - Hazard warning flasher |
146 |
| Marker - Hazard warning flasher |
146 |
| Figure - <GRAPHIK> |
146 |
| Para - The hazard warning flasher can be activated either manually via the switch located in the ... |
146 |
| Para - To activate hazard warning flasher, press switch once. To deactivate, press switch again. |
146 |
| Para - If hazard warning flasher was activated automatically, press switch twice to deactivate. |
146 |
| Note - Note: |
146 |
| BlockTitle - Note: |
146 |
| Para - With the hazard warning flasher activated, the combination switch in position for either l... |
146 |
| Section - Climate control |
147 |
| Title - Climate control |
147 |
| Marker - Climate control |
147 |
| Figure - <GRAPHIK> |
147 |
| OrderedList - 1 Display and controls |
148 |
| Item - 1 Display and controls |
148 |
| Item - 2 Air volume control for left center air outlet |
148 |
| Item - 3 Center air outlet, left, adjustable |
148 |
| Item - 4 Thumbwheel for adding outside air at air outlets for center, left and right sides, as we... |
148 |
| Item - 5 Center air outlet, right, adjustable |
148 |
| Item - 6 Air volume control for right center air outlet |
148 |
| Item - 7 Air volume control and air outlet on dashboard top center |
148 |
| Item - 8 Air volume control for side air outlet |
148 |
| Item - 9 Side air outlet, adjustable |
148 |
| Item - 10 Side defroster outlet, fixed |
148 |
| Subsection - Climate control:Display and controls |
149 |
| Title - Climate control:Display and controls |
149 |
| Marker - Climate control:Display and controls |
149 |
| Figure - <GRAPHIK> |
149 |
| OrderedList - 1 Air volume |
149 |
| Item - 1 Air volume |
149 |
| Item - 2 Temperature control, left |
149 |
| Item - 3 Temperature control, right |
149 |
| Item - 4 Air distribution control switch |
149 |
| Item - 5 Rear window defroster, see page� |
149 |
| Item - 6 Economy mode, see page� |
149 |
| Item - 7 Air distribution and air volume (automatic) |
149 |
| Item - 8 Air recirculation, see page� |
149 |
| Item - 9 Defrosting, see page� |
149 |
| Important - Important! |
149 |
| BlockTitle - Important! |
149 |
| Para - This vehicle is equipped with an air conditioning system that uses R-134a (HFC: hydrofluor... |
149 |
| Subsection - Climate control |
150 |
| Title - Climate control |
150 |
| Para - The system is always at operational readiness, except when manually switched off. |
150 |
| Para - The climate control only operates with the engine running. |
150 |
| Para - The temperature selector should be left at the desired temperature setting. The temperatur... |
150 |
| Para - The system will not heat or cool any quicker by setting a higher or lower temperature. |
150 |
| Para - The desired interior temperature can be selected separately for the left and right side of... |
150 |
| Para - The climate control removes considerable moisture from the air during operation in the coo... |
150 |
| Para - The air conditioning will not engage (no cooling) if the economy mode |
150 |
| Note - Notes: |
150 |
| BlockTitle - Notes: |
150 |
| Para - Do not obstruct the air flow by placing objects on the air flow-through exhaust slots belo... |
150 |
| Para - Also keep the air intake grill in front of the windshield free of snow and debris. |
150 |
| Para - The storage compartment between the front seats can be ventilated. See page� |
150 |
| Para - The air conditioner switches itself off for its own protection if refrigerant is lost. No ... |
150 |
| Subsection - Climate control:Dust filter |
150 |
| Title - Climate control:Dust filter |
150 |
| Marker - Climate control:Dust filter |
150 |
| Para - Nearly all dust particles and pollen are filtered out before outside air enters the passen... |
150 |
| Subsection - Climate control:Basic setting |
151 |
| Title - Climate control:Basic setting |
151 |
| Marker - Climate control:Basic setting |
151 |
| Para - Press |
151 |
| Para - Set the left and right temperature to�72 |
151 |
| Para - Heating mode: To lower headroom temperature, use thumbwheel (4, page� |
151 |
| Para - Air conditioning mode: Open air outlets at dashboard top center (7, page� |
151 |
| Subsection - Climate control:Special settings |
151 |
| Title - Climate control:Special settings |
151 |
| Marker - Climate control:Special settings |
151 |
| Subtitle - Air distribution and air volume, manual |
151 |
| Bold - Air distribution and air volume, manual |
151 |
| Para - Press |
151 |
| Para - Select any of the six air volume speeds and the air distribution. |
151 |
| Subtitle - Air distribution, manual: |
151 |
| DefinitionList - h |
151 |
| Definition - h |
151 |
| SpecialChar - h |
151 |
| Item - Air from the center, side, dashboard top center and rear passenger compartment air outlets. |
151 |
| Definition - j |
151 |
| SpecialChar - j |
151 |
| Item - Air from the windshield, side defroster and rear passenger compartment air outlets. |
151 |
| Definition - k |
151 |
| SpecialChar - k |
151 |
| Item - Air from the center, side, footwell, rear footwell and rear passenger compartment air outl... |
151 |
| Subtitle - To return to automatic mode: |
151 |
| Para - Press the |
151 |
| Subsection - Climate control:Defrosting |
152 |
| Title - Climate control:Defrosting |
152 |
| Marker - Climate control:Defrosting |
152 |
| Para - Press the |
152 |
| Para - Switch off air recirculation, if selected. Press button� |
152 |
| Para - Close center air outlets. |
152 |
| Para - Turn wheels�(8, page� |
152 |
| Para - Pressing the switch again returns the system to the previous setting. |
152 |
| Subsection - Climate control:Windows fogged up on the inside |
152 |
| Title - Climate control:Windows fogged up on the inside |
152 |
| Marker - Climate control:Windows fogged up on the inside |
152 |
| Para - Switch off the economy mode, if selected. Press button� |
152 |
| Para - Switch off air recirculation, if selected. Press button� |
152 |
| Para - Press the |
152 |
| Para - Increase temperature setting. |
152 |
| Para - Open the side air outlets�(9, page� |
152 |
| Subsection - Climate control:Windows fogged up on the outside |
153 |
| Title - Climate control:Windows fogged up on the outside |
153 |
| Marker - Climate control:Windows fogged up on the outside |
153 |
| Para - Switch on the windshield wiper. |
153 |
| Para - Close air outlet at dashboard top center. |
153 |
| Para - Switch to manual mode. |
153 |
| Para - Turn air distribution switch to position� |
153 |
| Subsection - Climate control:Air recirculation |
153 |
| Title - Climate control:Air recirculation |
153 |
| Marker - Climate control:Air recirculation |
153 |
| Para - Select air recirculation: |
153 |
| Para - Press button |
153 |
| Para - To switch off the air recirculation: |
153 |
| Para - Press button |
153 |
| Para - Switching on air recirculation and activating convenience closing of power windows and sli... |
153 |
| Para - Press button |
153 |
| Para - Switching off air recirculation and activating convenience opening: |
153 |
| Para - Press button |
153 |
| Para - A window or the sliding�/�pop-up roof opened manually after convenience closing will no lo... |
153 |
| Para - The system automatically switches from air recirculation to fresh air: |
153 |
| ItemizedList - • after 30�minutes if the outside temperature is above about�40 |
153 |
| Item - • after 30�minutes if the outside temperature is above about�40 |
153 |
| Item - • after 5�minutes if the outside temperature is below about 40 |
153 |
| Item - • after 5�minutes if economy mode |
153 |
| Para - The system switches automatically to air recirculation at high outside temperatures. A qua... |
153 |
| Para - If the windows should fog up from the inside, switch from recirculated air back to fresh air. |
153 |
| Subsection - Climate control � OFF/ON |
154 |
| Title - Climate control � OFF/ON |
154 |
| Para - To switch the climate control off, set the air volume control switch to position�0. |
154 |
| Para - The fresh air supply to the vehicle interior is shut off. |
154 |
| Para - While driving, use this setting only temporarily, otherwise the windshield could fog up. |
154 |
| Para - To switch the climate control on again, set air volume control switch to any speed. |
154 |
| Subsection - Climate control:Economy mode |
154 |
| Title - Climate control:Economy mode |
154 |
| Marker - Climate control:Economy mode |
154 |
| Para - The function of this setting corresponds to the automatic mode. However, because the air c... |
154 |
| Para - Press |
154 |
| Para - Press |
154 |
| Important - Important! |
154 |
| BlockTitle - Important! |
154 |
| Para - In the |
154 |
| Subsection - Climate control:Residual engine heat utilization |
154 |
| Title - Climate control:Residual engine heat utilization |
154 |
| Marker - Climate control:Residual engine heat utilization |
154 |
| Para - With the engine switched off, it is possible to continue to heat or ventilate the interior... |
154 |
| Para - To select: |
154 |
| Para - Turn the electronic key in starter switch to position�1 or�0 or remove it altogether. |
154 |
| Para - Press button |
154 |
| Para - This function selection will not activate if the battery level is insufficient. |
154 |
| Para - The function switches off automatically: |
154 |
| ItemizedList - • if the electronic key in starter switch is turned to position�2, |
154 |
| Item - • if the electronic key in starter switch is turned to position�2, |
154 |
| Item - • after approximately 30�minutes, |
154 |
| Item - • if the battery voltage drops. |
154 |
| Section - Automatic climate control |
155 |
| Title - Automatic climate control |
155 |
| Marker - Automatic climate control |
155 |
| Figure - <GRAPHIK> |
155 |
| OrderedList - 1 Display and controls |
156 |
| Item - 1 Display and controls |
156 |
| Item - 2 Air volume control for left center air outlet |
156 |
| Item - 3 Center air outlet, left, adjustable |
156 |
| Item - 4 Thumbwheel for adding outside air at air outlets for center, left and right sides, as we... |
156 |
| Item - 5 Center air outlet, right, adjustable |
156 |
| Item - 6 Air volume control for right center air outlet |
156 |
| Item - 7 Air volume control and air outlet on dashboard top center |
156 |
| Item - 8 Air volume control for side air outlet |
156 |
| Item - 9 Side air outlet, adjustable |
156 |
| Item - 10 Side defroster outlet, fixed |
156 |
| Subsection - Automatic climate control:Display and controls |
157 |
| Title - Automatic climate control:Display and controls |
157 |
| Marker - Automatic climate control:Display and controls |
157 |
| Figure - <GRAPHIK> |
157 |
| OrderedList - 1 Temperature control, left, lowering |
157 |
| Item - 1 Temperature control, left, lowering |
157 |
| Item - 2 Temperature control, left, raising |
157 |
| Item - 3 Air distribution control switch left (automatic, manual operation) |
157 |
| Item - 4 Activated charcoal filter, see page� |
157 |
| Item - 5 Display |
157 |
| Item - 6 Air distribution control switch right (automatic, manual operation) |
157 |
| Item - 7 Temperature control, right, raising |
157 |
| Item - 8 Temperature control, right, lowering |
157 |
| Item - 9 Rear window defroster, see page� |
157 |
| Item - 10 Economy mode, see page� |
157 |
| Item - 11 Air volume control + switch on system |
157 |
| Item - 12 Air volume control - switch off system |
157 |
| Item - 13 Air recirculation, see page� |
157 |
| Item - 14 Defrosting, see page� |
157 |
| Important - Important! |
157 |
| BlockTitle - Important! |
157 |
| Para - This vehicle is equipped with an air conditioning system that uses R-134a (HFC: hydrofluor... |
157 |
| OrderedList - 1 Temperature, left |
158 |
| Item - 1 Temperature, left |
158 |
| Item - 2 Temperature, right |
158 |
| Item - 3 Air volume |
158 |
| Item - 4 Automatic mode is selected |
158 |
| Subsection - Automatic climate control |
158 |
| Title - Automatic climate control |
158 |
| Para - The system is always at operational readiness, except when manually switched off. |
158 |
| Para - The automatic climate control only operates with the engine running. |
158 |
| Para - The temperature selector should be left at the desired temperature setting. The temperatur... |
158 |
| Para - The system will not heat or cool any quicker by setting a higher or lower temperature. |
158 |
| Para - The desired interior temperature and air distribution can be selected separately for the l... |
158 |
| Para - The automatic climate control removes considerable moisture from the air during operation ... |
158 |
| Para - The air conditioning will not engage (no cooling) if the economy mode |
158 |
| Note - Notes: |
159 |
| BlockTitle - Notes: |
159 |
| Para - Do not obstruct the air flow by placing objects on the air flow-through exhaust slots belo... |
159 |
| Para - Also keep the air intake grill in front of the windshield free of snow and debris. |
159 |
| Para - The storage compartment between the front seats can be ventilated. See page� |
159 |
| Para - The air conditioner switches itself off for its own protection if refrigerant is lost. No ... |
159 |
| Subsection - Automatic climate control:Dust filter |
159 |
| Title - Automatic climate control:Dust filter |
159 |
| Marker - Automatic climate control:Dust filter |
159 |
| Para - Nearly all dust particles and pollen are filtered out before outside air enters the passen... |
159 |
| Subsection - Automatic climate control:Basic setting |
159 |
| Title - Automatic climate control:Basic setting |
159 |
| Marker - Automatic climate control:Basic setting |
159 |
| Para - Briefly press left or right |
159 |
| Para - The economy mode and air recirculation functions will be switched off. The automatic blowe... |
159 |
| Para - Set the temperature switches on the left and right to�72 |
159 |
| Para - Heating mode: To lower headroom temperature, use thumbwheel (4, page� |
159 |
| Para - Air conditioning mode: Open air outlets at dashboard top center (7, page� |
159 |
| Subsection - Automatic climate control:Special settings |
160 |
| Title - Automatic climate control:Special settings |
160 |
| Marker - Automatic climate control:Special settings |
160 |
| Subtitle - Automatic climate control:Air volume, manual |
160 |
| Marker - Automatic climate control:Air volume, manual |
160 |
| Bold - Air distribution, manual |
160 |
| Para - Press left or right |
160 |
| DefinitionList - h |
160 |
| Definition - h |
160 |
| SpecialChar - h |
160 |
| Item - Air from the center, side, dashboard top center and rear passenger compartment air outlets. |
160 |
| Definition - j |
160 |
| SpecialChar - j |
160 |
| Item - Air from the windshield, side defroster and rear passenger compartment air outlets. |
160 |
| Definition - k |
160 |
| SpecialChar - k |
160 |
| Item - Air from the center, side, footwell, rear footwell and rear passenger compartment air outl... |
160 |
| Para - To return to automatic mode: |
160 |
| Para - Press left or right |
160 |
| Subtitle - Air volume, manual |
160 |
| Bold - Air volume, manual |
160 |
| Para - Seven blower speeds are available. |
160 |
| Para - Press right� |
160 |
| Para - The display |
160 |
| Para - To return to automatic mode: |
160 |
| Para - Press left or right |
160 |
| Subsection - Automatic climate control:Defrosting |
161 |
| Title - Automatic climate control:Defrosting |
161 |
| Marker - Automatic climate control:Defrosting |
161 |
| Para - Windows fogged up on the inside |
161 |
| Bold - Windows fogged up on the inside |
161 |
| Marker - Automatic climate control:Windows fogged up on the inside |
161 |
| Para - Press the |
161 |
| Para - Switch off air recirculation, if selected. Press button� |
161 |
| Para - The fan is set to a higher speed and the warm air is directed to the defroster and windshi... |
161 |
| Para - Pressing the switch again returns the system to the previous setting. |
161 |
| Subsection - Automatic climate control:Windows fogged up on the outside |
161 |
| Title - Automatic climate control:Windows fogged up on the outside |
161 |
| Marker - Automatic climate control:Windows fogged up on the outside |
161 |
| Para - Switch on the windshield wiper. |
161 |
| Para - Close air outlet on dashboard top center (7, page� |
161 |
| Para - Switch to manual mode. |
161 |
| Para - Turn air distribution control switch to position� |
161 |
| Subsection - Automatic climate control:Air recirculation |
162 |
| Title - Automatic climate control:Air recirculation |
162 |
| Marker - Automatic climate control:Air recirculation |
162 |
| Para - Select air recirculation: |
162 |
| Para - Press button |
162 |
| Para - To switch off the air recirculation: |
162 |
| Para - Press button |
162 |
| Para - Switching on air recirculation and activating convenience closing of power windows and sli... |
162 |
| Para - Press button |
162 |
| Para - Switching off air recirculation and activating convenience opening: |
162 |
| Para - Press button |
162 |
| Para - A window or the sliding�/�pop-up roof opened manually after convenience closing will no lo... |
162 |
| Para - The system automatically switches from air recirculation to fresh air: |
162 |
| ItemizedList - • after 30�minutes if the outside temperature is above about�40 |
162 |
| Item - • after 30�minutes if the outside temperature is above about�40 |
162 |
| Item - • after 5�minutes if the outside temperature is below about 40 |
162 |
| Item - • after 5�minutes if economy mode |
162 |
| Para - The system switches automatically to air recirculation at high outside temperatures. A qua... |
162 |
| Para - If the windows should fog up from the inside, switch from recirculated air back to fresh air. |
162 |
| Subsection - Automatic climate control:Activated charcoal filter |
163 |
| Title - Automatic climate control:Activated charcoal filter |
163 |
| Marker - Automatic climate control:Activated charcoal filter |
163 |
| Para - An activated charcoal filter markedly reduces bad odors and removes pollutants from air en... |
163 |
| Para - To select, press |
163 |
| Para - To cancel, press button. The indicator lamp in the button goes out. |
163 |
| Para - The system switches automatically to the air recirculation mode, if the carbon monoxide�(C... |
163 |
| Para - The automatic air recirculation mode does not function if economy mode |
163 |
| Para - The activated charcoal filter should be switched off when windows fog up on the inside, or... |
163 |
| Para - Switching on the activated carbon filter and activating convenience closing of power windo... |
163 |
| Para - The indicator lamp in the |
163 |
| Para - Switching off activated carbon filter and activating convenience opening: |
163 |
| Para - The indicator lamp in the |
163 |
| Para - A window or the sliding�/�pop-up roof opened manually after convenience closing will no lo... |
163 |
| Subsection - Automatic climate control:Economy mode |
164 |
| Title - Automatic climate control:Economy mode |
164 |
| Marker - Automatic climate control:Economy mode |
164 |
| Para - The function of this setting corresponds to the automatic mode. However, because the air c... |
164 |
| Para - Press |
164 |
| Para - Press |
164 |
| Important - Important! |
164 |
| BlockTitle - Important! |
164 |
| Para - In the |
164 |
| Subsection - Automatic climate control - OFF/ON |
164 |
| Title - Automatic climate control - OFF/ON |
164 |
| Para - To switch the climate control off, set the air volume control switch to position�0. |
164 |
| Para - The fresh air supply to the vehicle interior is shut off. |
164 |
| Para - While driving, use this setting only temporarily, otherwise the windshield could fog up. |
164 |
| Para - To switch the climate control on again, press the |
164 |
| Subsection - Automatic climate control:Residual engine heat utilization |
165 |
| Title - Automatic climate control:Residual engine heat utilization |
165 |
| Marker - Automatic climate control:Residual engine heat utilization |
165 |
| Para - With the engine switched off, it is possible to continue to heat or ventilate the interior... |
165 |
| Para - To select: |
165 |
| Para - Turn the electronic key in starter switch to position�1 or�0 or remove it altogether. |
165 |
| Para - Press button |
165 |
| Para - This function selection will not activate if the battery level is insufficient. |
165 |
| Para - The function switches off automatically: |
165 |
| ItemizedList - • if the electronic key in starter switch is turned to position�2, |
165 |
| Item - • if the electronic key in starter switch is turned to position�2, |
165 |
| Item - • after approximately 30�minutes, |
165 |
| Item - • if the battery voltage drops. |
165 |
| Section - Rear window defroster |
166 |
| Title - Rear window defroster |
166 |
| Marker - Rear window defroster |
166 |
| Para - Turn the electronic key in starter switch to position�2. |
166 |
| Para - To select: |
166 |
| Para - Press the |
166 |
| Para - To cancel: |
166 |
| Para - Press the |
166 |
| Note - Note: |
166 |
| BlockTitle - Note: |
166 |
| Para - Heavy accumulation of snow and ice should be removed before activating the defroster. |
166 |
| Para - The rear window defroster uses a large amount of power. To keep the battery drain to a min... |
166 |
| Para - The defroster is automatically turned off after approximately 6–17�minutes of operation de... |
166 |
| Para - If several power consumers are turned on simultaneously, or the battery is only partially ... |
166 |
| Para - As soon as the battery has sufficient voltage, the defroster automatically turns itself ba... |
166 |
| Section - Front center console storage compartment ventilation |
167 |
| Title - Front center console storage compartment ventilation |
167 |
| Marker - Front center console storage compartment ventilation |
167 |
| Figure - <GRAPHIK> |
167 |
| Para - The front center console compartment has its own air outlet. |
167 |
| Para - To open: Raise lever (1). |
167 |
| Para - To close: Lower lever (1). |
167 |
| Para - The air volume is dependent on the setting of: |
167 |
| ItemizedList - • air distribution control, |
167 |
| Item - • air distribution control, |
167 |
| Item - • air volume control, |
167 |
| Item - • air outlets in the dashboard. |
167 |
| Para - The air temperature is about the same as that of the dashboard air outlets. It cannot be r... |
167 |
| Note - Notes: |
167 |
| BlockTitle - Notes: |
167 |
| Para - The compartment can get very warm due to its confined space. When storing heat sensitive o... |
167 |
| Para - Do not allow articles to obstruct the air outlet in the storage compartment. |
167 |
| Section - Automatic climate control:Adjustable air outlets, rear passenger compartment |
168 |
| Title - Automatic climate control:Adjustable air outlets, rear passenger compartment |
168 |
| Marker - Automatic climate control:Adjustable air outlets, rear passenger compartment |
168 |
| Figure - <GRAPHIK> |
168 |
| OrderedList - 1 Center air outlet, left |
168 |
| Item - 1 Center air outlet, left |
168 |
| Item - 2 Air volume control for center air outlets |
168 |
| ItemPara - To open: Turn the wheel upward. |
168 |
| Item - 3 Center air outlet, right |
168 |
| Note - Note: |
168 |
| BlockTitle - Note: |
168 |
| Para - The temperature at the air outlets for the rear passenger compartment�(1 and�3) is the sam... |
168 |
| Section - Operation Audio and telephone |
169 |
| Title - Operation Audio and telephone |
169 |
| Marker - Operation Audio and telephone |
169 |
| Para - These instructions are intended to help you become acquainted with your Mercedes�Benz audi... |
169 |
| Warning - <TABELLE> |
169 |
| TBody - <TABELLENHAUPTTEXT> |
169 |
| Row - <TABELLENREIHE> |
169 |
| Entry - Warning! |
169 |
| Para - Warning! |
169 |
| Para - In order to avoid distraction which could lead to an accident, system settings should be e... |
169 |
| Row - <TABELLENREIHE> |
169 |
| Entry - Bear in mind that at a speed of just 30�mph (approximately 50�km/h), your car is covering... |
169 |
| Para - Bear in mind that at a speed of just 30�mph (approximately 50�km/h), your car is covering ... |
169 |
| Section - Operating safety |
169 |
| Title - Operating safety |
169 |
| Marker - Operating safety |
169 |
| Warning - <TABELLE> |
169 |
| TBody - <TABELLENHAUPTTEXT> |
169 |
| Row - <TABELLENREIHE> |
169 |
| Entry - Warning! |
169 |
| Para - Warning! |
169 |
| Para - Any alterations made to electronic components can cause malfunctions. |
169 |
| Row - <TABELLENREIHE> |
169 |
| Entry - The radio, cassette deck, CD changer1 and telephone1 are interconnected. Therefore, when ... |
169 |
| Para - The radio, cassette deck, CD changer |
169 |
| Row - <TABELLENREIHE> |
169 |
| Entry - These malfunctions might seriously impair the operating safety of your vehicle. |
169 |
| Para - These malfunctions might seriously impair the operating safety of your vehicle. |
169 |
| Row - <TABELLENREIHE> |
169 |
| Entry - We recommend that you have any service work or alterations to electronic components done ... |
169 |
| Para - We recommend that you have any service work or alterations to electronic components done a... |
169 |
| Footnote - 1 Optional equipment |
169 |
| Footnote - Dolby and the double-D symbol |
169 |
| Section - Operating and display elements |
170 |
| Title - Operating and display elements |
170 |
| Marker - Operating and display elements |
170 |
| Figure - <GRAPHIK> |
170 |
| OrderedList - 1 On/off, volume |
170 |
| Item - 1 On/off, volume |
170 |
| Item - 2 Telephone mode selector |
170 |
| Item - 3 Seek tuning |
170 |
| Item - 4 Radio mode selector |
170 |
| Item - 5 Manual tuning |
170 |
| Item - 6 CD mode selector |
170 |
| Item - 7 Tape mode selector |
170 |
| Item - 8 Display panel The cassette slot is located behind the display panel. For notes on playin... |
171 |
| Item - 9 Alpha-numeric keypad for station storage and frequency entry |
171 |
| Item - 10 Scan tuning (Radio, see page� |
171 |
| Item - 11 Function button |
171 |
| Item - 12 Soft keys for radio band selection |
171 |
| Item - 13 Tape eject, see page� |
171 |
| Section - Button and soft key operation |
172 |
| Title - Button and soft key operation |
172 |
| Marker - Button and soft key operation |
172 |
| Para - In these instructions, the alpha-numeric keypad (right side of radio face) and the functio... |
172 |
| Note - Note: |
172 |
| BlockTitle - Note: |
172 |
| Para - Do not press directly on the radio display face. |
172 |
| Section - Operation |
172 |
| Title - Operation |
172 |
| Marker - Operation |
172 |
| Subsection - Switching on and off |
172 |
| Title - Switching on and off |
172 |
| Marker - Switching on and off |
172 |
| Para - Press the control knob |
172 |
| Para - The system is switched off when the electronic main key in the starter switch is turned to... |
172 |
| Note - Note: |
172 |
| BlockTitle - Note: |
172 |
| Para - The system can also be switched on separately with the electronic main key removed, but wi... |
172 |
| Subsection - Adjusting the volume |
173 |
| Title - Adjusting the volume |
173 |
| Marker - Adjusting the volume |
173 |
| Para - Turning the control knob clockwise will increase the volume, counterclockwise will decreas... |
173 |
| Note - Note: |
173 |
| BlockTitle - Note: |
173 |
| Para - The volume setting can be selected separately for the telephone, audio system and voice re... |
173 |
| Subsection - Audio functions |
173 |
| Title - Audio functions |
173 |
| Marker - Audio functions |
173 |
| Para - The |
173 |
| Subsection - Bass |
173 |
| Title - Bass |
173 |
| Marker - Bass |
173 |
| Para - <GRAPHIK> |
173 |
| Symbol - <GRAPHIK> |
173 |
| Para - Press the |
173 |
| Para - Pressing the |
173 |
| Subsection - Treble |
173 |
| Title - Treble |
173 |
| Marker - Treble |
173 |
| Para - <GRAPHIK> |
173 |
| Symbol - <GRAPHIK> |
173 |
| Para - Press the |
173 |
| Para - Pressing the |
173 |
| Subsection - Fader |
174 |
| Title - Fader |
174 |
| Para - <GRAPHIK> |
174 |
| Symbol - <GRAPHIK> |
174 |
| Para - Pressing the |
174 |
| Subsection - Balance |
174 |
| Title - Balance |
174 |
| Marker - Balance |
174 |
| Para - <GRAPHIK> |
174 |
| Symbol - <GRAPHIK> |
174 |
| Para - Press the |
174 |
| Para - Pressing the |
174 |
| Subsection - Centering all audio functions |
174 |
| Title - Centering all audio functions |
174 |
| Marker - Centering all audio functions |
174 |
| Para - <GRAPHIK> |
174 |
| Symbol - <GRAPHIK> |
174 |
| Subsection - Audio system tone level selection |
175 |
| Title - Audio system tone level selection |
175 |
| Marker - Audio system tone level selection |
175 |
| Para - To select the tone level settings for radio, cassette, and CD operation press the key |
175 |
| Para - Press the key |
175 |
| Para - The key |
175 |
| Para - The key |
175 |
| Section - Radio mode |
175 |
| Title - Radio mode |
175 |
| Marker - Radio mode |
175 |
| Subsection - Selecting radio mode |
175 |
| Title - Selecting radio mode |
175 |
| Marker - Selecting radio mode |
175 |
| Para - Press |
175 |
| Subsection - Selecting the band |
175 |
| Title - Selecting the band |
175 |
| Marker - Selecting the band |
175 |
| Para - <GRAPHIK> |
175 |
| Symbol - <GRAPHIK> |
175 |
| Subsection - Manual tuning |
176 |
| Title - Manual tuning |
176 |
| Marker - Manual tuning |
176 |
| Para - <GRAPHIK> |
176 |
| Symbol - <GRAPHIK> |
176 |
| Para - The first three tuning steps will take place without muting. The radio will then be muted ... |
176 |
| Subsection - Seek tuning |
176 |
| Title - Seek tuning |
176 |
| Marker - Seek tuning |
176 |
| Para - Press either the |
176 |
| Subsection - Scan tuning |
176 |
| Title - Scan tuning |
176 |
| Marker - Scan tuning |
176 |
| Para - <GRAPHIK> |
176 |
| Symbol - <GRAPHIK> |
176 |
| Subsection - Weather Band |
177 |
| Title - Weather Band |
177 |
| Marker - Weather Band |
177 |
| Para - Press the |
177 |
| Para - Use buttons |
177 |
| Subsection - Station memory |
177 |
| Title - Station memory |
177 |
| Marker - Station memory |
177 |
| Para - Ten stations each in the AM and FM bands can be stored via the alpha-numeric keypad. The |
177 |
| Subsection - Storing stations automatically (Autostore) |
177 |
| Title - Storing stations automatically (Autostore) |
177 |
| Marker - Storing stations automatically (Autostore) |
177 |
| Para - <GRAPHIK> |
177 |
| Symbol - <GRAPHIK> |
177 |
| Note - Note: |
177 |
| BlockTitle - Note: |
177 |
| Para - Autostore memory is in addition to the regular station memory. Previously stored stations ... |
177 |
| Para - Briefly press |
177 |
| Subsection - Storing stations |
178 |
| Title - Storing stations |
178 |
| Marker - Storing stations |
178 |
| Para - Hold the desired number button |
178 |
| Subsection - Retrieving a station from memory |
178 |
| Title - Retrieving a station from memory |
178 |
| Marker - Retrieving a station from memory |
178 |
| Para - Press the desired station button |
178 |
| Subsection - Direct frequency input AM and FM only |
178 |
| Title - Direct frequency input AM and FM only |
178 |
| Marker - Direct frequency input AM and FM only |
178 |
| Para - <GRAPHIK> |
178 |
| Symbol - <GRAPHIK> |
178 |
| Section - Cassette mode |
178 |
| Title - Cassette mode |
178 |
| Subsection - Playing cassettes |
178 |
| Title - Playing cassettes |
178 |
| Marker - Playing cassettes |
178 |
| Para - Press the |
178 |
| Note - Note: |
178 |
| BlockTitle - Note: |
178 |
| Para - Do not press directly on the display face. |
178 |
| Para - Return the display panel to its normal position by folding it back up and pressing gently ... |
178 |
| Important - Important! |
178 |
| BlockTitle - Important! |
178 |
| Para - If the display is in the down position for more than 20�seconds, 2�successive beeps will b... |
178 |
| Para - <GRAPHIK> |
179 |
| Symbol - <GRAPHIK> |
179 |
| Para - The cassette will not be ejected when the system is switched off or another mode is selected. |
179 |
| Para - If a cassette is in the mechanism, cassette mode can be selected by using the |
179 |
| Para - If no cassette has been inserted, the display will show |
179 |
| Subsection - Cassette eject |
179 |
| Title - Cassette eject |
179 |
| Marker - Cassette eject |
179 |
| Para - Press the |
179 |
| Note - Notes: |
179 |
| BlockTitle - Notes: |
179 |
| Para - The cassette will not be ejected when the system is switched off. If a cassette is not eje... |
179 |
| Important - Important! |
179 |
| BlockTitle - Important! |
179 |
| Para - If the display is in the down position for more than 20�seconds, 2�successive beeps will b... |
179 |
| Subsection - Track selection |
180 |
| Title - Track selection |
180 |
| Marker - Track selection |
180 |
| Para - <GRAPHIK> |
180 |
| Symbol - <GRAPHIK> |
180 |
| Subsection - Track search forwards/backwards |
180 |
| Title - Track search forwards/backwards |
180 |
| Marker - Track search forwards/backwards |
180 |
| Para - <GRAPHIK> |
180 |
| Symbol - <GRAPHIK> |
180 |
| Para - <GRAPHIK> |
180 |
| Symbol - <GRAPHIK> |
180 |
| Note - Note: |
180 |
| BlockTitle - Note: |
180 |
| Para - The beginning of a track can only be located if there is a break of at least 4�seconds bet... |
180 |
| Subsection - Fast forward/reverse |
180 |
| Title - Fast forward/reverse |
180 |
| Marker - Fast forward/reverse |
180 |
| Para - <GRAPHIK> |
180 |
| Symbol - <GRAPHIK> |
180 |
| Para - <GRAPHIK> |
180 |
| Symbol - <GRAPHIK> |
180 |
| Para - Fast forward/reverse is stopped by pressing the same button again, or it will stop automat... |
180 |
| Subsection - Scanning |
181 |
| Title - Scanning |
181 |
| Marker - Scanning |
181 |
| Para - <GRAPHIK> |
181 |
| Symbol - <GRAPHIK> |
181 |
| Subsection - Scanning |
181 |
| Title - Scanning |
181 |
| Marker - Scanning |
181 |
| Para - <GRAPHIK> |
181 |
| Symbol - <GRAPHIK> |
181 |
| Para - With the |
181 |
| Subsection - Dolby�NR |
181 |
| Title - Dolby�NR |
181 |
| Para - <GRAPHIK> |
181 |
| Symbol - <GRAPHIK> |
181 |
| Section - CD mode |
182 |
| Title - CD mode |
182 |
| Subsection - General notes on CD mode |
182 |
| Title - General notes on CD mode |
182 |
| Marker - General notes on CD mode |
182 |
| Para - Should excessive temperatures occur while in CD mode, |
182 |
| Para - Should temperatures occur while in CD mode which are too low, |
182 |
| Para - Handle CDs carefully to prevent interference during playback. |
182 |
| Para - Avoid fingerprints and dust on CDs. Do not write on the CDs or apply any label or other ma... |
182 |
| Para - Clean CDs from time to time with a commercially available cleaning cloth. No solvents, ant... |
182 |
| Para - Replace the CD in its container after use. Protect CDs from heat and direct sunlight. |
182 |
| Warning - <TABELLE> |
182 |
| TBody - <TABELLENHAUPTTEXT> |
182 |
| Row - <TABELLENREIHE> |
182 |
| Entry - Warning! |
182 |
| Para - Warning! |
182 |
| Para - The CD changer |
182 |
| Row - <TABELLENREIHE> |
182 |
| Entry - Do not remove the cover. The CD changer1 does not contain any parts which can be serviced... |
182 |
| Para - Do not remove the cover. The CD changer |
182 |
| Para - 1 Optional equipment |
182 |
| Footnote - 1 Optional equipment |
182 |
| Subsection - CD changer |
183 |
| Title - CD changer |
183 |
| Figure - <GRAPHIK> |
183 |
| OrderedList - 1 CD changer |
183 |
| Item - 1 CD changer |
183 |
| Item - 2 CD magazine |
183 |
| Item - 3 CD tray |
183 |
| Item - 4 CD |
183 |
| Para - If a CD changer |
183 |
| Subsection - Loading/emptying the CD magazine |
183 |
| Title - Loading/emptying the CD magazine |
183 |
| Marker - Loading/emptying the CD magazine |
183 |
| Marker - Audio system:CD changer |
183 |
| Para - Slide the changer door to the right until it latches open and press the eject button |
183 |
| Important - Important! |
183 |
| BlockTitle - Important! |
183 |
| Para - Close the door after the magazine has been inserted. |
183 |
| Subsection - Playing CDs |
184 |
| Title - Playing CDs |
184 |
| Marker - Playing CDs |
184 |
| Para - Press the |
184 |
| Para - <GRAPHIK> |
184 |
| Symbol - <GRAPHIK> |
184 |
| Para - <GRAPHIK> |
184 |
| Symbol - <GRAPHIK> |
184 |
| Subsection - Skipping tracks forward/backward |
184 |
| Title - Skipping tracks forward/backward |
184 |
| Marker - Skipping tracks forward/backward |
184 |
| Para - Press the |
184 |
| Para - Press the |
184 |
| Subsection - Fast forward/reverse |
185 |
| Title - Fast forward/reverse |
185 |
| Marker - Fast forward/reverse |
185 |
| Para - Press and hold the |
185 |
| Para - Press and hold the |
185 |
| Para - <GRAPHIK> |
185 |
| Symbol - <GRAPHIK> |
185 |
| Subsection - Scanning |
185 |
| Title - Scanning |
185 |
| Marker - Scanning |
185 |
| Para - Press the |
185 |
| Subsection - Random play/repeat function |
185 |
| Title - Random play/repeat function |
185 |
| Marker - Random play/repeat function |
185 |
| Para - The tracks of the current CD are played in random order when the random feature (RDM) is s... |
185 |
| Para - <GRAPHIK> |
185 |
| Symbol - <GRAPHIK> |
185 |
| Note - Note: |
185 |
| BlockTitle - Note: |
185 |
| Para - Both functions cannot be used simultaneously. |
185 |
| Subsection - Direct track selection |
186 |
| Title - Direct track selection |
186 |
| Marker - Direct track selection |
186 |
| Para - Tracks can be selected directly using the buttons on the alpha-numeric keypad. Press the |
186 |
| Subsection - |
186 |
| Title - |
186 |
| Marker - |
186 |
| Para - <GRAPHIK> |
186 |
| Symbol - <GRAPHIK> |
186 |
| Para - Pressing the function button |
186 |
| Section - Telephone operation |
186 |
| Title - Telephone operation |
186 |
| Para - Various functions of the Mercedes-Benz integrated portable cellular telephone |
186 |
| Subsection - Switching the telephone on and off |
186 |
| Title - Switching the telephone on and off |
186 |
| Marker - Switching the telephone on and off |
186 |
| Para - Switching on: Press the |
186 |
| Para - Switching off: Press and hold the |
186 |
| Footnote - 1 Optional equipment |
186 |
| Subsection - |
187 |
| Title - |
187 |
| Marker - |
187 |
| Para - Turning the control knob clockwise will increase the volume, counterclockwise will decreas... |
187 |
| Note - Note: |
187 |
| BlockTitle - Note: |
187 |
| Para - The volume setting can be selected separately for the telephone, audio system and voice re... |
187 |
| Subsection - Entering telephone number and starting dialing process |
187 |
| Title - Entering telephone number and starting dialing process |
187 |
| Marker - Entering telephone number and starting dialing process |
187 |
| Para - <GRAPHIK> |
187 |
| Symbol - <GRAPHIK> |
187 |
| Para - Press the |
187 |
| Para - Press and hold the |
187 |
| Subsection - Calling up the phone book |
187 |
| Title - Calling up the phone book |
187 |
| Marker - Calling up the phone book |
187 |
| Para - The numbers stored in the telephone number memory can be called up via either name or numb... |
187 |
| Subsection - Switching between name search and number search |
187 |
| Title - Switching between name search and number search |
187 |
| Marker - Switching between name search and number search |
187 |
| Para - Press |
187 |
| Para - Press |
187 |
| Subsection - Searching and selecting telephone book entries by name |
188 |
| Title - Searching and selecting telephone book entries by name |
188 |
| Para - <GRAPHIK> |
188 |
| Symbol - <GRAPHIK> |
188 |
| Para - Using the buttons |
188 |
| Note - Note: |
188 |
| BlockTitle - Note: |
188 |
| Para - Some signs and symbols cannot be displayed. |
188 |
| Subsection - Searching and selecting phone book entries by number |
188 |
| Title - Searching and selecting phone book entries by number |
188 |
| Marker - Searching and selecting phone book entries by number |
188 |
| Para - <GRAPHIK> |
188 |
| Symbol - <GRAPHIK> |
188 |
| Subsection - Placing a call |
188 |
| Title - Placing a call |
188 |
| Marker - Placing a call |
188 |
| Para - <GRAPHIK> |
188 |
| Symbol - <GRAPHIK> |
188 |
| Subsection - Manual repeat dialing (redial) |
189 |
| Title - Manual repeat dialing (redial) |
189 |
| Marker - Manual repeat dialing (redial) |
189 |
| Para - The last number entered can be re-selected by pressing the |
189 |
| Para - <GRAPHIK> |
189 |
| Symbol - <GRAPHIK> |
189 |
| Subsection - Automatic repeat dialing (redial) |
189 |
| Title - Automatic repeat dialing (redial) |
189 |
| Marker - Automatic repeat dialing (redial) |
189 |
| Para - If no call can be placed, press the |
189 |
| Para - REDIAL |
189 |
| Quotes - REDIAL |
189 |
| Subsection - Abbreviated dialing from previously stored telephone numbers |
189 |
| Title - Abbreviated dialing from previously stored telephone numbers |
189 |
| Subtitle - Quick-dialing |
189 |
| Bold - Quick-dialing |
189 |
| Para - <GRAPHIK> |
189 |
| Symbol - <GRAPHIK> |
189 |
| Para - Press the soft key |
189 |
| Subsection - Speed dialing |
189 |
| Title - Speed dialing |
189 |
| Marker - Speed dialing |
189 |
| Para - Enter the memory location desired with buttons |
189 |
| Para - To correct the last digit press the soft key |
189 |
| Para - The abbreviation |
189 |
| Subsection - Turbo-dialing |
190 |
| Title - Turbo-dialing |
190 |
| Marker - Turbo-dialing |
190 |
| Para - Press one of the number buttons |
190 |
| Para - The phone number or the name stored at this memory location will appear on the screen. |
190 |
| Para - When the call is initiated, the call time will appear on the display. |
190 |
| Note - Note: |
190 |
| BlockTitle - Note: |
190 |
| Para - Please be aware that button |
190 |
| Subsection - Multi party call |
190 |
| Title - Multi party call |
190 |
| Marker - Multi party call |
190 |
| Para - While on the telephone, a second call can be accepted by pressing the |
190 |
| Para - An additional call can be accepted after ending one of the previous calls. |
190 |
| Subsection - Accepting incoming call in telephone mode |
190 |
| Title - Accepting incoming call in telephone mode |
190 |
| Marker - Accepting incoming call in telephone mode |
190 |
| Para - <GRAPHIK> |
190 |
| Symbol - <GRAPHIK> |
190 |
| Subsection - Accepting incoming call in tape, CD or radio mode |
190 |
| Title - Accepting incoming call in tape, CD or radio mode |
190 |
| Marker - Accepting incoming call in tape, CD or radio mode |
190 |
| Para - If the telephone is activated in the background (symbol |
190 |
| Subsection - Terminating call |
191 |
| Title - Terminating call |
191 |
| Marker - Terminating call |
191 |
| Para - A current call can be terminated by pressing the |
191 |
| Subsection - Muting a call |
191 |
| Title - Muting a call |
191 |
| Marker - Muting a call |
191 |
| Para - <GRAPHIK> |
191 |
| Symbol - <GRAPHIK> |
191 |
| Subsection - Component malfunctions |
191 |
| Title - Component malfunctions |
191 |
| Marker - Component malfunctions |
191 |
| Para - The radio, CD changer |
191 |
| Para - 1 Optional equipment |
191 |
| Footnote - 1 Optional equipment |
191 |
| Subsection - Emergency call |
192 |
| Title - Emergency call |
192 |
| Important - Important! |
192 |
| BlockTitle - Important! |
192 |
| Para - If you press button |
192 |
| Para - The 911 emergency call system is a public service. Using it without due cause is a crimina... |
192 |
| Para - You can make an emergency call to an emergency rescue station with a mobile communications... |
192 |
| Para - The emergency call will be placed as long as the corresponding mobile communications netwo... |
192 |
| Para - The call will also be placed if the unlock-code is not entered. |
192 |
| Para - Emergency calls may not be possible with all telephone networks or if certain network serv... |
192 |
| Para - To use this function you must ensure that the number stored in memory location 1 is the nu... |
192 |
| Note - Note: |
192 |
| BlockTitle - Note: |
192 |
| Para - <GRAPHIK> |
192 |
| Symbol - <GRAPHIK> |
192 |
| Section - Power windows |
193 |
| Title - Power windows |
193 |
| Marker - Power windows |
193 |
| Figure - <GRAPHIK> |
193 |
| Para - The control panel is located on the driver’s door. |
193 |
| Para - Switches for: |
193 |
| OrderedList - 1 left, front |
193 |
| Item - 1 left, front |
193 |
| Item - 2 right, front |
193 |
| Item - 3 left, rear |
193 |
| Item - 4 right, rear |
193 |
| Para - There are individual switches in the front passenger door and the rear doors for the respe... |
193 |
| Para - Turn electronic key in starter switch to position�1 or�2. |
193 |
| Para - Opening the windows: Press the switch to resistance point. |
193 |
| Para - Closing the windows: Pull the switch to resistance point. |
193 |
| Para - Release switch when window is in desired position. |
193 |
| Subsection - Power windows:Express opening and closing |
194 |
| Title - Power windows:Express opening and closing |
194 |
| Marker - Power windows:Express opening and closing |
194 |
| Para - Press or pull switch past resistance point and release�– window opens or closes completely. |
194 |
| Para - To interrupt procedure, briefly press or pull switch. |
194 |
| Para - If the upward movement of the window is blocked during the closing procedure, the window w... |
194 |
| Para - When pulling and holding the switch to close the window, and upward movement of the window... |
194 |
| Note - Note: |
194 |
| BlockTitle - Note: |
194 |
| Para - The power windows can also be opened and closed using the convenience opening�/�closing fe... |
194 |
| Warning - <TABELLE> |
194 |
| TBody - <TABELLENHAUPTTEXT> |
194 |
| Row - <TABELLENREIHE> |
194 |
| Entry - |
194 |
| Row - <TABELLENREIHE> |
194 |
| Entry - Warning! |
194 |
| Para - Warning! |
194 |
| Para - When closing the windows, be sure that there is no danger of anyone being harmed by the cl... |
194 |
| Row - <TABELLENREIHE> |
194 |
| Entry - In case of obstruction, the automatic reversal will not operate if a window is being clos... |
194 |
| Para - In case of obstruction, the automatic reversal will not operate if a window is being close... |
194 |
| Row - <TABELLENREIHE> |
194 |
| Entry - The closing procedure can be immediately reversed by either pressing or pulling the switc... |
194 |
| Para - The closing procedure can be immediately reversed by either pressing or pulling the switch... |
194 |
| Row - <TABELLENREIHE> |
194 |
| Entry - When leaving the vehicle, always remove the electronic key from starter switch, and lock ... |
194 |
| Para - When leaving the vehicle, always remove the electronic key from starter switch, and lock y... |
194 |
| Subsection - Power windows:Blocking of rear door window operation |
195 |
| Title - Power windows:Blocking of rear door window operation |
195 |
| Marker - Power windows:Blocking of rear door window operation |
195 |
| Figure - <GRAPHIK> |
195 |
| Para - The switch�(1) is located on the driver’s door. |
195 |
| Para - If no operation of the rear windows by switch (for instance by children) is desired, slide... |
195 |
| Para - Operation of the rear door windows with the switches located in the driver’s door is still... |
195 |
| Subsection - Power windows:Synchronizing power windows |
195 |
| Title - Power windows:Synchronizing power windows |
195 |
| Marker - Power windows:Synchronizing power windows |
195 |
| Para - If the power supply was interrupted, (battery disconnected or low), the windows cannot be ... |
195 |
| Para - To resynchronize the express feature, pull switch until the window is completely closed an... |
195 |
| Para - The automatic full opening and closing procedure of the windows should now be restored. |
195 |
| Section - Sliding/pop-up roof |
196 |
| Title - Sliding/pop-up roof |
196 |
| Marker - Sliding/pop-up roof |
196 |
| Figure - <GRAPHIK> |
196 |
| OrderedList - 1 to slide roof open |
196 |
| Item - 1 to slide roof open |
196 |
| Item - 2 to slide roof closed |
196 |
| Item - 3 to raise roof at rear |
196 |
| Item - 4 to lower roof at rear |
196 |
| Para - Turn the electronic key in starter switch to position�1 or�2. |
196 |
| Para - To open, close, raise or lower the sliding/pop-up roof: Move the switch to resistance poin... |
196 |
| Para - Release the switch when the roof has reached the required position. |
196 |
| Warning - <TABELLE> |
196 |
| TBody - <TABELLENHAUPTTEXT> |
196 |
| Row - <TABELLENREIHE> |
196 |
| Entry - Warning! |
196 |
| Para - Warning! |
196 |
| Para - When closing the sliding�/�pop-up roof, be sure that there is no danger of anyone being ha... |
196 |
| Row - <TABELLENREIHE> |
196 |
| Entry - When leaving the vehicle, always remove the electronic key from starter switch, and lock ... |
196 |
| Para - When leaving the vehicle, always remove the electronic key from starter switch, and lock y... |
196 |
| Subsection - Opening or closing the sliding�/�pop-up roof automatically |
197 |
| Title - Opening or closing the sliding�/�pop-up roof automatically |
197 |
| Para - Move the switch past resistance point in the direction required and release. |
197 |
| Para - The sliding�/�pop-up roof opens or closes completely. |
197 |
| Para - Stopping the sliding�/�pop-up roof: Move the switch in any direction. |
197 |
| Para - If the movement of the sliding�/�pop-up roof is blocked during the closing procedure, the ... |
197 |
| Warning - <TABELLE> |
197 |
| TBody - <TABELLENHAUPTTEXT> |
197 |
| Row - <TABELLENREIHE> |
197 |
| Entry - Warning! |
197 |
| Para - Warning! |
197 |
| Para - When closing the sliding�/�pop-up roof, be sure that there is no danger of anyone being ha... |
197 |
| Row - <TABELLENREIHE> |
197 |
| Entry - When leaving the vehicle, always remove the electronic key from starter switch, and lock ... |
197 |
| Para - When leaving the vehicle, always remove the electronic key from starter switch, and lock y... |
197 |
| Para - With the roof closed or tilted open, a screen can be slid into the roof opening to guard a... |
197 |
| Note - Notes: |
197 |
| BlockTitle - Notes: |
197 |
| Para - The sliding�/�pop-up roof can also be opened and closed using the summer opening�/�conveni... |
197 |
| Para - To avoid damaging the seals, do not transport any objects with sharp edges which can stick... |
197 |
| Para - The sliding/pop-up roof can be opened or closed manually should an electrical malfunction ... |
197 |
| Subsection - Sliding/pop-up roof:Synchronizing |
197 |
| Title - Sliding/pop-up roof:Synchronizing |
197 |
| Marker - Sliding/pop-up roof:Synchronizing |
197 |
| Para - The sliding�/�pop-up roof must be resynchronized if the power supply has been interrupted ... |
197 |
| ItemizedList - • Press the switch in the |
197 |
| Item - • Press the switch in the |
197 |
| Section - Interior lighting |
198 |
| Title - Interior lighting |
198 |
| Marker - Interior lighting |
198 |
| Figure - <GRAPHIK> |
198 |
| OrderedList - 1 Rear interior lights |
198 |
| Item - 1 Rear interior lights |
198 |
| ItemPara - Press the button to switch the rear passenger compartment lights on�/�off. |
198 |
| Item - 2 Right front reading lamp |
198 |
| ItemPara - Press the button to switch the reading lamp on or off. The right reading lamp will be ... |
198 |
| Item - 3 To switch off automatic function: Press the rocker switch. |
198 |
| ItemPara - The interior lighting remains switched off, even when unlocking the vehicle or opening... |
198 |
| Item - 4 To select automatic function: Press the rocker switch to the center position. |
198 |
| ItemPara - Interior lamps are switched on, and off (soft fade) delayed, when unlocking or locking... |
198 |
| Item - 5 Interior lamps, front: Press rocker switch in to switch front interior lamps on. The int... |
198 |
| ItemPara - Switching off the front interior lighting: Press rocker switch to position�(3) or�(4). |
198 |
| Item - 6 Left front reading lamp: Press the button to switch the reading lamp on or off. The left... |
198 |
| Note - Notes: |
199 |
| BlockTitle - Notes: |
199 |
| Para - The time delay for the interior light to switch off after the electronic key is removed fr... |
199 |
| Para - To prevent the vehicle battery from being discharged with doors open, all interior lamps s... |
199 |
| Para - An interior lamp switched on manually does not go out automatically. Before leaving the ve... |
199 |
| Subsection - Door entry lamps |
199 |
| Title - Door entry lamps |
199 |
| Para - The appropriate entry lamp switches on if a door is opened in darkness and if the interior... |
199 |
| Para - The entry lamp switches off automatically when the door is closed. |
199 |
| Section - Rear window sunshade |
200 |
| Title - Rear window sunshade |
200 |
| Marker - Rear window sunshade |
200 |
| Figure - <GRAPHIK> |
200 |
| Para - The switch is located in the center console. |
200 |
| Para - Turn the electronic key in starter switch to position�1 or�2. |
200 |
| Para - Press the switch briefly: |
200 |
| OrderedList - 1 to raise |
200 |
| Item - 1 to raise |
200 |
| Item - 2 to lower |
200 |
| Para - Always raise the sunshade fully for its support against the window frame. |
200 |
| Warning - <TABELLE> |
200 |
| TBody - <TABELLENHAUPTTEXT> |
200 |
| Row - <TABELLENREIHE> |
200 |
| Entry - Warning! |
200 |
| Para - Warning! |
200 |
| Para - When operating the rear window sunshade, be sure that there is no danger of anyone being h... |
200 |
| Row - <TABELLENREIHE> |
200 |
| Entry - The raising or lowering procedure can be immediately halted by briefly pressing the upper... |
200 |
| Para - The raising or lowering procedure can be immediately halted by briefly pressing the upper ... |
200 |
| Row - <TABELLENREIHE> |
200 |
| Entry - Briefly press upper or lower half of the switch again to raise or lower the rear window s... |
200 |
| Para - Briefly press upper or lower half of the switch again to raise or lower the rear window su... |
200 |
| Row - <TABELLENREIHE> |
200 |
| Entry - When leaving the vehicle, always remove the electronic key from starter switch, and lock ... |
200 |
| Para - When leaving the vehicle, always remove the electronic key from starter switch, and lock y... |
200 |
| Section - Sun visors |
201 |
| Title - Sun visors |
201 |
| Marker - Sun visors |
201 |
| Figure - <GRAPHIK> |
201 |
| Para - Swing sun visors�(2) down�(arrow�3) to protect against sun glare. |
201 |
| Para - If sunlight enters through a side window, disengage sun visor�(2) from the inner mounting�... |
201 |
| Section - Vanity mirrors |
201 |
| Title - Vanity mirrors |
201 |
| Marker - Vanity mirrors |
201 |
| Figure - <GRAPHIK> |
201 |
| OrderedList - 1 Illuminated vanity mirror |
201 |
| Item - 1 Illuminated vanity mirror |
201 |
| ItemPara - With the visor engaged in its inner mounting�(2), the lamp�(4) can be switched on by o... |
201 |
| ItemPara - Fold the cover�(3) down to close the vanity mirror. |
201 |
| Warning - <TABELLE> |
201 |
| TBody - <TABELLENHAUPTTEXT> |
201 |
| Row - <TABELLENREIHE> |
201 |
| Entry - Warning! |
201 |
| Para - Warning! |
201 |
| Para - Do not use the vanity mirror while driving. |
201 |
| Section - Interior |
202 |
| Title - Interior |
202 |
| Marker - Interior |
202 |
| Warning - <TABELLE> |
202 |
| TBody - <TABELLENHAUPTTEXT> |
202 |
| Row - <TABELLENREIHE> |
202 |
| Entry - Warning! |
202 |
| Para - Warning! |
202 |
| Para - To help avoid personal injury during a collision or sudden maneuver, exercise care when st... |
202 |
| Row - <TABELLENREIHE> |
202 |
| Entry - Luggage nets cannot secure hard or heavy objects. |
202 |
| Para - Luggage nets cannot secure hard or heavy objects. |
202 |
| Section - Storage compartments and armrests |
202 |
| Title - Storage compartments and armrests |
202 |
| Marker - Storage compartments and armrests |
202 |
| Warning - <TABELLE> |
202 |
| TBody - <TABELLENHAUPTTEXT> |
202 |
| Row - <TABELLENREIHE> |
202 |
| Entry - Warning! |
202 |
| Para - Warning! |
202 |
| Para - Keep compartment lids closed. This will help to prevent stored objects from being thrown a... |
202 |
| Subsection - Glove box |
203 |
| Title - Glove box |
203 |
| Marker - Glove box |
203 |
| Figure - <GRAPHIK> |
203 |
| OrderedList - 1 Unlocked position |
203 |
| Item - 1 Unlocked position |
203 |
| Item - 2 Locked position |
203 |
| Item - 3 Glove box |
203 |
| Item - 4 Glove box lid release Pull to open |
203 |
| Note - Notes: |
203 |
| BlockTitle - Notes: |
203 |
| Para - Prior to closing the glove box, close the compartment for glasses first. |
203 |
| Para - The glove box can be locked and unlocked with the mechanical key. See page� |
203 |
| Subsection - P68.00-2161-26 |
204 |
| Title - P68.00-2161-26 |
204 |
| Marker - P68.00-2161-26 |
204 |
| Figure - <GRAPHIK> |
204 |
| OrderedList - 5 Storage compartment in front of armrest |
204 |
| Item - 5 Storage compartment in front of armrest |
204 |
| Para - To open: Slide cover�(5) rearward. |
204 |
| Para - To close: Slide cover�(5) forward. |
204 |
| Note - Note: |
204 |
| BlockTitle - Note: |
204 |
| Para - The compartment contains a lighter (see page� |
204 |
| Subsection - P68.00-2163-26 |
205 |
| Title - P68.00-2163-26 |
205 |
| Marker - P68.00-2163-26 |
205 |
| Figure - <GRAPHIK> |
205 |
| Para - To open compartment in armrest: Lift armrest by handle�(6). |
205 |
| Para - To open compartment under armrest: Lift armrest by handle�(7). |
205 |
| Para - To close: Lower armrest until it engages in lock. |
205 |
| Para - To change inclination of armrest: Pull up on armrest. |
205 |
| Para - To lower armrest: Pull handle (7). |
205 |
| Note - Notes: |
205 |
| BlockTitle - Notes: |
205 |
| Para - The storage compartment can be heated or cooled, see page� |
205 |
| Para - The compartment can get very warm due to its confined space. When storing heat sensitive o... |
205 |
| Para - Do not obstruct the air outlet in the storage compartment. |
205 |
| Section - Cup holder |
206 |
| Title - Cup holder |
206 |
| Marker - Cup holder |
206 |
| Figure - <GRAPHIK> |
206 |
| OrderedList - 1 Cup holder in front seat armrest |
206 |
| Item - 1 Cup holder in front seat armrest |
206 |
| Para - Open the storage compartment in front of the armrest, see�page� |
206 |
| Para - Close the storage compartment in front of the armrest, see�page� |
206 |
| Para - . |
206 |
| Warning - <TABELLE> |
206 |
| TBody - <TABELLENHAUPTTEXT> |
206 |
| Row - <TABELLENREIHE> |
206 |
| Entry - Warning! |
206 |
| Para - Warning! |
206 |
| Para - Keep the cup holder closed while traveling. Place only containers that fit into the cup ho... |
206 |
| OrderedList - P91.27-2014-26 |
207 |
| Item - P91.27-2014-26 |
207 |
| Marker - P91.27-2014-26 |
207 |
| Graphic - <GRAPHIK> |
207 |
| Para - To open: Push front of sliding compartment – the cup holder slides out. |
207 |
| Para - To close: Push the sliding compartment back until it engages. |
207 |
| Warning - <TABELLE> |
207 |
| TBody - <TABELLENHAUPTTEXT> |
207 |
| Row - <TABELLENREIHE> |
207 |
| Entry - Warning! |
207 |
| Para - Warning! |
207 |
| Para - Keep the cup holder closed while traveling. Place only containers that fit into the cup ho... |
207 |
| Section - Ashtrays |
208 |
| Title - Ashtrays |
208 |
| Marker - Ashtrays |
208 |
| Subtitle - Center console |
208 |
| Bold - Center console |
208 |
| Para - To open: Briefly touch the mark on the cover, the ashtray opens automatically. |
208 |
| Para - To remove ashtray insert from center console: |
208 |
| Warning - <TABELLE> |
208 |
| TBody - <TABELLENHAUPTTEXT> |
208 |
| Row - <TABELLENREIHE> |
208 |
| Entry - Warning! |
208 |
| Para - Warning! |
208 |
| Para - Remove front ashtray only with vehicle standing still. With the gear selector lever in pos... |
208 |
| Para - Prior to removing the ashtray insert, move the gear selector lever to position� |
208 |
| Para - <GRAPHIK> |
208 |
| Graphic - <GRAPHIK> |
208 |
| Marker - P68.20-0507-26 |
208 |
| Para - To replace insert: Install insert into ashtray frame and push down to engage into place. |
208 |
| Subsection - Rear seats |
209 |
| Title - Rear seats |
209 |
| Figure - <GRAPHIK> |
209 |
| Subtitle - To open ashtray: |
209 |
| Para - Pull at top of cover. |
209 |
| Subtitle - To remove insert: |
209 |
| Para - Press latch (2) and remove insert. |
209 |
| Subtitle - To replace insert: |
209 |
| Para - Install insert and close the ashtray. |
209 |
| Section - Lighter |
210 |
| Title - Lighter |
210 |
| Marker - Lighter |
210 |
| Figure - <GRAPHIK> |
210 |
| OrderedList - 1 Center console lighter |
210 |
| Item - 1 Center console lighter |
210 |
| Para - The lighter is located in the center console compartment in front of the armrest, see�page� |
210 |
| Para - Turn the electronic key in starter switch to position�1 or�2. |
210 |
| Para - Push in lighter in�(1); it will pop out automatically when hot. |
210 |
| Warning - <TABELLE> |
210 |
| TBody - <TABELLENHAUPTTEXT> |
210 |
| Row - <TABELLENREIHE> |
210 |
| Entry - Warning! |
210 |
| Para - Warning! |
210 |
| Para - Never touch the heating element or sides of the lighter, they are extremely hot, hold at k... |
210 |
| Row - <TABELLENREIHE> |
210 |
| Entry - When leaving the vehicle always remove the electronic key from the starter switch. Do not... |
210 |
| Para - When leaving the vehicle always remove the electronic key from the starter switch. Do not ... |
210 |
| Note - Note: |
210 |
| BlockTitle - Note: |
210 |
| Para - The lighter can be operated with electronic key in starter switch position�1 or�2. |
210 |
| Para - The lighter socket can be used to accommodate electrical accessories up to a maximum 85�W. |
210 |
| Section - Parcel net in front passenger footwell |
211 |
| Title - Parcel net in front passenger footwell |
211 |
| Marker - Parcel net in front passenger footwell |
211 |
| Para - A small convenience parcel net is located in the front passenger footwell. It is for small... |
211 |
| Warning - <TABELLE> |
211 |
| TBody - <TABELLENHAUPTTEXT> |
211 |
| Row - <TABELLENREIHE> |
211 |
| Entry - Warning! |
211 |
| Para - Warning! |
211 |
| Para - Do not place heavy or fragile objects, or objects having sharp edges, in the parcel net. |
211 |
| Row - <TABELLENREIHE> |
211 |
| Entry - In an accident, during hard braking or sudden maneuvers, they could be thrown around insi... |
211 |
| Para - In an accident, during hard braking or sudden maneuvers, they could be thrown around insid... |
211 |
| Section - Ski sack |
211 |
| Title - Ski sack |
211 |
| Figure - <GRAPHIK> |
211 |
| Subtitle - Unfolding and loading |
211 |
| Bold - Unfolding and loading |
211 |
| OrderedList - 1. Fold armrest down (arrow). |
211 |
| Item - 1. Fold armrest down (arrow). |
211 |
| Item - 2. Swing cover�(1) down. |
211 |
| Item - <GRAPHIK> |
212 |
| Graphic - <GRAPHIK> |
212 |
| Item - <GRAPHIK> |
212 |
| Graphic - <GRAPHIK> |
212 |
| Item - <GRAPHIK> |
213 |
| Graphic - <GRAPHIK> |
213 |
| Warning - <TABELLE> |
213 |
| TBody - <TABELLENHAUPTTEXT> |
213 |
| Row - <TABELLENREIHE> |
213 |
| Entry - Warning! |
213 |
| Para - Warning! |
213 |
| Para - The ski sack is designed for up to four pairs of skis. Do not load the ski sack with other... |
213 |
| Row - <TABELLENREIHE> |
213 |
| Entry - Always fasten the ski sack securely. In an accident, an unfastened ski sack can cause inj... |
213 |
| Para - Always fasten the ski sack securely. In an accident, an unfastened ski sack can cause inju... |
213 |
| OrderedList - <GRAPHIK> |
213 |
| Item - <GRAPHIK> |
213 |
| Graphic - <GRAPHIK> |
213 |
| Item - 7. Close clasp�(arrows 4 and 5) and pull strap tight to immobilize skis. |
213 |
| Item - <GRAPHIK> |
214 |
| Graphic - <GRAPHIK> |
214 |
| Subtitle - Unloading and folding |
214 |
| Bold - Unloading and folding |
214 |
| OrderedList - 1. Loosen strap, open clasp by pressing tabs (arrows) together, and unload skis. |
214 |
| Item - 1. Loosen strap, open clasp by pressing tabs (arrows) together, and unload skis. |
214 |
| Item - 2. Close flap in trunk. |
214 |
| Item - 3. Disconnect snap hook�(6) from eye�(7). |
214 |
| Item - 4. Fold and flatten ski sack lengthwise and place folded ski sack inside recess of backrest. |
214 |
| Item - <GRAPHIK> |
215 |
| Graphic - <GRAPHIK> |
215 |
| Subsection - Removal of ski sack |
215 |
| Title - Removal of ski sack |
215 |
| Para - For removal of the ski sack we recommend that you contact an authorized Mercedes-Benz Center. |
215 |
| Note - Note: |
215 |
| BlockTitle - Note: |
215 |
| Para - To prevent unauthorized persons from access to the trunk, always close the pass-through. |
215 |
| Section - Enlarged cargo area |
216 |
| Title - Enlarged cargo area |
216 |
| Figure - <GRAPHIK> |
216 |
| OrderedList - 1. Pull handle (1) located in trunk to unlock backrest. |
216 |
| Item - 1. Pull handle (1) located in trunk to unlock backrest. |
216 |
| Para - On vehicles with optional split folding rear seat backrest you can fold down the two secti... |
216 |
| Subsection - Split folding rear seat bench |
216 |
| Title - Split folding rear seat bench |
216 |
| Figure - <GRAPHIK> |
216 |
| OrderedList - 2. Pull handle (2) and fold seat cushion (3) forward. |
216 |
| Item - 2. Pull handle (2) and fold seat cushion (3) forward. |
216 |
| Item - 3. Fully retract and fold down head restraints, see page� |
216 |
| Item - 4. Fold backrest (4) forward. |
216 |
| Subsection - Setting up rear seat bench |
217 |
| Title - Setting up rear seat bench |
217 |
| Bold - Setting up rear seat bench |
217 |
| Figure - <GRAPHIK> |
217 |
| OrderedList - 1. Pull backrest�(4) up until it locks in its upright position. Check for secure lo... |
217 |
| Item - 1. Pull backrest�(4) up until it locks in its upright position. Check for secure locking b... |
217 |
| ItemPara - The pop�up indicators�(5) (left and right backrest section) are visible in unlocked po... |
217 |
| Item - 2. Fold seat cushion (3) back until it locks in place. Check for secure locking by pressin... |
217 |
| Subsection - |
217 |
| Title - |
217 |
| Figure - <GRAPHIK> |
217 |
| Warning - <TABELLE> |
217 |
| TBody - <TABELLENHAUPTTEXT> |
217 |
| Row - <TABELLENREIHE> |
217 |
| Entry - Warning! |
217 |
| Para - Warning! |
217 |
| Para - Always lock backrest in its upright position when rear seat bench is occupied by passenger... |
217 |
| Note - Note: |
217 |
| BlockTitle - Note: |
217 |
| Para - To prevent unauthorized persons from access to the trunk, always lock backrest in its upri... |
217 |
| Section - Loading instructions |
218 |
| Title - Loading instructions |
218 |
| Figure - <GRAPHIK> |
218 |
| Para - The total load weight including vehicle occupants and luggage/cargo should not exceed the ... |
218 |
| Para - The handling characteristics of a fully loaded vehicle depend greatly on the load distribu... |
218 |
| Para - Always place items being carried against front or rear seat backrests, and fasten them as ... |
218 |
| Para - The heaviest portion of the cargo should always be kept as low as possible since it influe... |
218 |
| Note - Note: |
218 |
| BlockTitle - Note: |
218 |
| Para - The trunk is the preferred place to carry objects. |
218 |
| Para - The enlarged cargo area should only be used for items which do not fit in the trunk alone. |
218 |
| Warning - <TABELLE> |
218 |
| TBody - <TABELLENHAUPTTEXT> |
218 |
| Row - <TABELLENREIHE> |
218 |
| Entry - |
218 |
| Row - <TABELLENREIHE> |
219 |
| Entry - Warning! |
219 |
| Para - Warning! |
219 |
| Para - In an accident, during hard braking or sudden maneuvers, loose items will be thrown around... |
219 |
| Row - <TABELLENREIHE> |
219 |
| Entry - To help avoid personal injury during a collision or sudden maneuver, exercise care when s... |
219 |
| Para - To help avoid personal injury during a collision or sudden maneuver, exercise care when st... |
219 |
| Row - <TABELLENREIHE> |
219 |
| Entry - Never drive vehicle with trunk lid open while seat backrest sections not locked in their ... |
219 |
| Para - Never drive vehicle with trunk lid open while seat backrest sections not locked in their u... |
219 |
| Section - Cellular telephone |
219 |
| Title - Cellular telephone |
219 |
| Marker - Cellular telephone |
219 |
| Para - The vehicle is prepared for the installation of a cellular telephone. For further informat... |
219 |
| Warning - <TABELLE> |
219 |
| TBody - <TABELLENHAUPTTEXT> |
219 |
| Row - <TABELLENREIHE> |
219 |
| Entry - Warning! |
219 |
| Para - Warning! |
219 |
| Para - Some jurisdictions prohibit the driver from using a cellular telephone while driving a veh... |
219 |
| Para - Stop the vehicle in a safe location before answering or placing a call. |
219 |
| Section - Telephone, general |
220 |
| Title - Telephone, general |
220 |
| Marker - Telephone, general |
220 |
| Warning - <TABELLE> |
220 |
| TBody - <TABELLENHAUPTTEXT> |
220 |
| Row - <TABELLENREIHE> |
220 |
| Entry - Warning! |
220 |
| Para - Warning! |
220 |
| Para - A driver’s attention to the road must always be his�/ �her primary focus when driving. For... |
220 |
| Row - <TABELLENREIHE> |
220 |
| Entry - Some jurisdictions prohibit the driver from using a cellular telephone while driving a ve... |
220 |
| Para - Some jurisdictions prohibit the driver from using a cellular telephone while driving a veh... |
220 |
| Row - <TABELLENREIHE> |
220 |
| Entry - |
220 |
| Row - <TABELLENREIHE> |
220 |
| Entry - Bear in mind that at a speed of just 30�mph (approximately 50�km�/�h), your vehicle is co... |
220 |
| Para - Bear in mind that at a speed of just 30�mph (approximately 50�km�/�h), your vehicle is cov... |
220 |
| Row - <TABELLENREIHE> |
220 |
| Entry - Never operate radio transmitters equipped with a built-in or attached antenna (i.e. witho... |
220 |
| Para - Never operate radio transmitters equipped with a built-in or attached antenna (i.e. withou... |
220 |
| Para - See separate instruction manual for instructions on how to operate the telephone. |
220 |
| Section - Garage door opener |
221 |
| Title - Garage door opener |
221 |
| Marker - Garage door opener |
221 |
| Figure - <GRAPHIK> |
221 |
| OrderedList - 1 Signal transmitter keys |
221 |
| Item - 1 Signal transmitter keys |
221 |
| Item - 2 Indicator lamp |
221 |
| Item - 3 Portable remote control transmitter |
221 |
| Para - The built-in remote control is capable of operating up to three separately controlled obje... |
221 |
| Warning - <TABELLE> |
221 |
| TBody - <TABELLENHAUPTTEXT> |
221 |
| Row - <TABELLENREIHE> |
221 |
| Entry - Warning! |
221 |
| Para - Warning! |
221 |
| Para - When programming a garage door opener, the door moves up or down. |
221 |
| Row - <TABELLENREIHE> |
221 |
| Entry - When programming or operating the remote control make sure there is no possibility of any... |
221 |
| Para - When programming or operating the remote control make sure there is no possibility of anyo... |
221 |
| Note - Note: |
221 |
| BlockTitle - Note: |
221 |
| Para - Certain types of garage door openers are incompatible with the integrated opener. If you s... |
221 |
| Para - For operation in the USA only: This device complies with Part 15 of the FCC Rules. Operati... |
222 |
| Para - (1) This device may not cause harmful interference, and |
222 |
| Para - (2) this device must accept any interference received, including interference that may cau... |
222 |
| Para - Any unauthorized modification to this device could void the user’s authority to operate th... |
222 |
| Subtitle - Programming or reprogramming the integrated remote control: |
222 |
| Bold - Programming or reprogramming the integrated remote control: |
222 |
| OrderedList - 1. Turn electronic key in starter switch to position�1 or�2. |
222 |
| Item - 1. Turn electronic key in starter switch to position�1 or�2. |
222 |
| Item - 2. Hold the end of the hand-held transmitter of the device you wish to train approximately... |
222 |
| Item - 3. Using both hands, simultaneously push the hand- held transmitter button and the desired... |
223 |
| Item - 4. The indicator lamp on the integrated remote control will flash, first slowly and then r... |
223 |
| Note - Note: |
223 |
| BlockTitle - Note: |
223 |
| Para - If, after repeated attempts, you do not successfully program the integrated remote control... |
223 |
| Subtitle - Rolling code programming: |
223 |
| Bold - Rolling code programming: |
223 |
| Para - To train a garage door opener (or other rolling code devices) with the rolling code featur... |
223 |
| OrderedList - 1. Locate training button on the garage door opener motor head unit. Exact location... |
223 |
| Item - 1. Locate training button on the garage door opener motor head unit. Exact location and co... |
223 |
| Item - 2. Press |
223 |
| ItemPara - Note: |
223 |
| ItemPara - Following step�2, there are 30�seconds to initiate step�3. |
223 |
| Item - 3. Firmly press and release the programmed integrated remote control transmit button. Pres... |
224 |
| Item - 4. Confirm the garage door operation by pressing the programmed button on the integrated r... |
224 |
| Subtitle - Canadian programming: |
224 |
| Bold - Canadian programming: |
224 |
| Para - During programming, your hand-held transmitter may automatically stop transmitting. Contin... |
224 |
| Subtitle - Operation of remote control: |
225 |
| Bold - Operation of remote control: |
225 |
| OrderedList - 1. Turn electronic key in starter switch to position�1 or�2. |
225 |
| Item - 1. Turn electronic key in starter switch to position�1 or�2. |
225 |
| Item - 2. Select and press the appropriate button to activate the remote controlled device. The i... |
225 |
| Subtitle - Erasing the remote control memory: |
225 |
| Bold - Erasing the remote control memory: |
225 |
| OrderedList - 1. Turn electronic key in starter switch to position�1 or�2. |
225 |
| Item - 1. Turn electronic key in starter switch to position�1 or�2. |
225 |
| Item - 2. Simultaneously holding down the left and right side buttons for approximately 20�second... |
225 |
| ToC - Contents - Driving |
226 |
| Title - Contents - Driving |
226 |
| Marker - Contents - Driving |
226 |
| ToCEntry - Control and operation of radio transmitters 218 |
226 |
| ToCEntry - The first 1 000 miles (1 500 km) 219 |
226 |
| ToCEntry - Maintenance 219 |
226 |
| ToCEntry - Tele Aid 220 |
226 |
| ToCEntry - Catalytic converter 228 |
226 |
| ToCEntry - Emission control 229 |
226 |
| ToCEntry - Starter switch 230 |
226 |
| ToCEntry - Starting and turning off the engine 232 |
226 |
| ToCEntry - Manual transmission 233 |
226 |
| ToCEntry - Automatic transmission 234 |
226 |
| ToCEntry - Parking brake 243 |
226 |
| ToCEntry - Driving instructions 244 |
226 |
| ToCEntry - Drive sensibly – Save Fuel 244 |
226 |
| ToCSubEntry - Drive sensibly – Save Fuel 244 |
226 |
| ToCSubEntry - Drinking and driving 244 |
226 |
| ToCSubEntry - Pedals 244 |
226 |
| ToCSubEntry - Power assistance 245 |
226 |
| ToCSubEntry - Brakes 245 |
226 |
| ToCSubEntry - Driving off 246 |
226 |
| ToCSubEntry - Parking 246 |
226 |
| ToCSubEntry - Tires 247 |
226 |
| ToCSubEntry - Snow chains 250 |
226 |
| ToCSubEntry - Winter driving instructions 250 |
226 |
| ToCSubEntry - Deep water 252 |
226 |
| ToCSubEntry - Passenger compartment 253 |
226 |
| ToCSubEntry - Traveling abroad 253 |
226 |
| ToCEntry - Cruise control 254 |
226 |
| ToCEntry - Brake assist system (BAS) 257 |
226 |
| ToCEntry - Antilock brake system (ABS) 258 |
226 |
| ToCEntry - Electronic stability program (ESP) 260 |
226 |
| ToCEntry - What you should know at the gas station 264 |
226 |
| ToCEntry - Check regularly and before a long trip 266 |
226 |
| Part - Driving |
227 |
| Section - Driving |
227 |
| Title - Driving |
227 |
| Hypertext - Driving |
227 |
| Marker - Control and operation of radio transmitters |
227 |
| Subsection - COMAND, radio, telephone and two-way radio |
227 |
| Title - COMAND, radio, telephone and two-way radio |
227 |
| Marker - COMAND, radio, telephone and two-way radio |
227 |
| CapLetter - COMAND |
227 |
| Warning - <TABELLE> |
227 |
| TBody - <TABELLENHAUPTTEXT> |
227 |
| Row - <TABELLENREIHE> |
227 |
| Entry - Warning! |
227 |
| Para - Warning! |
227 |
| Para - Please do not forget that your primary responsibility is to drive the vehicle. Only operat... |
227 |
| Row - <TABELLENREIHE> |
227 |
| Entry - Bear in mind that at a speed of just 30�mph (approximately 50�km�/�h), your vehicle is co... |
227 |
| Para - Bear in mind that at a speed of just 30�mph (approximately 50�km�/�h), your vehicle is cov... |
227 |
| Para - |
227 |
| Para - |
227 |
| Para - |
227 |
| Para - |
227 |
| Para - |
227 |
| Para - |
227 |
| Footnote - 1 Observe all legal requirements. |
227 |
| Section - |
227 |
| Title - |
227 |
| Subsection - Telephones and two-way radios |
227 |
| Title - Telephones and two-way radios |
227 |
| Marker - Telephones and two-way radios |
227 |
| Warning - <TABELLE> |
227 |
| TBody - <TABELLENHAUPTTEXT> |
227 |
| Row - <TABELLENREIHE> |
227 |
| Entry - Warning! |
227 |
| Para - Warning! |
227 |
| Para - Never operate radio transmitters equipped with a built-in or attached antenna (i.e. withou... |
227 |
| Para - Radio transmitters, such as a portable telephone or a citizens band unit should only be us... |
227 |
| Para - Refer to the radio transmitter operation instructions regarding use of an external antenna. |
227 |
| Section - The first 1 000 miles (1 500 km) |
228 |
| Title - The first 1 000 miles (1 500 km) |
228 |
| Marker - The first 1 000 miles (1 500 km) |
228 |
| Para - The more cautiously you treat your vehicle during the break-in period, the more satisfied ... |
228 |
| Para - During this period, avoid heavy loads (full throttle driving) and excessive engine speeds. |
228 |
| Para - Avoid accelerating by kickdown. It is not recommended to brake the vehicle by manually shi... |
228 |
| Para - After 1�000 miles (1�500 km) speeds may be gradually increased to the permissible maximum. |
228 |
| Section - Maintenance |
228 |
| Title - Maintenance |
228 |
| Marker - Maintenance |
228 |
| Para - Approximately 30�days or 2000�miles (2000�km) prior to the next recommended service, the r... |
228 |
| Para - We strongly recommend that you have your vehicle serviced by your authorized Mercedes-Benz... |
228 |
| Para - Failure to have the vehicle maintained in accordance with the Service Booklet at the desig... |
228 |
| Section - Tele Aid |
229 |
| Title - Tele Aid |
229 |
| Marker - Tele Aid |
229 |
| Important - Important! |
229 |
| BlockTitle - Important! |
229 |
| Para - The initial activation of the Tele Aid system may only be performed by completing the subs... |
229 |
| Para - If you have any questions regarding activation, please call the Response Center at 1-800-7... |
229 |
| Subtitle - ( |
229 |
| Para - The Tele�Aid system consists of three types of response; automatic and manual emergency, r... |
229 |
| Para - The Tele�Aid system is always operational, providing that the vehicle’s battery is charged... |
229 |
| Subsection - System self-check |
229 |
| Title - System self-check |
229 |
| Para - Initially, after turning the electronic key in starter switch to position�2, malfunctions ... |
229 |
| Para - If a malfunction is indicated as outlined above, have the system checked at the nearest Me... |
229 |
| Important - Important! |
229 |
| BlockTitle - Important! |
229 |
| Para - Always make sure that the indicator lamp in the |
229 |
| Subsection - Emergency calls |
229 |
| Title - Emergency calls |
229 |
| Para - An emergency call is initiated automatically following an accident in which the Emergency ... |
229 |
| Para - Once the emergency call is in progress, the indicator lamp in the |
230 |
| Para - A voice connection between the Response Center and the occupants of the vehicle will be es... |
230 |
| Para - The Tele Aid system is available if: |
230 |
| ItemizedList - • it has been activated and is operational. Activation requires a subscription for... |
230 |
| Item - • it has been activated and is operational. Activation requires a subscription for monitor... |
230 |
| Item - • the relevant cellular phone network and |
230 |
| Note - Note: |
230 |
| BlockTitle - Note: |
230 |
| Para - Location of the vehicle on a map is possible if the vehicle is able to receive signals fro... |
230 |
| Warning - <TABELLE> |
230 |
| TBody - <TABELLENHAUPTTEXT> |
230 |
| Row - <TABELLENREIHE> |
230 |
| Entry - Warning! |
230 |
| Para - Warning! |
230 |
| Para - If the indicator lamp in the |
230 |
| Row - <TABELLENREIHE> |
230 |
| Entry - Should this occur, assistance must be summoned by other means. |
230 |
| Para - Should this occur, assistance must be summoned by other means. |
230 |
| Subsection - P82.00-0410-26 |
231 |
| Title - P82.00-0410-26 |
231 |
| Marker - P82.00-0410-26 |
231 |
| Figure - <GRAPHIK> |
231 |
| Para - Manually: Briefly press on cover�(1) – the cover will open. |
231 |
| Subsection - P68.20-0411-26 |
231 |
| Title - P68.20-0411-26 |
231 |
| Marker - P68.20-0411-26 |
231 |
| Figure - <GRAPHIK> |
231 |
| Para - Press the emergency call switch�(2) briefly (for longer than 2�seconds). The indicator lam... |
231 |
| Para - Close the cover�(1) after the emergency call is concluded. |
231 |
| Warning - <TABELLE> |
231 |
| TBody - <TABELLENHAUPTTEXT> |
231 |
| Row - <TABELLENREIHE> |
231 |
| Entry - |
231 |
| Row - <TABELLENREIHE> |
232 |
| Entry - Warning! |
232 |
| Para - Warning! |
232 |
| Para - If you feel at any way in jeopardy when in the vehicle (e.g. smoke or fire in the vehicle,... |
232 |
| Subsection - Roadside Assistance button |
232 |
| Title - Roadside Assistance button |
232 |
| Para - Located below the center armrest cover is the Roadside Assistance button� |
232 |
| Para - A voice connection between the Roadside Assistance dispatcher and the occupants of the veh... |
232 |
| Para - If the vehicle requires more than Sign and Drive services, the Mercedes-Benz Roadside assi... |
232 |
| Para - For other than Sign and Drive services, labor and�/�or towing charges may apply. Refer to ... |
232 |
| Note - Notes: |
232 |
| BlockTitle - Notes: |
232 |
| Para - The indicator lamp in the Roadside Assistance button� |
232 |
| Para - See system self�check on page� |
232 |
| Subsection - Information button |
233 |
| Title - Information button |
233 |
| Para - Located below the center armrest cover is the Information button� |
233 |
| Para - A voice connection between the Client Assistance Center representative and the occupants o... |
233 |
| Para - If you have chosen the Route Guidance Service (an optional service available at additional... |
233 |
| Para - For more details concerning this optional service, please contact the Response Center at�1... |
233 |
| Note - Notes: |
233 |
| BlockTitle - Notes: |
233 |
| Para - The indicator lamp in the Information button� |
233 |
| Para - See system self�check on page� |
233 |
| Important - Important! |
233 |
| BlockTitle - Important! |
233 |
| Para - If the indicator lamps do not illuminate or remain illuminated (in red) at any time, the T... |
233 |
| Subtitle - Upgrade Signals |
234 |
| Para - Tele Aid system processes calls using the following priority. |
234 |
| ItemizedList - • Automatic emergency�–�First priority |
234 |
| Item - • Automatic emergency�–�First priority |
234 |
| Item - • Manual emergency�–�Second priority |
234 |
| Item - • Roadside assistance�–�Third priority |
234 |
| Item - • Information�–�Fourth priority |
234 |
| Para - Should a higher priority call be initiated while you are connected, an upgrade (alternatin... |
234 |
| Important - Important! |
234 |
| BlockTitle - Important! |
234 |
| Para - If the indicator lamp continues to flash or the system does not reset, contact the Respons... |
234 |
| Note - Notes: |
234 |
| BlockTitle - Notes: |
234 |
| Para - The indicator lamp in the respective button flashes until the call is concluded and this c... |
234 |
| Subsection - Remote door unlock |
235 |
| Title - Remote door unlock |
235 |
| Para - In the case you have your vehicle locked unintentionally (e.g. key inside vehicle), and th... |
235 |
| Para - Then return to your vehicle and pull outside trunk handle for a minimum of 20�seconds. |
235 |
| Para - The Response Center will then unlock your vehicle with the remote door unlocking feature. |
235 |
| Note - Note: |
235 |
| BlockTitle - Note: |
235 |
| Para - The remote door unlock feature is available if the relevant cellular phone network and |
235 |
| Subsection - Vehicle location/stolen vehicle tracking services |
235 |
| Title - Vehicle location/stolen vehicle tracking services |
235 |
| Para - Should you wish to locate your vehicle, contact the Mercedes�Benz Response Center at 1-800... |
235 |
| Para - In the event your vehicle was stolen, report the incident to the police who will issue a n... |
235 |
| Para - The Response Center will then attempt to covertly contact the vehicle’s Tele Aid system. T... |
235 |
| Subsection - Starguide |
236 |
| Title - Starguide |
236 |
| Para - If you have chosen Starguide Service, you can request several individual informations, for... |
236 |
| Para - For notes on operation see separate |
236 |
| Para - For more details concerning this optional service, please contact the Response Center at�1... |
236 |
| Important - Important! |
236 |
| BlockTitle - Important! |
236 |
| Para - Tele Aid utilizes the cellular network for communication and the |
236 |
| Warning - <TABELLE> |
236 |
| TBody - <TABELLENHAUPTTEXT> |
236 |
| Row - <TABELLENREIHE> |
236 |
| Entry - Warning! |
236 |
| Para - Warning! |
236 |
| Para - If the indicator lamp in the |
236 |
| Section - Catalytic converter |
237 |
| Title - Catalytic converter |
237 |
| Marker - Catalytic converter |
237 |
| Para - Your Mercedes-Benz is equipped with monolithic type catalytic converters, an important ele... |
237 |
| Caution - Caution! |
237 |
| BlockTitle - Caution! |
237 |
| Para - To prevent damage to the catalytic converters, use only premium unleaded gasoline in this ... |
237 |
| Para - Any noticeable irregularities in engine operation should be repaired promptly. Otherwise, ... |
237 |
| Para - |
237 |
| Para - |
237 |
| Warning - <TABELLE> |
237 |
| TBody - <TABELLENHAUPTTEXT> |
237 |
| Row - <TABELLENREIHE> |
237 |
| Entry - |
237 |
| Row - <TABELLENREIHE> |
237 |
| Entry - Warning! |
237 |
| Para - Warning! |
237 |
| Para - As with any vehicle, do not idle, park or operate this vehicle in areas where combustible ... |
237 |
| Section - Emission control |
238 |
| Title - Emission control |
238 |
| Marker - Emission control |
238 |
| Para - Certain systems of the engine serve to keep the toxic components of the exhaust gases with... |
238 |
| Para - These systems, of course, will function properly only when maintained strictly according t... |
238 |
| Para - |
238 |
| Para - |
238 |
| Para - |
238 |
| Para - |
238 |
| Para - |
238 |
| Warning - <TABELLE> |
238 |
| TBody - <TABELLENHAUPTTEXT> |
238 |
| Row - <TABELLENREIHE> |
238 |
| Entry - |
238 |
| Row - <TABELLENREIHE> |
238 |
| Entry - Warning! |
238 |
| Para - Warning! |
238 |
| Para - Inhalation of exhaust gas is hazardous to your health. All exhaust gas contains carbon mon... |
238 |
| Row - <TABELLENREIHE> |
238 |
| Entry - Do not run the engine in confined areas (such as a garage) which are not properly ventila... |
238 |
| Para - Do not run the engine in confined areas (such as a garage) which are not properly ventilat... |
238 |
| Section - Starter switch |
239 |
| Title - Starter switch |
239 |
| Marker - Starter switch |
239 |
| Figure - <GRAPHIK> |
239 |
| OrderedList - 0 The electronic key can be withdrawn in this position only. The steering is locked... |
239 |
| Item - 0 The electronic key can be withdrawn in this position only. The steering is locked when t... |
239 |
| ItemPara - In vehicles with automatic transmission, the electronic key can be removed only with t... |
239 |
| Item - 1 Gear selector lever is unlocked. |
239 |
| ItemPara - Most electrical consumers can be operated. For detailed information see respective sub... |
239 |
| Item - 2 Driving position. |
239 |
| Item - 3 Starting position. |
239 |
| Para - See page� |
239 |
| Warning - <TABELLE> |
239 |
| TBody - <TABELLENHAUPTTEXT> |
239 |
| Row - <TABELLENREIHE> |
239 |
| Entry - Warning! |
239 |
| Para - Warning! |
239 |
| Para - When leaving the vehicle always remove the electronic key from the starter switch, and loc... |
239 |
| Important - Important! |
240 |
| BlockTitle - Important! |
240 |
| Para - If the electronic key is left in the starter switch position�0 for a extended period of ti... |
240 |
| Caution - Caution! |
240 |
| BlockTitle - Caution! |
240 |
| Para - To prevent accelerated battery discharge and a possible dead battery, always remove the el... |
240 |
| Note - Notes: |
240 |
| BlockTitle - Notes: |
240 |
| Para - A warning sounds when the driver’s door is opened with the electronic key is in starter sw... |
240 |
| Para - With the engine at idle speed, the charging rate of the alternator (output) is limited. |
240 |
| Para - It is therefore recommended that you turn off unnecessary electrical consumers while drivi... |
240 |
| Para - Unnecessary strain on the battery and charging system may be minimized by turning off the ... |
240 |
| Para - Heated seats, rear window defroster. In addition, the automatic climate air volume control... |
240 |
| Section - Starting and turning off the engine |
241 |
| Title - Starting and turning off the engine |
241 |
| Marker - Starting and turning off the engine |
241 |
| Subsection - Before starting |
241 |
| Title - Before starting |
241 |
| Para - Ensure that parking brake is engaged and that selector lever is in position�“P” or�“N” (ge... |
241 |
| Subsection - Starting |
241 |
| Title - Starting |
241 |
| Subtitle - Vehicles with automatic transmission: |
241 |
| Para - Do not depress accelerator. Briefly turn electronic key in starter switch clockwise to the... |
241 |
| Para - If engine will not run, and the starting procedure stops, turn electronic key completely t... |
241 |
| Para - After several unsuccessful attempts, have the system checked at the nearest authorized Mer... |
241 |
| Subtitle - Vehicles with manual transmission: |
241 |
| Para - Do not depress accelerator. Fully depress clutch pedal, otherwise the engine cannot be sta... |
241 |
| Para - Turn electronic key in starter switch clockwise to the stop. Release only when the engine ... |
241 |
| Important - Important! |
241 |
| BlockTitle - Important! |
241 |
| Para - Due to the installed starter non-repeat feature, the electronic key must be turned complet... |
241 |
| Para - In areas where temperatures frequently drop below -4 |
241 |
| Subsection - Turning off |
241 |
| Title - Turning off |
241 |
| Para - Turn the electronic key in the starter switch to position�0 to stop the engine. |
241 |
| Subtitle - Vehicles with automatic transmission: |
241 |
| Para - The electronic key can only be removed with the selector lever in position� |
241 |
| Section - Manual transmission |
242 |
| Title - Manual transmission |
242 |
| Marker - Manual transmission |
242 |
| Figure - <GRAPHIK> |
242 |
| Para - See illustration for gearshift lever positions corresponding to the individual gears. |
242 |
| Para - Stop the vehicle completely before shifting into reverse; to shift into reverse, pull the ... |
242 |
| Para - Do not exceed the maximum engine speed in the individual gears. Refer to tachometer (see p... |
242 |
| Important - Important! |
242 |
| BlockTitle - Important! |
242 |
| Para - When vehicle is parked, always be sure to engage first or reverse gear and firmly set park... |
242 |
| Para - Downshifting gears leading to overrevving the engine can result in transmission damage tha... |
242 |
| Para - Do not exceed engine speed limits, see page� |
242 |
| Warning - <TABELLE> |
242 |
| TBody - <TABELLENHAUPTTEXT> |
242 |
| Row - <TABELLENREIHE> |
242 |
| Entry - Warning! |
242 |
| Para - Warning! |
242 |
| Para - On slippery road surfaces as well as high engine speeds, never downshift in order to obtai... |
242 |
| Section - Automatic transmission |
243 |
| Title - Automatic transmission |
243 |
| Marker - Automatic transmission |
243 |
| Figure - <GRAPHIK> |
243 |
| Para - The automatic transmission selects individual gears automatically, dependent upon |
243 |
| ItemizedList - • Selector lever position |
243 |
| Item - • Selector lever position |
243 |
| Item - • Program mode selector |
243 |
| Item - • Accelerator position |
243 |
| Item - • Vehicle speed |
243 |
| Para - The gear shifting process is continuously adapted, dependent on the driving style, the dri... |
243 |
| Important - Important! |
243 |
| BlockTitle - Important! |
243 |
| Para - When parking the vehicle or before working on the vehicle with the engine running, firmly ... |
243 |
| Subsection - Driving |
244 |
| Title - Driving |
244 |
| Para - The selector lever is automatically locked while in position� |
244 |
| Para - Shift selector lever to the desired position only when the engine is idling normally and t... |
244 |
| Warning - <TABELLE> |
244 |
| TBody - <TABELLENHAUPTTEXT> |
244 |
| Row - <TABELLENREIHE> |
244 |
| Entry - Warning! |
244 |
| Para - Warning! |
244 |
| Para - It is dangerous to shift the selector lever out of� |
244 |
| Important - Important! |
244 |
| BlockTitle - Important! |
244 |
| Para - After selecting any driving position from� |
244 |
| Subsection - Accelerator position |
244 |
| Title - Accelerator position |
244 |
| Para - Partial throttle = early upshifting = normal acceleration |
244 |
| Para - Full throttle = later upshifting = rapid acceleration |
244 |
| Para - Kickdown (depressing the accelerator beyond full throttle) = downshifting to a lower gear ... |
244 |
| Subsection - Stopping |
245 |
| Title - Stopping |
245 |
| Para - For brief stops, e.g. at traffic lights, leave the transmission in gear and hold vehicle w... |
245 |
| Para - For longer stops with the engine idling, shift into� |
245 |
| Para - When stopping the vehicle on an uphill gradient, do not hold it with the accelerator, use ... |
245 |
| Subsection - Maneuvering |
245 |
| Title - Maneuvering |
245 |
| Para - To maneuver in tight areas, e.g. when pulling into a parking space, control the vehicle sp... |
245 |
| Para - To rock a vehicle out of soft ground (mud or snow), alternately shift from forward to reve... |
245 |
| Para - Rocking a vehicle free in this manner may cause the ABS or traction system malfunction ind... |
245 |
| Warning - <TABELLE> |
245 |
| TBody - <TABELLENHAUPTTEXT> |
245 |
| Row - <TABELLENREIHE> |
245 |
| Entry - Warning! |
245 |
| Para - Warning! |
245 |
| Para - Getting out of your vehicle with the selector lever not fully engaged in position� |
245 |
| Row - <TABELLENREIHE> |
245 |
| Entry - Always set the parking brake in addition to shifting to position�“P”, see page�243 for pa... |
245 |
| Para - Always set the parking brake in addition to shifting to position� |
245 |
| Row - <TABELLENREIHE> |
245 |
| Entry - When parked on an incline, also turn front wheel against curb. |
245 |
| Para - When parked on an incline, also turn front wheel against curb. |
245 |
| Subsection - P54.30-2521-26 |
246 |
| Title - P54.30-2521-26 |
246 |
| Marker - P54.30-2521-26 |
246 |
| Figure - <GRAPHIK> |
246 |
| OrderedList - 1 Program mode indicator, see page� |
246 |
| Item - 1 Program mode indicator, see page� |
246 |
| Item - 2 Gear range indicators |
246 |
| Para - The current selector lever position is highlighted in the gear range indicator display�(2)... |
246 |
| DefinitionList - <GRAPHIK> |
246 |
| Definition - <GRAPHIK> |
246 |
| Item - Park position |
246 |
| Bold - Park position |
246 |
| ItemPara - The park position is to be used when parking the vehicle. Engage only with the vehicle... |
246 |
| ItemPara - Note: |
246 |
| ItemPara - The electronic key can only be removed from the starter switch with the selector lever... |
246 |
| Definition - <GRAPHIK> |
246 |
| Item - Reverse gear |
246 |
| Bold - Reverse gear |
246 |
| ItemPara - Shift to reverse gear only with the vehicle stopped. |
246 |
| ItemPara - Dependent on the program mode selector switch position� |
246 |
| Definition - <GRAPHIK> |
247 |
| Item - Neutral |
247 |
| Bold - Neutral |
247 |
| ItemPara - No power is transmitted from the engine to the drive axle. When the brakes are release... |
247 |
| ItemPara - Important! |
247 |
| Bold - Important! |
247 |
| ItemPara - Coasting the vehicle, or driving for any other reason with selector lever in� |
247 |
| Definition - <GRAPHIK> |
247 |
| Item - The transmission automatically upshifts through 5th gear. Position� |
247 |
| Subsection - Gear selection for special circumstances |
247 |
| Title - Gear selection for special circumstances |
247 |
| Para - The transmission gear ranges for special circumstances can be selected by pressing the sel... |
247 |
| Para - The gear range currently selected is highlighted in the instrument cluster display. |
247 |
| Para - Press and hold selector lever in the |
247 |
| Para - Briefly press selector lever in the |
247 |
| Para - Press and hold selector lever in the |
248 |
| Warning - <TABELLE> |
248 |
| TBody - <TABELLENHAUPTTEXT> |
248 |
| Row - <TABELLENREIHE> |
248 |
| Entry - Warning! |
248 |
| Para - Warning! |
248 |
| Para - On slippery road surfaces, never downshift in order to obtain braking action. This could r... |
248 |
| Important - Important! |
248 |
| BlockTitle - Important! |
248 |
| Para - With transmission in gear range� |
248 |
| Para - The delayed upshift is effective with vehicle speeds below 31�mph (50�km/h) at partial thr... |
248 |
| Para - To avoid overrevving the engine when the selector lever is moved to a lower gear range, th... |
248 |
| Para - To prevent the engine from laboring at low |
248 |
| Para - Gear ranges: |
249 |
| DefinitionList - <GRAPHIK> |
249 |
| Definition - <GRAPHIK> |
249 |
| Item - Upshift through 4th gear only. Suitable for performance driving. |
249 |
| Definition - <GRAPHIK> |
249 |
| Item - Upshift through 3rd gear only. Suitable for moderately steep hills. Since the transmission... |
249 |
| Definition - <GRAPHIK> |
249 |
| Item - Upshift through 2nd gear only. For driving in mountainous regions or under extreme operati... |
249 |
| Definition - <GRAPHIK> |
249 |
| Item - Use this position, which makes maximum use of the engine’s braking effect, while descendin... |
249 |
| Subsection - P27.60-2081-26 |
250 |
| Title - P27.60-2081-26 |
250 |
| Marker - P27.60-2081-26 |
250 |
| Figure - <GRAPHIK> |
250 |
| Para - The transmission is provided with a selector switch�(1) for Standard |
250 |
| Para - The program mode currently selected is indicated in the gear range indicator display. |
250 |
| DefinitionList - S |
250 |
| Definition - S |
250 |
| Bold - S |
250 |
| Item - Standard mode |
250 |
| ItemPara - Press switch. |
250 |
| ItemPara - The vehicle starts out in 1st gear. |
250 |
| ItemPara - Accelerator Operation: Fast on = depressing the accelerator pedal quickly (not into ki... |
250 |
| ItemPara - Fast off = there will be no upshift when releasing the accelerator pedal quickly, e.g.... |
250 |
| Definition - W |
251 |
| Bold - W |
251 |
| Item - Winter�/�Wet (snow and ice) mode |
251 |
| ItemPara - Press switch. |
251 |
| ItemPara - The� |
251 |
| ItemPara - The gear shifting process occurs at lower vehicle and engine speeds than in the� |
251 |
| Caution - Caution! |
251 |
| BlockTitle - Caution! |
251 |
| Para - Never change the program mode when the selector lever is out of position� |
251 |
| Important - Important! |
251 |
| BlockTitle - Important! |
251 |
| Para - Always be certain of the program mode selected since the vehicle driving characteristics c... |
251 |
| Para - Dependent on the program mode selector switch position� |
251 |
| Subsection - Emergency operation (Limp home mode) |
251 |
| Title - Emergency operation (Limp home mode) |
251 |
| Para - If vehicle acceleration worsens or the transmission no longer shifts, the transmission is ... |
251 |
| Para - In this mode only the 2nd gear or reverse gear can be activated. |
251 |
| Para - To engage 2nd gear or reverse: |
251 |
| OrderedList - 1. Stop the vehicle. |
251 |
| Item - 1. Stop the vehicle. |
251 |
| Item - 2. Move selector lever to position� |
251 |
| Item - 3. Turn off the engine. |
251 |
| Item - 4. Wait approximately 10�seconds. |
251 |
| Item - 5. Restart the engine. |
251 |
| Item - 6. Move selector lever to position� |
251 |
| Para - Have the transmission checked at your authorized Mercedes�Benz Center as soon as possible. |
251 |
| Section - Parking brake |
252 |
| Title - Parking brake |
252 |
| Marker - Parking brake |
252 |
| Figure - <GRAPHIK> |
252 |
| Para - To engage, firmly depress parking brake pedal. When the electronic key is in starter switc... |
252 |
| Para - To release the parking brake, pull handle on instrument panel. The brake warning lamp in t... |
252 |
| Para - A warning sounds and the parking brake warning message appears in the multifunction displa... |
252 |
| Para - Also see brake warning lamp on page� |
252 |
| Warning - <TABELLE> |
252 |
| TBody - <TABELLENHAUPTTEXT> |
252 |
| Row - <TABELLENREIHE> |
252 |
| Entry - Warning! |
252 |
| Para - Warning! |
252 |
| Para - When leaving the vehicle always remove the electronic key from the starter switch, and loc... |
252 |
| Section - Driving instructions |
253 |
| Title - Driving instructions |
253 |
| Marker - Driving instructions |
253 |
| Subsection - Drive sensibly - Save Fuel |
253 |
| Title - Drive sensibly - Save Fuel |
253 |
| Marker - Drive sensibly - Save Fuel |
253 |
| Para - Fuel consumption, to a great extent, depends on driving habits and operating conditions. |
253 |
| ItemizedList - • keep tires at the recommended inflation pressures, |
253 |
| Item - • keep tires at the recommended inflation pressures, |
253 |
| Item - • remove unnecessary loads, |
253 |
| Item - • remove roof rack when not in use, |
253 |
| Item - • allow engine to warm up under low load use, |
253 |
| Item - • avoid frequent acceleration and deceleration, |
253 |
| Item - • have all maintenance work performed at regular intervals by an authorized Mercedes-Benz ... |
253 |
| Para - Fuel consumption is also increased by driving in cold weather, in stop-and-go traffic, on ... |
253 |
| Subsection - Drinking and driving |
253 |
| Title - Drinking and driving |
253 |
| Marker - Drinking and driving |
253 |
| Warning - <TABELLE> |
253 |
| TBody - <TABELLENHAUPTTEXT> |
253 |
| Row - <TABELLENREIHE> |
253 |
| Entry - Warning! |
253 |
| Para - Warning! |
253 |
| Para - Drinking or taking drugs and driving can be a very dangerous combination. Even a small amo... |
253 |
| Row - <TABELLENREIHE> |
253 |
| Entry - The possibility of a serious or even fatal accident is sharply increased when you drink o... |
253 |
| Para - The possibility of a serious or even fatal accident is sharply increased when you drink or... |
253 |
| Row - <TABELLENREIHE> |
253 |
| Entry - Please don’t drink or take drugs and drive or allow anyone to drive after drinking or tak... |
253 |
| Para - Please don’t drink or take drugs and drive or allow anyone to drive after drinking or taki... |
253 |
| Subsection - Pedals |
253 |
| Title - Pedals |
253 |
| Marker - Pedals |
253 |
| Warning - <TABELLE> |
253 |
| TBody - <TABELLENHAUPTTEXT> |
253 |
| Row - <TABELLENREIHE> |
253 |
| Entry - Warning! |
253 |
| Para - Warning! |
253 |
| Para - Keep driver’s foot area clear at all times. Objects stored in this area may impair pedal m... |
253 |
| Subsection - Power assistance |
254 |
| Title - Power assistance |
254 |
| Marker - Power assistance |
254 |
| Warning - <TABELLE> |
254 |
| TBody - <TABELLENHAUPTTEXT> |
254 |
| Row - <TABELLENREIHE> |
254 |
| Entry - Warning! |
254 |
| Para - Warning! |
254 |
| Para - When the engine is not running, the brake and steering systems are without power assistanc... |
254 |
| Subsection - Brakes |
254 |
| Title - Brakes |
254 |
| Marker - Brakes |
254 |
| Warning - <TABELLE> |
254 |
| TBody - <TABELLENHAUPTTEXT> |
254 |
| Row - <TABELLENREIHE> |
254 |
| Entry - Warning! |
254 |
| Para - Warning! |
254 |
| Para - After driving in heavy rain for some time without applying the brakes or through water dee... |
254 |
| Row - <TABELLENREIHE> |
254 |
| Entry - Resting your foot on the brake pedal will cause excessive and premature wear of the brake... |
254 |
| Para - Resting your foot on the brake pedal will cause excessive and premature wear of the brake ... |
254 |
| Row - <TABELLENREIHE> |
254 |
| Entry - It can also result in the brakes overheating thereby significantly reducing their effecti... |
254 |
| Para - It can also result in the brakes overheating thereby significantly reducing their effectiv... |
254 |
| Para - The condition of the parking brake system is checked each time the vehicle is in the shop ... |
254 |
| Para - If the parking brake is released and the brake warning lamp in the instrument cluster stay... |
254 |
| Para - Brake pad wear or a leak in the system may be the reason for low brake fluid in the reserv... |
254 |
| Para - Have the brake system inspected at an authorized Mercedes-Benz Center immediately. |
254 |
| Para - All checks and service work on the brake system should be carried out by an authorized Mer... |
254 |
| Para - Install only brake pads and brake fluid recommended by Mercedes-Benz. |
254 |
| Warning - <TABELLE> |
254 |
| TBody - <TABELLENHAUPTTEXT> |
254 |
| Row - <TABELLENREIHE> |
254 |
| Entry - Warning! |
254 |
| Para - Warning! |
254 |
| Para - If other than recommended brake pads are installed, or other than recommended brake fluid ... |
254 |
| Caution - Caution! |
255 |
| BlockTitle - Caution! |
255 |
| Para - When driving down long and steep grades, relieve the load on the brakes by shifting into a... |
255 |
| Para - After hard braking, it is advisable to drive on for some time, rather than immediately par... |
255 |
| Subsection - Driving off |
255 |
| Title - Driving off |
255 |
| Marker - Driving off |
255 |
| Para - Apply the service brakes to test them briefly after driving off. Perform this procedure on... |
255 |
| Para - Warm up the engine smoothly. Do not place full load on the engine until the operating temp... |
255 |
| Para - When starting off on a slippery surface, do not allow one drive wheel to spin for an exten... |
255 |
| Subsection - Parking |
255 |
| Title - Parking |
255 |
| Marker - Parking |
255 |
| Warning - <TABELLE> |
255 |
| TBody - <TABELLENHAUPTTEXT> |
255 |
| Row - <TABELLENREIHE> |
255 |
| Entry - Warning! |
255 |
| Para - Warning! |
255 |
| Para - To reduce the risk of personal injury as a result of vehicle movement, |
255 |
| Row - <TABELLENREIHE> |
255 |
| Entry - 1. Keep right foot on service brake pedal. |
255 |
| OrderedList - 1. Keep right foot on service brake pedal. |
255 |
| Item - 1. Keep right foot on service brake pedal. |
255 |
| Item - 2. Firmly depress parking brake pedal. |
255 |
| Item - 3. Move the selector lever to position� |
255 |
| Item - 4. Slowly release service brake pedal. |
255 |
| Item - 5. Turn front wheels towards the road curb. |
255 |
| Item - 6. Turn the electronic key to starter switch position�0 and remove. |
255 |
| Item - 7. Take the electronic key and lock vehicle when leaving. |
255 |
| Important - Important! |
256 |
| BlockTitle - Important! |
256 |
| Para - It is advisable to set the parking brake whenever parking or leaving the vehicle. In addit... |
256 |
| Subsection - Tires |
256 |
| Title - Tires |
256 |
| Marker - Tires |
256 |
| Warning - <TABELLE> |
256 |
| TBody - <TABELLENHAUPTTEXT> |
256 |
| Row - <TABELLENREIHE> |
256 |
| Entry - Warning! |
256 |
| Para - Warning! |
256 |
| Para - If you feel a sudden significant vibration or ride disturbance, or you suspect that possib... |
256 |
| Row - <TABELLENREIHE> |
256 |
| Entry - Inspect the tires and under the vehicle for possible damage. If the vehicle or tires appe... |
256 |
| Para - Inspect the tires and under the vehicle for possible damage. If the vehicle or tires appea... |
256 |
| Para - Tread wear indicators (TWI) are required by law. These indicators are located in six place... |
256 |
| Para - The tread wear indicator appears as a solid band across the tread. |
256 |
| Para - <GRAPHIK> |
257 |
| Graphic - <GRAPHIK> |
257 |
| Marker - P40.10-2104-26 |
257 |
| Warning - <TABELLE> |
257 |
| TBody - <TABELLENHAUPTTEXT> |
257 |
| Row - <TABELLENREIHE> |
257 |
| Entry - Warning! |
257 |
| Para - Warning! |
257 |
| Para - Do not allow your tires to wear down too far. As tread depth approaches |
257 |
| Row - <TABELLENREIHE> |
257 |
| Entry - Depending upon the weather and�/�or road surface (conditions), the tire traction varies w... |
257 |
| Para - Depending upon the weather and�/�or road surface (conditions), the tire traction varies wi... |
257 |
| Para - Specified tire pressures must be maintained. This applies particularly if the tires are su... |
257 |
| Warning - <TABELLE> |
257 |
| TBody - <TABELLENHAUPTTEXT> |
257 |
| Row - <TABELLENREIHE> |
257 |
| Entry - Warning! |
257 |
| Para - Warning! |
257 |
| Para - Do not drive with a flat tire. A flat tire affects the ability to steer or brake the vehic... |
257 |
| Subtitle - Aquaplaning |
257 |
| Bold - Aquaplaning |
257 |
| Para - Depending on the depth of the water layer on the road, aquaplaning may occur, even at low ... |
257 |
| Subtitle - Tire traction |
258 |
| Bold - Tire traction |
258 |
| Para - The safe speed on a wet, snow covered or icy road is always lower than on a dry road. |
258 |
| Para - You should pay particular attention to the condition of the road whenever the outside temp... |
258 |
| Warning - <TABELLE> |
258 |
| TBody - <TABELLENHAUPTTEXT> |
258 |
| Row - <TABELLENREIHE> |
258 |
| Entry - Warning! |
258 |
| Para - Warning! |
258 |
| Para - If ice has formed on the road, tire traction will be substantially reduced. Under such wea... |
258 |
| Para - We recommend M+S rated radial-ply tires for the winter season for all four wheels to insur... |
258 |
| Subtitle - Tire speed rating |
258 |
| Bold - Tire speed rating |
258 |
| Para - Vehicles without Sport Package: Your vehicle is factory equipped with |
258 |
| Para - An electronic speed limiter prevents your vehicle from exceeding the speed rating. |
258 |
| Warning - <TABELLE> |
258 |
| TBody - <TABELLENHAUPTTEXT> |
258 |
| Row - <TABELLENREIHE> |
258 |
| Entry - Warning! |
258 |
| Para - Warning! |
258 |
| Para - Even when permitted by law, never operate a vehicle at speeds greater than the maximum spe... |
258 |
| Row - <TABELLENREIHE> |
258 |
| Entry - Exceeding the maximum speed for which tires are rated can lead to sudden tire failure cau... |
258 |
| Para - Exceeding the maximum speed for which tires are rated can lead to sudden tire failure caus... |
258 |
| Subsection - Snow chains |
259 |
| Title - Snow chains |
259 |
| Marker - Snow chains |
259 |
| Para - Use only snow chains that are tested and recommended by Mercedes-Benz. Your authorized Mer... |
259 |
| Para - Chains should only be used on the rear wheels. Follow the manufacturer’s mounting instruct... |
259 |
| Para - Snow chains should only be driven on snow covered roads at speeds not to exceed 30�mph (50... |
259 |
| Para - When driving with snow chains, press the ESP control switch to OFF, refer to page� |
259 |
| Subsection - Winter driving instructions |
259 |
| Title - Winter driving instructions |
259 |
| Marker - Winter driving instructions |
259 |
| Para - The most important rule for slippery or icy roads is to drive sensibly and to avoid abrupt... |
259 |
| Para - When the vehicle is in danger of skidding, move selector lever to position� |
259 |
| Para - Road salts and chemicals can adversely affect braking efficiency. Increased pedal force ma... |
259 |
| Para - If the vehicle is parked after being driven on salt treated roads, the braking efficiency ... |
260 |
| Warning - <TABELLE> |
260 |
| TBody - <TABELLENHAUPTTEXT> |
260 |
| Row - <TABELLENREIHE> |
260 |
| Entry - Warning! |
260 |
| Para - Warning! |
260 |
| Para - If the vehicle becomes stuck in snow, make sure that snow is kept clear of the exhaust pip... |
260 |
| Row - <TABELLENREIHE> |
260 |
| Entry - To assure sufficient fresh air ventilation, open a window slightly on the side of the veh... |
260 |
| Para - To assure sufficient fresh air ventilation, open a window slightly on the side of the vehi... |
260 |
| Subsection - Winter driving |
260 |
| Title - Winter driving |
260 |
| Para - Have your vehicle winterized at your authorized Mercedes-Benz Center before the onset of w... |
260 |
| ItemizedList - • Change the engine oil if the engine contains an oil which is not approved for wi... |
260 |
| Item - • Change the engine oil if the engine contains an oil which is not approved for winter ope... |
260 |
| Item - • Check engine coolant anticorrosion�/�antifreeze concentration. |
260 |
| Item - • Additive for the windshield washer and headlamp cleaning system: Add MB Concentrate |
260 |
| Item - • Test battery: Battery capacity drops with decreasing ambient temperature. A well charged... |
260 |
| Item - • Tires: We recommend M+S rated radial-ply tires on all four wheels for the winter season.... |
261 |
| Note - Note: |
261 |
| BlockTitle - Note: |
261 |
| Para - In winter operation, the maximum effectiveness of the antilock brake system (ABS) and elec... |
261 |
| Subsection - Block heater |
261 |
| Title - Block heater |
261 |
| Marker - Block heater |
261 |
| Para - The engine is equipped with a block heater. |
261 |
| Para - The electrical cable may be installed at your authorized Mercedes�Benz Center. |
261 |
| Subsection - Deep water |
261 |
| Title - Deep water |
261 |
| Marker - Deep water |
261 |
| Caution - Caution! |
261 |
| BlockTitle - Caution! |
261 |
| Para - Do not drive through flooded areas or water of unknown depth. |
261 |
| Para - If you must drive through deep water, drive slowly to prevent water from entering the engi... |
261 |
| Subsection - Passenger compartment |
262 |
| Title - Passenger compartment |
262 |
| Marker - Passenger compartment |
262 |
| Warning - <TABELLE> |
262 |
| TBody - <TABELLENHAUPTTEXT> |
262 |
| Row - <TABELLENREIHE> |
262 |
| Entry - Warning! |
262 |
| Para - Warning! |
262 |
| Para - Always fasten items being carried as securely as possible. |
262 |
| Row - <TABELLENREIHE> |
262 |
| Entry - In an accident, during hard braking or sudden maneuvers, loose items will be thrown aroun... |
262 |
| Para - In an accident, during hard braking or sudden maneuvers, loose items will be thrown around... |
262 |
| Row - <TABELLENREIHE> |
262 |
| Entry - The trunk is the preferred place to carry objects. |
262 |
| Para - The trunk is the preferred place to carry objects. |
262 |
| Subsection - Traveling abroad |
262 |
| Title - Traveling abroad |
262 |
| Marker - Traveling abroad |
262 |
| Para - Abroad, there is a widely-spread Mercedes-Benz service network at your disposal. If you pl... |
262 |
| Section - Cruise control |
263 |
| Title - Cruise control |
263 |
| Marker - Cruise control |
263 |
| Figure - <GRAPHIK> |
263 |
| Para - The cruise control allows you to drive in a more relaxed manner, for example over long dis... |
263 |
| Para - Any given speed above approximately 25�mph (40�km�/�h) can be maintained with the cruise c... |
263 |
| OrderedList - 1 Accelerate and set: Lift lever briefly to set speed. Hold lever up to accelerate. |
263 |
| Item - 1 Accelerate and set: Lift lever briefly to set speed. Hold lever up to accelerate. |
263 |
| Item - 2 Decelerate and set: Depress lever briefly to set speed. Hold lever down to decelerate. |
263 |
| ItemPara - Normally the vehicle is accelerated to the desired speed with the accelerator. |
263 |
| ItemPara - Speed is set by briefly pushing the lever to position�1 or 2. The accelerator can then... |
263 |
| ItemPara - The speed can be increased (e.g. for passing) by using the accelerator. After the acce... |
263 |
| ItemPara - If a set speed is to be increased or decreased slightly, e. g. to adapt to the traffic... |
263 |
| Item - 3 Canceling |
264 |
| ItemPara - To cancel the cruise control, briefly push lever to position�3. |
264 |
| ItemPara - When you step on the brake pedal or the vehicle speed drops below approximately 25�mph... |
264 |
| ItemPara - If the cruise control cancels by itself and remains inoperative until the engine is re... |
264 |
| Item - 4 Resume |
264 |
| ItemPara - If the lever is briefly pushed to position�4 when driving at a speed exceeding approxi... |
264 |
| ItemPara - The last memorized speed is canceled when the electronic key in the starter switch is ... |
264 |
| Important - Important! |
264 |
| BlockTitle - Important! |
264 |
| Para - Moving gear selector lever to position� |
264 |
| Warning - <TABELLE> |
264 |
| TBody - <TABELLENHAUPTTEXT> |
264 |
| Row - <TABELLENREIHE> |
264 |
| Entry - |
264 |
| Row - <TABELLENREIHE> |
265 |
| Entry - Warning! |
265 |
| Para - Warning! |
265 |
| Para - Only use the cruise control if the traffic and weather conditions make it advisable to tra... |
265 |
| Row - <TABELLENREIHE> |
265 |
| Entry - • The use of cruise control can be dangerous on winding roads or in heavy traffic because... |
265 |
| ItemizedList - • The use of cruise control can be dangerous on winding roads or in heavy traffic ... |
265 |
| Item - • The use of cruise control can be dangerous on winding roads or in heavy traffic because ... |
265 |
| Item - • The use of cruise control can be dangerous on slippery roads. Rapid changes in tire adhe... |
265 |
| Row - <TABELLENREIHE> |
265 |
| Entry - The “Resume” function should only be operated if the driver is fully aware of the previou... |
265 |
| Para - The “Resume” function should only be operated if the driver is fully aware of the previous... |
265 |
| Note - Notes: |
265 |
| BlockTitle - Notes: |
265 |
| Para - If the engine does not brake the vehicle sufficiently while driving on a downgrade, the sp... |
265 |
| Para - Vehicles with automatic transmission: |
265 |
| Para - Downshift occurs (max. to 3rd gear) to maintain the set cruise controlled speed by using t... |
265 |
| Para - As soon as the grade eases, the automatic transmission shifts up again dependent on the se... |
265 |
| Para - Vehicles with manual transmission: |
265 |
| Para - The set cruise controlled speed is switched off when declutching exceeds four seconds duri... |
265 |
| Para - Nevertheless, in some cases you may have to step on the brake pedal to slow down. In this ... |
265 |
| Para - Use the lever to resume the previously set speed. |
265 |
| Section - Brake assist system (BAS) |
266 |
| Title - Brake assist system (BAS) |
266 |
| Marker - Brake assist system (BAS) |
266 |
| Warning - <TABELLE> |
266 |
| TBody - <TABELLENHAUPTTEXT> |
266 |
| Row - <TABELLENREIHE> |
266 |
| Entry - Warning! |
266 |
| Para - Warning! |
266 |
| Para - BAS cannot prevent the natural laws of physics from acting on the vehicle, nor can it incr... |
266 |
| Para - The BAS is designed to maximize the vehicle’s braking capability during emergency braking ... |
266 |
| Para - Applying the brakes very quickly results in maximum BAS assistance. |
266 |
| Para - To receive the benefit of the system you must apply continuous full braking power during t... |
266 |
| Para - Once the brake pedal is released, the BAS is deactivated. |
266 |
| Para - If the BAS warning message is displayed, a malfunction has been detected in the system. Th... |
266 |
| Para - With the ABS malfunctioning, the BAS is also switched off. |
266 |
| Para - If a BAS warning message is displayed, have the BAS checked at your authorized Mercedes-Be... |
266 |
| Section - Antilock brake system (ABS) |
267 |
| Title - Antilock brake system (ABS) |
267 |
| Marker - Antilock brake system (ABS) |
267 |
| Warning - <TABELLE> |
267 |
| TBody - <TABELLENHAUPTTEXT> |
267 |
| Row - <TABELLENREIHE> |
267 |
| Entry - Warning! |
267 |
| Para - Warning! |
267 |
| Para - Do not pump the brake pedal, rather use firm, steady brake pedal pressure. Pumping the bra... |
267 |
| Important - Important! |
267 |
| BlockTitle - Important! |
267 |
| Para - The ABS improves steering control of the vehicle during hard braking maneuvers. |
267 |
| Para - The ABS prevents the wheels from locking up above a vehicle speed of approximately 5 mph (... |
267 |
| Para - At the instant one of the wheels is about to lock up, a slight pulsation can be felt in th... |
267 |
| Para - Continuous steady brake pedal pressure results in applying the advantages of the ABS, name... |
267 |
| Para - In the case of an emergency brake maneuver keep continuous full pressure on the brake peda... |
267 |
| Para - On slippery road surfaces, the ABS will respond even with light brake pedal pressure becau... |
267 |
| Subtitle - ABS control |
268 |
| Bold - ABS control |
268 |
| Para - The ABS malfunction indicator lamp� |
268 |
| Para - When the ABS malfunction indicator lamp in the instrument cluster comes on while the engin... |
268 |
| Para - For |
268 |
| Para - With the ABS malfunctioning, the BAS and ESP are also switched off. Both malfunction indic... |
268 |
| Para - If the charging voltage falls below 10�volts, the malfunction indicator lamp comes on and ... |
268 |
| Para - If the ABS malfunction indicator lamp stays illuminated, have the system checked at your a... |
268 |
| Warning - <TABELLE> |
268 |
| TBody - <TABELLENHAUPTTEXT> |
268 |
| Row - <TABELLENREIHE> |
268 |
| Entry - Warning! |
268 |
| Para - Warning! |
268 |
| Para - ABS cannot prevent the natural laws of physics from acting on the vehicle, nor can it incr... |
268 |
| Note - Note: |
268 |
| BlockTitle - Note: |
268 |
| Para - To alert following vehicles to slippery road conditions you discover, operate your hazard ... |
268 |
| Section - Electronic stability program (ESP) |
269 |
| Title - Electronic stability program (ESP) |
269 |
| Marker - Electronic stability program (ESP) |
269 |
| Warning - <TABELLE> |
269 |
| TBody - <TABELLENHAUPTTEXT> |
269 |
| Row - <TABELLENREIHE> |
269 |
| Entry - Warning! |
269 |
| Para - Warning! |
269 |
| Para - ESP |
269 |
| CapLetter - ESP |
269 |
| Para - The ESP enhances directional control and reduces driving wheel spin of the vehicle under v... |
269 |
| Para - Over/understeering of the vehicle is counteracted by applying brakes to the appropriate wh... |
269 |
| Important - Important! |
269 |
| BlockTitle - Important! |
269 |
| Para - If the ESP warning lamp� |
269 |
| ItemizedList - • During take-off apply as little throttle as possible. |
269 |
| Item - • During take-off apply as little throttle as possible. |
269 |
| Item - • While driving ease up on the accelerator. |
269 |
| Item - • Adapt your speed and driving to the prevailing road conditions. |
269 |
| Item - • Do not switch off the ESP. |
269 |
| Caution - Caution! |
269 |
| BlockTitle - Caution! |
269 |
| Para - If the vehicle is towed with the front axle raised (see page� |
269 |
| Note - Notes: |
270 |
| BlockTitle - Notes: |
270 |
| Para - The yellow ESP warning lamp� |
270 |
| Para - If the ESP warning message is displayed, a malfunction has been detected in the system. Pr... |
270 |
| Para - Have the ESP checked at your authorized Mercedes�Benz Center as soon as possible. |
270 |
| Para - For |
270 |
| Para - With the ABS malfunctioning, the ESP is also switched off. |
270 |
| Para - Driving the vehicle with varied size tires will cause the wheels to rotate at different sp... |
270 |
| Para - When testing the parking brake on a brake test dynamometer, the engine must be shut off. O... |
270 |
| Para - In winter operation, the maximum effectiveness of the ESP is only achieved with Mercedes-B... |
270 |
| Subsection - Synchronizing ESP |
270 |
| Title - Synchronizing ESP |
270 |
| Para - If the power supply was interrupted (battery disconnected or empty), the ESP warning messa... |
270 |
| Para - Turn steering wheel completely to the left and then to the right. The ESP warning message ... |
270 |
| Subsection - P42.45-0287-26 |
271 |
| Title - P42.45-0287-26 |
271 |
| Marker - P42.45-0287-26 |
271 |
| Figure - <GRAPHIK> |
271 |
| Para - ESP control switch located on center console. |
271 |
| OrderedList - 1 Press to switch ESP off |
271 |
| Item - 1 Press to switch ESP off |
271 |
| ItemPara - ESP warning lamp� |
271 |
| Item - 2 Press to switch ESP on |
271 |
| ItemPara - ESP warning lamp� |
271 |
| Para - To improve the vehicle’s traction when driving with snow chains, or starting off in deep s... |
271 |
| Warning - <TABELLE> |
271 |
| TBody - <TABELLENHAUPTTEXT> |
271 |
| Row - <TABELLENREIHE> |
271 |
| Entry - Warning! |
271 |
| Para - Warning! |
271 |
| Para - When the ESP warning lamp is illuminated continuously, the ESP is switched off. |
271 |
| Row - <TABELLENREIHE> |
271 |
| Entry - Adapt your speed and driving to the prevailing road conditions. |
271 |
| Para - Adapt your speed and driving to the prevailing road conditions. |
271 |
| Para - With the ESP system switched off, the engine torque reduction feature is cancelled. Theref... |
271 |
| Para - Adapt your speed and driving to the prevailing road conditions. |
271 |
| Para - A portion of the ESP system remains active, even with the switch in the OFF position. |
271 |
| Para - If one drive wheel loses traction and begins to spin, the brake is applied until the wheel... |
271 |
| Note - Notes: |
272 |
| BlockTitle - Notes: |
272 |
| Para - Avoid spinning of one drive wheel. This may cause serious damage to the drive train which ... |
272 |
| Para - The ESP warning lamp, located in the speedometer dial, starts to flash at any vehicle spee... |
272 |
| Para - To return to the enhanced vehicle stability offered by ESP: press lower half (2) of the sw... |
272 |
| Important - Important! |
272 |
| BlockTitle - Important! |
272 |
| Para - If the ESP warning lamp flashes: |
272 |
| ItemizedList - • During take-off, apply as little throttle as possible. |
272 |
| Item - • During take-off, apply as little throttle as possible. |
272 |
| Item - • While driving, ease up on the accelerator. |
272 |
| Section - What you should know at the gas station |
273 |
| Title - What you should know at the gas station |
273 |
| Marker - What you should know at the gas station |
273 |
| Para - Fuel supply |
273 |
| Bold - Fuel supply |
273 |
| Figure - <GRAPHIK> |
273 |
| Warning - <TABELLE> |
273 |
| TBody - <TABELLENHAUPTTEXT> |
273 |
| Row - <TABELLENREIHE> |
273 |
| Entry - Warning! |
273 |
| Para - Warning! |
273 |
| Para - Gasoline is highly flammable and poisonous. It burns violently and can cause serious injur... |
273 |
| Para - Open flap by pushing near front (arrow). Turn fuel cap to the left and hold on to it until... |
273 |
| Para - See page� |
273 |
| Subtitle - Fuel |
273 |
| Bold - Fuel |
273 |
| Para - To prevent fuel vapors from escaping into open air, fully insert filler nozzle unit. |
273 |
| Para - Only fill fuel tank until the filler nozzle unit cuts out –�do not top up or overfill. |
273 |
| Warning - <TABELLE> |
273 |
| TBody - <TABELLENHAUPTTEXT> |
273 |
| Row - <TABELLENREIHE> |
273 |
| Entry - Warning! |
273 |
| Para - Warning! |
273 |
| Para - Overfilling of fuel tank may result in creating pressure in the system which could cause a... |
273 |
| Para - Leaving the engine running and the fuel cap open can cause the |
273 |
| Para - Fuel tank capacity approximately 16.4�US�gal (62.0�l). This includes approximately 2.1�US�... |
274 |
| Para - Use premium unleaded gasoline: Posted Octane Index 91 (Average of 96 RON�/�86 MON). |
274 |
| Subtitle - Engine oil |
274 |
| Bold - Engine oil |
274 |
| Para - Checking oil level, see instructions on page� |
274 |
| Para - Recommended engine oils, see Approved Service Products sheet. |
274 |
| Para - Coolant |
274 |
| Bold - Coolant |
274 |
| Para - For normal replenishing, use water (potable water quality). For further information refer ... |
274 |
| Para - Tire pressure |
274 |
| Bold - Tire pressure |
274 |
| Para - For tire pressure, refer to tire pressure label inside the fuel filler flap. See page� |
274 |
| Para - Spark plugs |
274 |
| Bold - Spark plugs |
274 |
| Para - Approved spark plugs, refer to |
274 |
| Para - Air conditioner |
274 |
| Bold - Air conditioner |
274 |
| Para - R-134a refrigerant and special PAG lubricant, refer to |
274 |
| Para - Bulbs |
274 |
| Bold - Bulbs |
274 |
| Para - High and low beams: H7 (55 W), low beam: Xenon (optional) fog lamps: H B4 (55 W), turn sig... |
274 |
| Section - Check regularly and before a long trip |
275 |
| Title - Check regularly and before a long trip |
275 |
| Marker - Check regularly and before a long trip |
275 |
| Figure - <GRAPHIK> |
275 |
| OrderedList - 1 Windshield washer and headlamp cleaning system |
275 |
| Item - 1 Windshield washer and headlamp cleaning system |
275 |
| Bold - 1 Windshield washer and headlamp cleaning system |
275 |
| Item - 2 Coolant level |
275 |
| Bold - 2 Coolant level |
275 |
| Bold - , |
275 |
| Item - 3 Brake fluid, |
275 |
| Bold - 3 Brake fluid, |
275 |
| Para - Opening hood, see page� |
275 |
| Para - Vehicle lighting: |
275 |
| Bold - Vehicle lighting: |
275 |
| Para - Exterior lamp switch, see page� |
275 |
| ToC - Contents - Instrument cluster display |
276 |
| Title - Contents - Instrument cluster display |
276 |
| Marker - Contents - Instrument cluster display |
276 |
| ToCEntry - Malfunction and indicator lamps in the instrument cluster 268 |
276 |
| ToCEntry - On-board diagnostic system 268 |
276 |
| ToCEntry - Check engine malfunction indicator lamp 268 |
276 |
| ToCSubEntry - Check engine malfunction indicator lamp 268 |
276 |
| ToCSubEntry - Brake warning lamp 270 |
276 |
| ToCSubEntry - Supplemental restraint system (SRS) indicator lamp 271 |
276 |
| ToCSubEntry - Fuel reserve warning 271 |
276 |
| ToCSubEntry - ABS malfunction indicator lamp 272 |
276 |
| ToCSubEntry - Electronic stability program (ESP) — warning lamp 273 |
276 |
| ToCEntry - Seat belt nonusage warning lamp 273 |
276 |
| ToCEntry - Malfunction and indicator lamp in the center console 273 |
276 |
| ToCEntry - AIRBAG OFF indicator lamp 273 |
276 |
| ToCSubEntry - AIRBAG OFF indicator lamp 273 |
276 |
| ToCEntry - Malfunction and warning messages in the multifunction display 274 |
276 |
| ToCEntry - DISPLAY DEFECTIVE 275 |
276 |
| ToCSubEntry - DISPLAY DEFECTIVE 275 |
276 |
| ToCSubEntry - BATTERY / ALTERNATOR 276 |
276 |
| ToCSubEntry - ANTILOCK BRAKE SYSTEM 277 |
276 |
| ToCSubEntry - BRAKE ASSIST 277 |
276 |
| ToCSubEntry - BRAKE LINING WEAR 278 |
276 |
| ToCSubEntry - BRAKE FLUID 278 |
276 |
| ToCSubEntry - PARKING BRAKE 279 |
276 |
| ToCSubEntry - SEAT BELT SYSTEM 279 |
276 |
| ToCSubEntry - ELEC. STABIL. PROG. (Electronic stability program) 280 |
276 |
| ToCSubEntry - COOLANT (coolant level) 281 |
276 |
| ToCSubEntry - COOLANT (coolant temperature) 282 |
276 |
| ToCSubEntry - ENGINE OIL LEVEL 283 |
276 |
| ToCSubEntry - LIGHTING SYSTEM 284 |
276 |
| ToCSubEntry - LIGHT SENSOR 286 |
276 |
| ToCSubEntry - DOOR 286 |
276 |
| ToCSubEntry - TRUNK OPEN 287 |
276 |
| ToCSubEntry - HOOD 287 |
276 |
| ToCSubEntry - TELEPHONE – FUNCTION 288 |
276 |
| ToCSubEntry - TELE AID 288 |
276 |
| ToCSubEntry - WASHER FLUID 289 |
276 |
| ToCSubEntry - RESTRAINT SYSTEM 290 |
276 |
| ToCSubEntry - KEY 290 |
276 |
| ToCSubEntry - FUEL RESERVE 291 |
276 |
| ToCSubEntry - UNDERVOLTAGE 291 |
276 |
| ToCSubEntry - STEER. WHEEL ADJUST. 292 |
276 |
| ToCSubEntry - ENTRANCE POSITION 292 |
276 |
| Part - Instrument cluster display |
277 |
| Section - Instrument cluster display |
277 |
| Title - Instrument cluster display |
277 |
| Hypertext - Instrument cluster display |
277 |
| Marker - Malfunction and indicator lamps |
277 |
| Subtitle - General information: |
277 |
| Para - If a bulb in the instrument cluster fails to light up during the bulb self�check when turn... |
277 |
| Subtitle - Emission control |
277 |
| Bold - Emission control |
277 |
| Para - Certain systems of the engine serve to keep the toxic components of the exhaust gases with... |
277 |
| Para - These systems, of course, will function properly only when maintained strictly according t... |
277 |
| Warning - <TABELLE> |
277 |
| TBody - <TABELLENHAUPTTEXT> |
277 |
| Row - <TABELLENREIHE> |
277 |
| Entry - |
277 |
| Row - <TABELLENREIHE> |
277 |
| Entry - Warning! |
277 |
| Para - Warning! |
277 |
| Para - Inhalation of exhaust gas is hazardous to your health. All exhaust gas contains carbon mon... |
277 |
| Row - <TABELLENREIHE> |
277 |
| Entry - Do not run the engine in confined areas (such as a garage) which are not properly ventila... |
277 |
| Para - Do not run the engine in confined areas (such as a garage) which are not properly ventilat... |
277 |
| Section - On-board diagnostic system |
277 |
| Title - On-board diagnostic system |
277 |
| Marker - On-board diagnostic system |
277 |
| Subsection - Check engine malfunction indicator lamp |
277 |
| Title - Check engine malfunction indicator lamp |
277 |
| Marker - Check engine malfunction indicator lamp |
277 |
| Para - <GRAPHIK> |
277 |
| Symbol - <GRAPHIK> |
277 |
| Para - If the |
278 |
| Para - The Sequential Multiport Fuel Injection (SFI) control module monitors emission control com... |
278 |
| Para - If the |
278 |
| Para - With some exceptions, the control module switches off the |
278 |
| Para - An on-board diagnostic connector is located in the passenger compartment near to the parki... |
278 |
| Subsection - Brake warning lamp |
279 |
| Title - Brake warning lamp |
279 |
| Marker - Brake warning lamp |
279 |
| Para - <GRAPHIK> |
279 |
| Symbol - <GRAPHIK> |
279 |
| Para - <GRAPHIK> |
279 |
| Symbol - <GRAPHIK> |
279 |
| Para - When the brake warning lamp and message appear while the engine is running, this means: |
279 |
| ItemizedList - • there is insufficient brake fluid in the reservoir (engine running and parking b... |
279 |
| Item - • there is insufficient brake fluid in the reservoir (engine running and parking brake rel... |
279 |
| Item - • the parking brake is set (engine running). |
279 |
| Para - |
279 |
| Para - |
279 |
| Warning - <TABELLE> |
279 |
| TBody - <TABELLENHAUPTTEXT> |
279 |
| Row - <TABELLENREIHE> |
279 |
| Entry - |
279 |
| Row - <TABELLENREIHE> |
279 |
| Entry - Warning! |
279 |
| Para - Warning! |
279 |
| Para - Driving with the brake warning lamp illuminated can result in an accident. Have your brake... |
279 |
| Note - Note: |
279 |
| BlockTitle - Note: |
279 |
| Para - If you find that the minimum mark on the brake fluid reservoir is reached, have the brake ... |
279 |
| Subsection - Supplemental restraint system (SRS) indicator lamp |
280 |
| Title - Supplemental restraint system (SRS) indicator lamp |
280 |
| Marker - Supplemental restraint system (SRS) indicator lamp |
280 |
| Para - <GRAPHIK> |
280 |
| Symbol - <GRAPHIK> |
280 |
| Warning - <TABELLE> |
280 |
| TBody - <TABELLENHAUPTTEXT> |
280 |
| Row - <TABELLENREIHE> |
280 |
| Entry - Warning! |
280 |
| Para - Warning! |
280 |
| Para - In the event a malfunction of the “SRS” is indicated as outlined above, the “SRS” may not ... |
280 |
| Para - See page� |
280 |
| Subsection - P54.30-2941-21 |
280 |
| Title - P54.30-2941-21 |
280 |
| Marker - P54.30-2941-21 |
280 |
| Figure - <GRAPHIK> |
280 |
| OrderedList - 1 Fuel reserve indicator |
280 |
| Item - 1 Fuel reserve indicator |
280 |
| Para - When the warning lamp�(1) comes on after starting the engine, or if comes on while driving... |
280 |
| Para - See page� |
280 |
| Subsection - ABS malfunction indicator lamp |
281 |
| Title - ABS malfunction indicator lamp |
281 |
| Marker - ABS malfunction indicator lamp |
281 |
| Para - <GRAPHIK> |
281 |
| Symbol - <GRAPHIK> |
281 |
| Para - When the ABS malfunction indicator lamp symbol and warning in the instrument cluster remai... |
281 |
| Para - A malfunctioning ABS control unit can possibly affect the operation of other systems (e.g.... |
281 |
| Para - With the ABS malfunctioning, the BAS and ESP are also switched off. The malfunction indica... |
281 |
| Para - If the charging voltage falls below 10�volts, the malfunction indicator lamp comes on and ... |
281 |
| Para - Have the system checked at your authorized Mercedes�Benz Center as soon as possible. |
281 |
| Para - See page� |
281 |
| Subsection - Electronic stability program (ESP) — warning lamp |
282 |
| Title - Electronic stability program (ESP) — warning lamp |
282 |
| Marker - Electronic stability program (ESP) — warning lamp |
282 |
| Para - <GRAPHIK> |
282 |
| Symbol - <GRAPHIK> |
282 |
| Para - If the ESP malfunction indicator lamp remains illuminated with the engine running, a malfu... |
282 |
| Para - See electronic stability program (ESP) on page� |
282 |
| Subsection - Seat belts:Warning lamp |
282 |
| Title - Seat belts:Warning lamp |
282 |
| Marker - Seat belts:Warning lamp |
282 |
| Para - <GRAPHIK> |
282 |
| Symbol - <GRAPHIK> |
282 |
| Para - After starting the engine, the seat belt nonusage warning lamp blinks for a brief period t... |
282 |
| Section - Malfunction and indicator lamp in the center console |
282 |
| Title - Malfunction and indicator lamp in the center console |
282 |
| Marker - Malfunction and indicator lamp in the center console |
282 |
| Subsection - AIRBAG OFF indicator lamp |
282 |
| Title - AIRBAG OFF indicator lamp |
282 |
| Marker - AIRBAG OFF indicator lamp |
282 |
| CapLetter - AIRBAG OFF |
282 |
| Para - The |
282 |
| Para - It does not light up if there is a fault in the system. |
282 |
| Para - The |
282 |
| Para - See page� |
282 |
| Para - |
282 |
| Para - |
282 |
| Para - |
282 |
| Para - |
282 |
| Para - |
282 |
| Para - |
282 |
| Footnote - Baby Smart |
282 |
| Section - Malfunction and warning messages |
283 |
| Title - Malfunction and warning messages |
283 |
| Marker - Malfunction and warning messages |
283 |
| Para - Malfunction and warning messages for the following systems will be displayed immediately i... |
283 |
| Para - Messages of most immediate priority. |
283 |
| Para - These cannot be cleared from the instrument cluster using the reset knob on the instrument... |
283 |
| Para - Categories C2 and C3: |
283 |
| Para - Messages of less immediate priority. |
283 |
| Para - These can be cleared from the instrument cluster using the reset knob on the instrument cl... |
283 |
| Note - Note: |
283 |
| BlockTitle - Note: |
283 |
| Para - Certain malfunction and warning messages are accompanied by an audible signal. Malfunction... |
283 |
| Para - Temporary messages such as |
283 |
| Warning - <TABELLE> |
283 |
| TBody - <TABELLENHAUPTTEXT> |
283 |
| Row - <TABELLENREIHE> |
283 |
| Entry - Warning! |
283 |
| Para - Warning! |
283 |
| Para - All categories of messages contain important information which should be taken note of and... |
283 |
| Row - <TABELLENREIHE> |
283 |
| Entry - Failure to repair condition noted may cause damage not covered by the Mercedes�Benz Limit... |
283 |
| Para - Failure to repair condition noted may cause damage not covered by the Mercedes�Benz Limite... |
283 |
| Subsection - P54.30-2085-21 |
284 |
| Title - P54.30-2085-21 |
284 |
| Marker - P54.30-2085-21 |
284 |
| CapLetter - DISPLAY DEFECTIVE |
284 |
| Figure - <GRAPHIK> |
284 |
| Table - <TABELLE> |
284 |
| THead - <TABELLENKOPFZEILE> |
284 |
| Row - <TABELLENREIHE> |
284 |
| Entry - Line 1 |
284 |
| Bold - Line 1 |
284 |
| Entry - Line 2 |
284 |
| Bold - Line 2 |
284 |
| Entry - C* |
284 |
| Bold - C* |
284 |
| TBody - <TABELLENHAUPTTEXT> |
284 |
| Row - <TABELLENREIHE> |
284 |
| Entry - Visit workshop! |
284 |
| Entry - Display FAULty |
284 |
| Entry - 2 |
284 |
| Footnote - * C = Category, see page� |
284 |
| Para - This message is displayed to indicate that the information being relayed by the engine con... |
284 |
| Subsection - P54.30-2089-21 |
284 |
| Title - P54.30-2089-21 |
284 |
| Marker - P54.30-2089-21 |
284 |
| CapLetter - Display defective |
284 |
| Figure - <GRAPHIK> |
284 |
| Table - <TABELLE> |
284 |
| THead - <TABELLENKOPFZEILE> |
284 |
| Row - <TABELLENREIHE> |
284 |
| Entry - Line 1 |
284 |
| Bold - Line 1 |
284 |
| Entry - Line 2 |
284 |
| Bold - Line 2 |
284 |
| Entry - C* |
284 |
| Bold - C* |
284 |
| TBody - <TABELLENHAUPTTEXT> |
284 |
| Row - <TABELLENREIHE> |
284 |
| Entry - visit workshop! |
284 |
| Entry - display fAULTY |
284 |
| Entry - 2 |
284 |
| Footnote - * C = Category, see page� |
284 |
| Para - The displays for several systems have failed. Some systems themselves may also have failed. |
284 |
| Subsection - P54.30-2093-21 |
285 |
| Title - P54.30-2093-21 |
285 |
| Marker - P54.30-2093-21 |
285 |
| CapLetter - BATTERY �/�ALTERNATOR |
285 |
| Figure - <GRAPHIK> |
285 |
| Table - <TABELLE> |
285 |
| THead - <TABELLENKOPFZEILE> |
285 |
| Row - <TABELLENREIHE> |
285 |
| Entry - Line 1 |
285 |
| Bold - Line 1 |
285 |
| Entry - Line 2 |
285 |
| Bold - Line 2 |
285 |
| Entry - C* |
285 |
| Bold - C* |
285 |
| TBody - <TABELLENHAUPTTEXT> |
285 |
| Row - <TABELLENREIHE> |
285 |
| Entry - battery/ALTERNaTOR |
285 |
| Entry - visit workshop! |
285 |
| Entry - 2 |
285 |
| Footnote - * C = Category, see page� |
285 |
| Para - This message indicates a malfunction which must be repaired immediately. |
285 |
| Para - It may indicate that the poly-V-belt has broken. Should this condition occur, the poly-V-b... |
285 |
| Para - Do not continue to drive the vehicle with this message displayed. |
285 |
| Para - Doing so could result in serious engine damage that is not covered by the Mercedes�Benz Li... |
285 |
| Subsection - P54.30-2097-21 |
286 |
| Title - P54.30-2097-21 |
286 |
| Marker - P54.30-2097-21 |
286 |
| CapLetter - ANTILOCK BRAKE SYSTEM |
286 |
| Figure - <GRAPHIK> |
286 |
| Table - <TABELLE> |
286 |
| THead - <TABELLENKOPFZEILE> |
286 |
| Row - <TABELLENREIHE> |
286 |
| Entry - Line 1 |
286 |
| Bold - Line 1 |
286 |
| Entry - Line 2 |
286 |
| Bold - Line 2 |
286 |
| Entry - C* |
286 |
| Bold - C* |
286 |
| TBody - <TABELLENHAUPTTEXT> |
286 |
| Row - <TABELLENREIHE> |
286 |
| Entry - aBS system |
286 |
| Entry - visit workshop! |
286 |
| Entry - 2 |
286 |
| Row - <TABELLENREIHE> |
286 |
| Entry - display defective |
286 |
| Entry - visit workshop!1 |
286 |
| Entry - 2 |
286 |
| Footnote - * C = Category, see page� |
286 |
| Para - See page� |
286 |
| Footnote - 1 The display or the system is malfunctioning |
286 |
| Subsection - P54.30-2097-21 |
286 |
| Title - P54.30-2097-21 |
286 |
| Marker - P54.30-2097-21 |
286 |
| CapLetter - BRAKE ASSIST |
286 |
| Figure - <GRAPHIK> |
286 |
| Table - <TABELLE> |
286 |
| THead - <TABELLENKOPFZEILE> |
286 |
| Row - <TABELLENREIHE> |
286 |
| Entry - Line 1 |
286 |
| Bold - Line 1 |
286 |
| Entry - Line 2 |
286 |
| Bold - Line 2 |
286 |
| Entry - C* |
286 |
| Bold - C* |
286 |
| TBody - <TABELLENHAUPTTEXT> |
286 |
| Row - <TABELLENREIHE> |
286 |
| Entry - brake assist |
286 |
| Entry - not available! |
286 |
| Entry - 2 |
286 |
| Row - <TABELLENREIHE> |
286 |
| Entry - brake assist |
286 |
| Entry - visit workshop! |
286 |
| Entry - 2 |
286 |
| Row - <TABELLENREIHE> |
286 |
| Entry - DISPLAY DEFECTIVE |
286 |
| Entry - visit workshop! |
286 |
| Entry - 2 |
286 |
| Footnote - * C = Category, see page� |
286 |
| Para - A malfunction has been detected in the system. The brake system functions in the usual man... |
286 |
| Para - See page� |
286 |
| Subsection - P54.30-2105-21 |
287 |
| Title - P54.30-2105-21 |
287 |
| Marker - P54.30-2105-21 |
287 |
| CapLetter - BRAKE LINING WEAR |
287 |
| Figure - <GRAPHIK> |
287 |
| Table - <TABELLE> |
287 |
| THead - <TABELLENKOPFZEILE> |
287 |
| Row - <TABELLENREIHE> |
287 |
| Entry - Line 1 |
287 |
| Bold - Line 1 |
287 |
| Entry - Line 2 |
287 |
| Bold - Line 2 |
287 |
| Entry - C* |
287 |
| Bold - C* |
287 |
| TBody - <TABELLENHAUPTTEXT> |
287 |
| Row - <TABELLENREIHE> |
287 |
| Entry - Brake lining wear |
287 |
| Entry - visit workshop! |
287 |
| Entry - 2 |
287 |
| Footnote - * C = Category, see page� |
287 |
| Para - When this message appears during braking, it indicates that the brake pads are worn down. |
287 |
| Para - Have the brake system checked at your authorized Mercedes�Benz Center as soon as possible. |
287 |
| Subsection - P54.30-2101-21 |
287 |
| Title - P54.30-2101-21 |
287 |
| Marker - P54.30-2101-21 |
287 |
| CapLetter - BRAKE FLUID |
287 |
| Figure - <GRAPHIK> |
287 |
| Table - <TABELLE> |
287 |
| THead - <TABELLENKOPFZEILE> |
287 |
| Row - <TABELLENREIHE> |
287 |
| Entry - Line 1 |
287 |
| Bold - Line 1 |
287 |
| Entry - Line 2 |
287 |
| Bold - Line 2 |
287 |
| Entry - C* |
287 |
| Bold - C* |
287 |
| TBody - <TABELLENHAUPTTEXT> |
287 |
| Row - <TABELLENREIHE> |
287 |
| Entry - Brake fluid |
287 |
| Entry - visit workshop! |
287 |
| Entry - 2 |
287 |
| Footnote - * C = Category, see page� |
287 |
| Warning - <TABELLE> |
287 |
| TBody - <TABELLENHAUPTTEXT> |
287 |
| Row - <TABELLENREIHE> |
287 |
| Entry - Warning! |
287 |
| Para - Warning! |
287 |
| Para - Driving with this message displayed can result in an accident. Have your brake system chec... |
287 |
| Subsection - P54.30-2129-21 |
288 |
| Title - P54.30-2129-21 |
288 |
| Marker - P54.30-2129-21 |
288 |
| CapLetter - PARKING BRAKE |
288 |
| Figure - <GRAPHIK> |
288 |
| Table - <TABELLE> |
288 |
| THead - <TABELLENKOPFZEILE> |
288 |
| Row - <TABELLENREIHE> |
288 |
| Entry - Line 1 |
288 |
| Bold - Line 1 |
288 |
| Entry - Line 2 |
288 |
| Bold - Line 2 |
288 |
| Entry - C* |
288 |
| Bold - C* |
288 |
| TBody - <TABELLENHAUPTTEXT> |
288 |
| Row - <TABELLENREIHE> |
288 |
| Entry - Parking brake |
288 |
| Entry - Engage Brake! |
288 |
| Entry - 1 |
288 |
| Row - <TABELLENREIHE> |
288 |
| Entry - Parking brake |
288 |
| Entry - release Brake! |
288 |
| Entry - 1 |
288 |
| Footnote - * C = Category, see page� |
288 |
| Subsection - P54.30-2129-21 |
288 |
| Title - P54.30-2129-21 |
288 |
| Marker - P54.30-2129-21 |
288 |
| CapLetter - SEAT BELT SYSTEM |
288 |
| Figure - <GRAPHIK> |
288 |
| Table - <TABELLE> |
288 |
| THead - <TABELLENKOPFZEILE> |
288 |
| Row - <TABELLENREIHE> |
288 |
| Entry - Line 1 |
288 |
| Bold - Line 1 |
288 |
| Entry - Line 2 |
288 |
| Bold - Line 2 |
288 |
| Entry - C* |
288 |
| Bold - C* |
288 |
| TBody - <TABELLENHAUPTTEXT> |
288 |
| Row - <TABELLENREIHE> |
288 |
| Entry - seat belt system |
288 |
| Entry - VISIT WORKSHOP! |
288 |
| Entry - 1 |
288 |
| Row - <TABELLENREIHE> |
288 |
| Entry - PASSENGER SEAT BELT |
288 |
| Entry - FASTEN SEAT BELT! |
288 |
| Entry - 2 |
288 |
| Row - <TABELLENREIHE> |
288 |
| Entry - DRIVER SEAT BELT |
288 |
| Entry - FASTEN SEAT BELT! |
288 |
| Entry - 2 |
288 |
| Footnote - * C = Category, see page� |
288 |
| Subsection - P54.30-2125-21 |
289 |
| Title - P54.30-2125-21 |
289 |
| Marker - P54.30-2125-21 |
289 |
| CapLetter - ELEC. STABIL. PROG. |
289 |
| Figure - <GRAPHIK> |
289 |
| Table - <TABELLE> |
289 |
| THead - <TABELLENKOPFZEILE> |
289 |
| Row - <TABELLENREIHE> |
289 |
| Entry - Line 1 |
289 |
| Bold - Line 1 |
289 |
| Entry - Line 2 |
289 |
| Bold - Line 2 |
289 |
| Entry - C* |
289 |
| Bold - C* |
289 |
| TBody - <TABELLENHAUPTTEXT> |
289 |
| Row - <TABELLENREIHE> |
289 |
| Entry - elec. stabil. prog. |
289 |
| Entry - not available!1, 2, 3, 4 |
289 |
| Entry - 2 |
289 |
| Row - <TABELLENREIHE> |
289 |
| Entry - elec. stabil. prog. |
289 |
| Entry - visit workshop!1, 5 |
289 |
| Entry - 2 |
289 |
| Row - <TABELLENREIHE> |
289 |
| Entry - Display defective |
289 |
| Entry - Visit workshop!6 |
289 |
| Entry - 2 |
289 |
| Footnote - * C = Category, see page� |
289 |
| Para - |
289 |
| Para - |
289 |
| Para - |
289 |
| Para - |
289 |
| Footnote - 1 The enhanced vehicle stability offered by ESP and the torque reduction feature are u... |
289 |
| Footnote - 2 This message may be displayed if the power supply was interrupted (battery disconnec... |
289 |
| Footnote - 3 The system is temporarily unavailable. The reason could be that the self-diagnosis h... |
289 |
| Footnote - 4 The system is unavailable due to low voltage, e.g. battery not being charged. |
289 |
| Footnote - 5 A malfunction has been detected in the system. In case of ESP malfunction the ESP wa... |
289 |
| Footnote - 6 The display or the system is malfunctioning. |
289 |
| Subsection - P54.30-2137-21 |
290 |
| Title - P54.30-2137-21 |
290 |
| Marker - P54.30-2137-21 |
290 |
| CapLetter - COOLANT |
290 |
| Figure - <GRAPHIK> |
290 |
| Table - <TABELLE> |
290 |
| THead - <TABELLENKOPFZEILE> |
290 |
| Row - <TABELLENREIHE> |
290 |
| Entry - Line 1 |
290 |
| Bold - Line 1 |
290 |
| Entry - Line 2 |
290 |
| Bold - Line 2 |
290 |
| Entry - C* |
290 |
| Bold - C* |
290 |
| TBody - <TABELLENHAUPTTEXT> |
290 |
| Row - <TABELLENREIHE> |
290 |
| Entry - Coolant |
290 |
| Entry - check level! |
290 |
| Entry - 2 |
290 |
| Footnote - * C = Category, see page� |
290 |
| Para - When this message appears while driving, the coolant level has dropped below the required ... |
290 |
| Para - The low engine coolant level warning should not be ignored. Extended driving with the symb... |
290 |
| Para - In cases of major or frequent minor coolant loss, have the cooling system checked at your ... |
290 |
| Note - Note: |
290 |
| BlockTitle - Note: |
290 |
| Para - Do not drive without coolant in the cooling system. The engine will overheat causing major... |
290 |
| Para - Monitor the coolant temperature gauge while driving, see page� |
290 |
| Para - See page� |
290 |
| Warning - <TABELLE> |
290 |
| TBody - <TABELLENHAUPTTEXT> |
290 |
| Row - <TABELLENREIHE> |
290 |
| Entry - Warning! |
290 |
| Para - Warning! |
290 |
| Para - Do not spill antifreeze on hot engine parts. Antifreeze contains ethylene glycol which may... |
290 |
| Subsection - P54.30-2141-21 |
291 |
| Title - P54.30-2141-21 |
291 |
| Marker - P54.30-2141-21 |
291 |
| CapLetter - COOLANT |
291 |
| Figure - <GRAPHIK> |
291 |
| Table - <TABELLE> |
291 |
| THead - <TABELLENKOPFZEILE> |
291 |
| Row - <TABELLENREIHE> |
291 |
| Entry - Line 1 |
291 |
| Bold - Line 1 |
291 |
| Entry - Line 2 |
291 |
| Bold - Line 2 |
291 |
| Entry - C* |
291 |
| Bold - C* |
291 |
| TBody - <TABELLENHAUPTTEXT> |
291 |
| Row - <TABELLENREIHE> |
291 |
| Entry - coolant |
291 |
| Entry - stop, engine off!1 |
291 |
| Entry - 1 |
291 |
| Row - <TABELLENREIHE> |
291 |
| Entry - coolant |
291 |
| Entry - Visit workshop!2 |
291 |
| Entry - 2 |
291 |
| Footnote - * C = Category, see page� |
291 |
| Footnote - 1 This may indicate that the poly-V-belt has broken. Should this condition occur, the ... |
291 |
| Footnote - 2 The cooling fan for the coolant is faulty. Observe the coolant temperature gauge. Se... |
291 |
| Para - During severe operating conditions and stop-and-go city traffic, the coolant temperature m... |
291 |
| Para - The engine should not be operated with the coolant temperature above 120 |
291 |
| Warning - <TABELLE> |
291 |
| TBody - <TABELLENHAUPTTEXT> |
291 |
| Row - <TABELLENREIHE> |
291 |
| Entry - Warning! |
291 |
| Para - Warning! |
291 |
| Para - Driving when your engine is badly overheated can cause some fluids which may have leaked i... |
291 |
| Row - <TABELLENREIHE> |
291 |
| Entry - Steam from an overheated engine can cause serious burns and can occur just by opening the... |
291 |
| Para - Steam from an overheated engine can cause serious burns and can occur just by opening the ... |
291 |
| Row - <TABELLENREIHE> |
291 |
| Entry - Turn off the engine, get out of the vehicle and do not stand near the vehicle until it co... |
291 |
| Para - Turn off the engine, get out of the vehicle and do not stand near the vehicle until it coo... |
291 |
| Subsection - P54.30-2157-21 |
292 |
| Title - P54.30-2157-21 |
292 |
| Marker - P54.30-2157-21 |
292 |
| CapLetter - ENGINE OIL LEVEL |
292 |
| Figure - <GRAPHIK> |
292 |
| Table - <TABELLE> |
292 |
| THead - <TABELLENKOPFZEILE> |
292 |
| Row - <TABELLENREIHE> |
292 |
| Entry - Line 1 |
292 |
| Bold - Line 1 |
292 |
| Entry - Line 2 |
292 |
| Bold - Line 2 |
292 |
| Entry - C* |
292 |
| Bold - C |
292 |
| TBody - <TABELLENHAUPTTEXT> |
292 |
| Row - <TABELLENREIHE> |
292 |
| Entry - Engine oil level |
292 |
| Entry - check level!1 |
292 |
| Entry - 2 |
292 |
| Row - <TABELLENREIHE> |
292 |
| Entry - Engine oil level |
292 |
| Entry - stop, engine off!2 |
292 |
| Entry - 1 |
292 |
| Row - <TABELLENREIHE> |
292 |
| Entry - engine oil level |
292 |
| Entry - reduce oil level13 |
292 |
| Entry - 2 |
292 |
| Row - <TABELLENREIHE> |
292 |
| Entry - Engine oil |
292 |
| Entry - visit workshop!4 |
292 |
| Entry - 2 |
292 |
| Row - <TABELLENREIHE> |
292 |
| Entry - Engine oil level |
292 |
| Entry - visit workshop!5 |
292 |
| Entry - 2 |
292 |
| Footnote - * C = Category, see page� |
292 |
| Footnote - 1 The engine oil level must be checked immediately. See Engine oil level indicator on ... |
292 |
| Footnote - 2 There is no oil in the engine. There is a danger of engine damage. |
292 |
| Footnote - 3 There is a risk of damaging the engine or catalytic converter. The engine oil level ... |
292 |
| Footnote - 4 The engine oil level has dropped to a critical level. Check the engine oil level imm... |
292 |
| Footnote - 5 The measuring system is malfunctioning. |
292 |
| Para - When the |
292 |
| Para - When this occurs, the warning will first come on intermittently and then stay on if the oi... |
292 |
| Para - If no oil leaks are noted, continue to drive to the nearest service station where the engi... |
292 |
| Para - The engine oil level warnings should not be ignored. Extended driving with the symbol disp... |
292 |
| Subsection - P54.30-2145-21 |
293 |
| Title - P54.30-2145-21 |
293 |
| Marker - P54.30-2145-21 |
293 |
| CapLetter - LIGHTING SYSTEM |
293 |
| Figure - <GRAPHIK> |
293 |
| Table - <TABELLE> |
293 |
| THead - <TABELLENKOPFZEILE> |
293 |
| Row - <TABELLENREIHE> |
293 |
| Entry - Line 1 |
293 |
| Bold - Line 1 |
293 |
| Entry - Line 2 |
293 |
| Bold - Line 2 |
293 |
| Entry - C* |
293 |
| Bold - C |
293 |
| TBody - <TABELLENHAUPTTEXT> |
293 |
| Row - <TABELLENREIHE> |
293 |
| Entry - low beam,l |
293 |
| Entry - check lamp! |
293 |
| Entry - 2 |
293 |
| Row - <TABELLENREIHE> |
293 |
| Entry - low beam,r |
293 |
| Entry - check lamp! |
293 |
| Entry - 2 |
293 |
| Row - <TABELLENREIHE> |
293 |
| Entry - Display defective |
293 |
| Entry - visit workshop!1 |
293 |
| Entry - 2 |
293 |
| Row - <TABELLENREIHE> |
293 |
| Entry - turn signal, l |
293 |
| Entry - check lamp! |
293 |
| Entry - 2 |
293 |
| Row - <TABELLENREIHE> |
293 |
| Entry - turn signal, r |
293 |
| Entry - check lamp! |
293 |
| Entry - 2 |
293 |
| Row - <TABELLENREIHE> |
293 |
| Entry - l. turn sig. rflectr |
293 |
| Entry - check lamp! |
293 |
| Entry - 2 |
293 |
| Row - <TABELLENREIHE> |
293 |
| Entry - r. turn sig. rflectr |
293 |
| Entry - check lamp! |
293 |
| Entry - 2 |
293 |
| Row - <TABELLENREIHE> |
293 |
| Entry - turn signal F, l |
293 |
| Entry - check lamp! |
293 |
| Entry - 2 |
293 |
| Row - <TABELLENREIHE> |
293 |
| Entry - turn signal F, R |
293 |
| Entry - check lamp! |
293 |
| Entry - 2 |
293 |
| Row - <TABELLENREIHE> |
293 |
| Entry - brake light2 |
293 |
| Entry - visit workshop! |
293 |
| Entry - 2 |
293 |
| Row - <TABELLENREIHE> |
293 |
| Entry - brake light, l3 |
293 |
| Entry - check lamp! |
293 |
| Entry - 2 |
293 |
| Row - <TABELLENREIHE> |
293 |
| Entry - brake light, r3 |
293 |
| Entry - check lamp! |
293 |
| Entry - 2 |
293 |
| Row - <TABELLENREIHE> |
293 |
| Entry - 3rd stop lamp3 |
293 |
| Entry - check lamp! |
293 |
| Entry - 2 |
293 |
| Row - <TABELLENREIHE> |
293 |
| Entry - high beam, l |
293 |
| Entry - check lamp! |
293 |
| Entry - 2 |
293 |
| Row - <TABELLENREIHE> |
293 |
| Entry - high beam, r |
293 |
| Entry - check lamp! |
293 |
| Entry - 2 |
293 |
| Row - <TABELLENREIHE> |
293 |
| Entry - license plate l, l |
293 |
| Entry - check lamp! |
293 |
| Entry - 2 |
293 |
| Row - <TABELLENREIHE> |
293 |
| Entry - license plate l, r |
293 |
| Entry - check lamp! |
293 |
| Entry - 2 |
293 |
| Row - <TABELLENREIHE> |
293 |
| Entry - Lights |
293 |
| Entry - switch off lights! |
293 |
| Entry - 1 |
293 |
| Row - <TABELLENREIHE> |
293 |
| Entry - autom. light on |
293 |
| Entry - remove key! |
293 |
| Entry - 1 |
293 |
| Row - <TABELLENREIHE> |
293 |
| Entry - front foglamp, l |
293 |
| Entry - check lamp! |
293 |
| Entry - 2 |
293 |
| Row - <TABELLENREIHE> |
293 |
| Entry - front foglamp, r |
293 |
| Entry - check lamp! |
293 |
| Entry - 2 |
293 |
| Row - <TABELLENREIHE> |
293 |
| Entry - rear foglamp |
293 |
| Entry - check lamp! |
293 |
| Entry - 2 |
293 |
| Row - <TABELLENREIHE> |
294 |
| Entry - rear foglamp |
294 |
| Entry - Switch off Substitute Lamp On!4 |
294 |
| Entry - 2 |
294 |
| Row - <TABELLENREIHE> |
294 |
| Entry - reverse light, l |
294 |
| Entry - check lamp! |
294 |
| Entry - 2 |
294 |
| Row - <TABELLENREIHE> |
294 |
| Entry - reverse light, r |
294 |
| Entry - check lamp! |
294 |
| Entry - 2 |
294 |
| Row - <TABELLENREIHE> |
294 |
| Entry - tail light, l |
294 |
| Entry - check lamp! Substitute Lamp On!4 |
294 |
| Entry - 2 |
294 |
| Row - <TABELLENREIHE> |
294 |
| Entry - tail light, r |
294 |
| Entry - check lamp! Substitute Lamp On!4 |
294 |
| Entry - 2 |
294 |
| Row - <TABELLENREIHE> |
294 |
| Entry - sidelight, l |
294 |
| Entry - check lamp! Substitute Lamp On!4 |
294 |
| Entry - 2 |
294 |
| Row - <TABELLENREIHE> |
294 |
| Entry - sidelight, r |
294 |
| Entry - check lamp! Substitute Lamp On!4 |
294 |
| Entry - 2 |
294 |
| Para - In the case of bulb failures in certain lamps, other lamps will substitute. See page� |
294 |
| Footnote - * C = Category, see page� |
294 |
| Footnote - 1 The display or the system is malfunctioning. |
294 |
| Footnote - 2 The brake lamps are switching on after a delay or are permanently on – visit worksho... |
294 |
| Footnote - 3 The brake lamp comprises several light emitting diodes. The warning message will onl... |
294 |
| Footnote - 4 Other bulbs will be brought into use as replacements when certain lamps blow. |
294 |
| Subsection - P54.30-2149-21 |
295 |
| Title - P54.30-2149-21 |
295 |
| Marker - P54.30-2149-21 |
295 |
| CapLetter - LIGHT SENSOR |
295 |
| Figure - <GRAPHIK> |
295 |
| Table - <TABELLE> |
295 |
| THead - <TABELLENKOPFZEILE> |
295 |
| Row - <TABELLENREIHE> |
295 |
| Entry - Line 1 |
295 |
| Bold - Line 1 |
295 |
| Entry - Line 2 |
295 |
| Bold - Line 2 |
295 |
| Entry - C* |
295 |
| Bold - C |
295 |
| TBody - <TABELLENHAUPTTEXT> |
295 |
| Row - <TABELLENREIHE> |
295 |
| Entry - light sensor |
295 |
| Entry - visit workshop! |
295 |
| Entry - 2 |
295 |
| Footnote - * C = Category, see page� |
295 |
| Para - The headlamps will be switched on automatically if the light sensor malfunctions. |
295 |
| Para - The |
295 |
| Subsection - P54.30-2173-21 |
295 |
| Title - P54.30-2173-21 |
295 |
| Marker - P54.30-2173-21 |
295 |
| CapLetter - DOOR |
295 |
| Figure - <GRAPHIK> |
295 |
| Table - <TABELLE> |
295 |
| THead - <TABELLENKOPFZEILE> |
295 |
| Row - <TABELLENREIHE> |
295 |
| Entry - Line 1 |
295 |
| Bold - Line 1 |
295 |
| Entry - Line 2 |
295 |
| Bold - Line 2 |
295 |
| Entry - C* |
295 |
| Bold - C* |
295 |
| TBody - <TABELLENHAUPTTEXT> |
295 |
| Row - <TABELLENREIHE> |
295 |
| Entry - door open! |
295 |
| Entry - |
295 |
| Entry - 1 |
295 |
| Footnote - * C = Category, see page� |
295 |
| Subsection - P54.30-2133-21 |
296 |
| Title - P54.30-2133-21 |
296 |
| Marker - P54.30-2133-21 |
296 |
| CapLetter - TRUNK OPEN |
296 |
| Figure - <GRAPHIK> |
296 |
| Table - <TABELLE> |
296 |
| THead - <TABELLENKOPFZEILE> |
296 |
| Row - <TABELLENREIHE> |
296 |
| Entry - Line 1 |
296 |
| Bold - Line 1 |
296 |
| Entry - Line 2 |
296 |
| Bold - Line 2 |
296 |
| Entry - C* |
296 |
| Bold - C* |
296 |
| TBody - <TABELLENHAUPTTEXT> |
296 |
| Row - <TABELLENREIHE> |
296 |
| Entry - trunk open! |
296 |
| Entry - |
296 |
| Entry - 2 |
296 |
| Footnote - * C = Category, see page� |
296 |
| Subsection - HOOD |
296 |
| Title - HOOD |
296 |
| Marker - HOOD |
296 |
| CapLetter - HOOD |
296 |
| Figure - <GRAPHIK> |
296 |
| Table - <TABELLE> |
296 |
| TBody - <TABELLENHAUPTTEXT> |
296 |
| Row - <TABELLENREIHE> |
296 |
| Entry - Line 1 |
296 |
| Bold - Line 1 |
296 |
| Entry - Line 2 |
296 |
| Bold - Line 2 |
296 |
| Entry - C* |
296 |
| Bold - C* |
296 |
| Row - <TABELLENREIHE> |
296 |
| Entry - ENGINE HOOD open! |
296 |
| Entry - |
296 |
| Entry - 2 |
296 |
| Footnote - * C = Category, see page� |
296 |
| Para - See page� |
296 |
| Subsection - P54.30-????-21 |
297 |
| Title - P54.30-????-21 |
297 |
| Marker - P54.30-????-21 |
297 |
| CapLetter - TELEPHONE – FUNCTION |
297 |
| Figure - <GRAPHIK> |
297 |
| Table - <TABELLE> |
297 |
| THead - <TABELLENKOPFZEILE> |
297 |
| Row - <TABELLENREIHE> |
297 |
| Entry - Line 1 |
297 |
| Bold - Line 1 |
297 |
| Entry - Line 2 |
297 |
| Bold - Line 2 |
297 |
| Entry - C* |
297 |
| Bold - C |
297 |
| TBody - <TABELLENHAUPTTEXT> |
297 |
| Row - <TABELLENREIHE> |
297 |
| Entry - function |
297 |
| Entry - not available! |
297 |
| Entry - 3 |
297 |
| Footnote - * C = Category, see page� |
297 |
| Para - The display appears if button |
297 |
| Subsection - P54.30-????-21 |
297 |
| Title - P54.30-????-21 |
297 |
| Marker - P54.30-????-21 |
297 |
| CapLetter - TELE AID |
297 |
| Figure - <GRAPHIK> |
297 |
| Table - <TABELLE> |
297 |
| THead - <TABELLENKOPFZEILE> |
297 |
| Row - <TABELLENREIHE> |
297 |
| Entry - Line 1 |
297 |
| Bold - Line 1 |
297 |
| Entry - Line 2 |
297 |
| Bold - Line 2 |
297 |
| Entry - C* |
297 |
| Bold - C |
297 |
| TBody - <TABELLENHAUPTTEXT> |
297 |
| Row - <TABELLENREIHE> |
297 |
| Entry - Tele aid |
297 |
| Entry - visit workshop!1 |
297 |
| Entry - 1 |
297 |
| Footnote - * C = Category, see page� |
297 |
| Footnote - 1 The Tele Aid system consists of three types of response; automatic and manual emerge... |
297 |
| Footnote - See page� |
297 |
| Para - If a malfunction is indicated as outlined above, have the system checked at the nearest Me... |
297 |
| Subsection - P54.30-2181-21 |
298 |
| Title - P54.30-2181-21 |
298 |
| Marker - P54.30-2181-21 |
298 |
| CapLetter - WASHER FLUID |
298 |
| Figure - <GRAPHIK> |
298 |
| Table - <TABELLE> |
298 |
| THead - <TABELLENKOPFZEILE> |
298 |
| Row - <TABELLENREIHE> |
298 |
| Entry - Line 1 |
298 |
| Bold - Line 1 |
298 |
| Entry - Line 2 |
298 |
| Bold - Line 2 |
298 |
| Entry - C* |
298 |
| Bold - C* |
298 |
| TBody - <TABELLENHAUPTTEXT> |
298 |
| Row - <TABELLENREIHE> |
298 |
| Entry - washer fluid |
298 |
| Entry - check level! |
298 |
| Entry - 3 |
298 |
| Footnote - * C = Category, see page� |
298 |
| Para - When this message appears while the engine is running, the level of the reservoir has drop... |
298 |
| Para - See windshield and headlamp washer system on page� |
298 |
| Subsection - P54.30-????-21 |
299 |
| Title - P54.30-????-21 |
299 |
| Marker - P54.30-????-21 |
299 |
| CapLetter - RESTRAINT SYSTEM |
299 |
| Figure - <GRAPHIK> |
299 |
| Table - <TABELLE> |
299 |
| THead - <TABELLENKOPFZEILE> |
299 |
| Row - <TABELLENREIHE> |
299 |
| Entry - Line 1 |
299 |
| Bold - Line 1 |
299 |
| Entry - Line 2 |
299 |
| Bold - Line 2 |
299 |
| Entry - C* |
299 |
| Bold - C |
299 |
| TBody - <TABELLENHAUPTTEXT> |
299 |
| Row - <TABELLENREIHE> |
299 |
| Entry - RESTRAINT SYSTEM |
299 |
| Entry - visit workshop! |
299 |
| Entry - 1 |
299 |
| Footnote - * C = Category, see page� |
299 |
| Para - See page� |
299 |
| Subsection - KEY |
299 |
| Title - KEY |
299 |
| Marker - KEY |
299 |
| CapLetter - KEY |
299 |
| Figure - <GRAPHIK> |
299 |
| Table - <TABELLE> |
299 |
| TBody - <TABELLENHAUPTTEXT> |
299 |
| Row - <TABELLENREIHE> |
299 |
| Entry - Line 1 |
299 |
| Bold - Line 1 |
299 |
| Entry - Line 2 |
299 |
| Bold - Line 2 |
299 |
| Entry - C* |
299 |
| Bold - C* |
299 |
| Row - <TABELLENREIHE> |
299 |
| Entry - replace Key1 |
299 |
| Entry - visit workshop! |
299 |
| Entry - 2 |
299 |
| Row - <TABELLENREIHE> |
299 |
| Entry - AUTOM. LIGHT ON |
299 |
| Entry - remove key! |
299 |
| Entry - 1 |
299 |
| Footnote - * C = Category, see page� |
299 |
| Footnote - 1 Key needs possibly to be replaced. |
299 |
| Subsection - FUEL RESERVE |
300 |
| Title - FUEL RESERVE |
300 |
| Marker - FUEL RESERVE |
300 |
| CapLetter - FUEL RESERVE |
300 |
| Figure - <GRAPHIK> |
300 |
| Table - <TABELLE> |
300 |
| TBody - <TABELLENHAUPTTEXT> |
300 |
| Row - <TABELLENREIHE> |
300 |
| Entry - Line 1 |
300 |
| Bold - Line 1 |
300 |
| Entry - Line 2 |
300 |
| Bold - Line 2 |
300 |
| Entry - C* |
300 |
| Bold - C* |
300 |
| Row - <TABELLENREIHE> |
300 |
| Entry - RESERVE FUEL |
300 |
| Entry - visit filling STATION! |
300 |
| Entry - 2 |
300 |
| Footnote - * C = Category, see page� |
300 |
| Subsection - UNDERVOLTAGE |
300 |
| Title - UNDERVOLTAGE |
300 |
| Marker - UNDERVOLTAGE |
300 |
| CapLetter - UNDERVOLTAGE |
300 |
| Figure - <GRAPHIK> |
300 |
| Table - <TABELLE> |
300 |
| TBody - <TABELLENHAUPTTEXT> |
300 |
| Row - <TABELLENREIHE> |
300 |
| Entry - Line 1 |
300 |
| Bold - Line 1 |
300 |
| Entry - Line 2 |
300 |
| Bold - Line 2 |
300 |
| Entry - C* |
300 |
| Bold - C* |
300 |
| Row - <TABELLENREIHE> |
300 |
| Entry - UNDERVOLTAGE |
300 |
| Entry - ENGINE ON! |
300 |
| Entry - 1 |
300 |
| Row - <TABELLENREIHE> |
300 |
| Entry - UNDERVOLTAGE |
300 |
| Entry - CONSUMER defective! |
300 |
| Entry - 1 |
300 |
| Footnote - * C = Category, see page� |
300 |
| Subsection - STEER. WHEEL ADJUST. - malfunction and warning messages |
301 |
| Title - STEER. WHEEL ADJUST. - malfunction and warning messages |
301 |
| Marker - STEER. WHEEL ADJUST. - malfunction and warning messages |
301 |
| CapLetter - STEERing WH. ADJUST |
301 |
| Figure - <GRAPHIK> |
301 |
| Table - <TABELLE> |
301 |
| TBody - <TABELLENHAUPTTEXT> |
301 |
| Row - <TABELLENREIHE> |
301 |
| Entry - Line 1 |
301 |
| Bold - Line 1 |
301 |
| Entry - Line 2 |
301 |
| Bold - Line 2 |
301 |
| Entry - C* |
301 |
| Bold - C* |
301 |
| Row - <TABELLENREIHE> |
301 |
| Entry - steerING wh. adjust |
301 |
| Entry - LOCK! |
301 |
| Entry - 1 |
301 |
| Footnote - * C = Category, see page� |
301 |
| Para - For locking the manual steering wheel adjustment, see�page� |
301 |
| Subsection - ENTRANCE POSITION - malfunction and warning messages |
301 |
| Title - ENTRANCE POSITION - malfunction and warning messages |
301 |
| Marker - ENTRANCE POSITION - malfunction and warning messages |
301 |
| CapLetter - Entrance position |
301 |
| Figure - <GRAPHIK> |
301 |
| Table - <TABELLE> |
301 |
| TBody - <TABELLENHAUPTTEXT> |
301 |
| Row - <TABELLENREIHE> |
301 |
| Entry - Line 1 |
301 |
| Bold - Line 1 |
301 |
| Entry - Line 2 |
301 |
| Bold - Line 2 |
301 |
| Entry - C* |
301 |
| Bold - C* |
301 |
| Row - <TABELLENREIHE> |
301 |
| Entry - Entrance position |
301 |
| CapLetter - Entrance position |
301 |
| Entry - do not drive! |
301 |
| Entry - 1 |
301 |
| Footnote - * C = Category, see page� |
301 |
| Para - Wait until the seat and steering wheel have moved to their driving positions. The display ... |
301 |
| Para - See also�page� |
301 |
| ToC - Contents - Practical hints |
302 |
| Title - Contents - Practical hints |
302 |
| Marker - Contents - Practical hints |
302 |
| ToCEntry - First aid kit 294 |
302 |
| ToCEntry - Stowing things in the vehicle 294 |
302 |
| ToCEntry - Fuses 295 |
302 |
| ToCEntry - Hood 297 |
302 |
| ToCEntry - Checking engine oil level 300 |
302 |
| ToCEntry - Automatic transmission fluid level 301 |
302 |
| ToCEntry - Coolant level 301 |
302 |
| ToCEntry - Adding coolant 302 |
302 |
| ToCSubEntry - Adding coolant 302 |
302 |
| ToCEntry - Windshield and headlamp washer system 302 |
302 |
| ToCEntry - Spare wheel, vehicle tools, storage compartment 304 |
302 |
| ToCEntry - Vehicle jack 305 |
302 |
| ToCEntry - Wheels 306 |
302 |
| ToCEntry - Tire replacement 306 |
302 |
| ToCSubEntry - Tire replacement 306 |
302 |
| ToCSubEntry - Rotating wheels 307 |
302 |
| ToCEntry - Spare wheel 308 |
302 |
| ToCEntry - Changing wheels 309 |
302 |
| ToCEntry - Tire inflation pressure 315 |
302 |
| ToCEntry - Battery 316 |
302 |
| ToCEntry - Jump starting 318 |
302 |
| ToCEntry - Towing the vehicle 321 |
302 |
| ToCEntry - Transmission selector lever, manually unlocking 325 |
302 |
| ToCSubEntry - Transmission selector lever, manually unlocking 325 |
302 |
| ToCEntry - Exterior lamps 326 |
302 |
| ToCEntry - Replacing bulbs 326 |
302 |
| ToCSubEntry - Replacing bulbs 326 |
302 |
| ToCEntry - Trunk lamp 331 |
302 |
| ToCEntry - Changing batteries in the electronic main key 332 |
302 |
| ToCEntry - Synchronizing remote control 334 |
302 |
| ToCSubEntry - Synchronizing remote control 334 |
302 |
| ToCEntry - Emergency engine shut-down 334 |
302 |
| ToCEntry - Fuel filler flap, manual release 335 |
302 |
| ToCEntry - Replacing wiper blade insert 337 |
302 |
| ToCEntry - Roof rack 338 |
302 |
| Part - Practical hints |
303 |
| Section - Practical hints |
303 |
| Title - Practical hints |
303 |
| Hypertext - Practical hints |
303 |
| Marker - First aid kit |
303 |
| Figure - <GRAPHIK> |
303 |
| Para - The first aid kit is located in the storage space�(1) in the shelf below the rear window. |
303 |
| Para - Lift cover. Remove first aid kit. |
303 |
| Section - Stowing things in the vehicle |
303 |
| Title - Stowing things in the vehicle |
303 |
| Marker - Stowing things in the vehicle |
303 |
| Warning - <TABELLE> |
303 |
| TBody - <TABELLENHAUPTTEXT> |
303 |
| Row - <TABELLENREIHE> |
303 |
| Entry - Warning! |
303 |
| Para - Warning! |
303 |
| Para - To help avoid personal injury during a collision or sudden maneuver, exercise care when st... |
303 |
| Section - Fuses |
304 |
| Title - Fuses |
304 |
| Marker - Fuses |
304 |
| Para - Most of your vehicle’s electrical components are fused with safety fuses. With the excepti... |
304 |
| Para - The circuit for components is protected by a cycled circuit breaker interrupted if too muc... |
304 |
| Para - Always use a new fuse for replacement. Never attempt to repair or bridge a blown fuse. |
304 |
| Para - A fuse chart is located in fuse box�(1). |
304 |
| Para - A fuse extractor is located in the auxiliary fuse box in the trunk, see page� |
304 |
| Subsection - P54.15-2007-26 |
304 |
| Title - P54.15-2007-26 |
304 |
| Marker - P54.15-2007-26 |
304 |
| Figure - <GRAPHIK> |
304 |
| OrderedList - 1 Fuse box in passenger compartment |
304 |
| Item - 1 Fuse box in passenger compartment |
304 |
| Para - To gain access to fuse box, pull cover away from fuse box�(arrow) and remove rearward. |
304 |
| Subsection - P54.15-0466-26 |
305 |
| Title - P54.15-0466-26 |
305 |
| Marker - P54.15-0466-26 |
305 |
| Figure - <GRAPHIK> |
305 |
| OrderedList - 2 Fuse box in engine compartment, left-hand side |
305 |
| Item - 2 Fuse box in engine compartment, left-hand side |
305 |
| Item - 3 Tabs |
305 |
| Para - To gain access to fuse box: |
305 |
| Para - Release clamps�(3) and remove the cover. |
305 |
| Para - To close the fuse box: |
305 |
| Para - Ensure that the sealing rubber is properly positioned when you replace the cover. Press th... |
305 |
| Subsection - P82.10-0911-26 |
305 |
| Title - P82.10-0911-26 |
305 |
| Marker - P82.10-0911-26 |
305 |
| Figure - <GRAPHIK> |
305 |
| OrderedList - 4 Auxiliary fuse box in left hand side of trunk. |
305 |
| Item - 4 Auxiliary fuse box in left hand side of trunk. |
305 |
| Para - To open: Remove the cover. |
305 |
| Para - To close: Press the cover on. |
305 |
| Section - Engine compartment |
306 |
| Title - Engine compartment |
306 |
| Marker - Engine compartment |
306 |
| Warning - <TABELLE> |
306 |
| TBody - <TABELLENHAUPTTEXT> |
306 |
| Row - <TABELLENREIHE> |
306 |
| Entry - Warning! |
306 |
| Para - Warning! |
306 |
| Para - To help prevent personal injury, stay clear of moving parts when the hood is open and the ... |
306 |
| Row - <TABELLENREIHE> |
306 |
| Entry - The radiator fan may continue to run for approximately 30�seconds or even restart after t... |
306 |
| Para - The radiator fan may continue to run for approximately 30�seconds or even restart after th... |
306 |
| Row - <TABELLENREIHE> |
306 |
| Entry - If you see flames or smoke coming from the engine compartment, or if the coolant temperat... |
306 |
| Para - If you see flames or smoke coming from the engine compartment, or if the coolant temperatu... |
306 |
| Row - <TABELLENREIHE> |
306 |
| Entry - The engine is equipped with a transistorized ignition system. Because of the high voltage... |
306 |
| Para - The engine is equipped with a transistorized ignition system. Because of the high voltage ... |
306 |
| ItemizedList - • with the engine running, |
306 |
| Item - • with the engine running, |
306 |
| Item - • while starting the engine, |
306 |
| Item - • if ignition is |
306 |
| Para - <GRAPHIK> |
307 |
| Graphic - <GRAPHIK> |
307 |
| Marker - P88.40-2001-26 |
307 |
| Para - <GRAPHIK> |
307 |
| Graphic - <GRAPHIK> |
307 |
| Marker - P88.40-0391-26 |
307 |
| Note - Note: |
307 |
| BlockTitle - Note: |
307 |
| Para - To avoid damage to the windshield wipers or hood, open the hood only with the wipers in th... |
307 |
| Para - <GRAPHIK> |
308 |
| Graphic - <GRAPHIK> |
308 |
| Marker - P88.40-0390-26 |
308 |
| Para - To close: Lower the hood and let it drop into lock from a height of approximately 1�ft. (3... |
308 |
| Para - To avoid hood damage, please make sure that hood is fully closed. If not, repeat closing p... |
308 |
| Section - Checking engine oil level |
309 |
| Title - Checking engine oil level |
309 |
| Marker - Checking engine oil level |
309 |
| Figure - <GRAPHIK> |
309 |
| OrderedList - 1 Oil filler cap |
309 |
| Item - 1 Oil filler cap |
309 |
| Para - To check the engine oil level, park vehicle on level ground, with engine at normal operati... |
309 |
| Para - Check engine oil level approximately 5�minutes after stopping the engine, allowing for the... |
309 |
| Para - The engine oil level can be checked via the multifunction display in the instrument cluster. |
309 |
| Para - Unscrew the oil filler cap and add oil carefully if you need to top up the oil. Fill quant... |
309 |
| Para - Do not overfill the engine. |
309 |
| Underline - Do not overfill the engine. |
309 |
| Para - See malfunction and warning messages on page� |
309 |
| Note - Note: |
309 |
| BlockTitle - Note: |
309 |
| Para - See page� |
309 |
| Section - Automatic transmission fluid level |
310 |
| Title - Automatic transmission fluid level |
310 |
| Marker - Automatic transmission fluid level |
310 |
| Para - The transmission has a permanent fill of automatic transmission fluid. |
310 |
| Para - Regular automatic transmission fluid level checks and changes are not required. For this r... |
310 |
| Para - If you notice fluid leaks or gear shifting malfunctions, have your authorized Mercedes-Ben... |
310 |
| Section - Coolant level |
310 |
| Title - Coolant level |
310 |
| Marker - Coolant level |
310 |
| Figure - <GRAPHIK> |
310 |
| OrderedList - 1 Coolant expansion tank |
310 |
| Item - 1 Coolant expansion tank |
310 |
| Para - To check the coolant level, the vehicle must be parked on level ground and the engine stop... |
310 |
| Para - Check coolant level only when coolant is cold. |
310 |
| Para - The coolant level should reach the black top part of the reservoir. |
310 |
| Para - See page� |
310 |
| Subsection - Adding coolant |
311 |
| Title - Adding coolant |
311 |
| Marker - Adding coolant |
311 |
| Para - If coolant has to be added, a 50/50 mixture of water and MB anticorrosion�/�antifreeze sho... |
311 |
| Warning - <TABELLE> |
311 |
| TBody - <TABELLENHAUPTTEXT> |
311 |
| Row - <TABELLENREIHE> |
311 |
| Entry - Warning! |
311 |
| Para - Warning! |
311 |
| ItemizedList - • In order to avoid possibly serious burns: Use extreme caution when opening the h... |
311 |
| Item - • In order to avoid possibly serious burns: Use extreme caution when opening the hood if t... |
311 |
| Row - <TABELLENREIHE> |
311 |
| Entry - • Do not remove pressure cap on coolant reservoir if engine temperature is above 194°F (9... |
311 |
| ItemizedList - • Do not remove pressure cap on coolant reservoir if engine temperature is above 194 |
311 |
| Item - • Do not remove pressure cap on coolant reservoir if engine temperature is above 194 |
311 |
| Row - <TABELLENREIHE> |
311 |
| Entry - • Using a rag, slowly open cap approximately 1/2 turn to relieve excess pressure. If open... |
311 |
| ItemizedList - • Using a rag, slowly open cap approximately 1/2 turn to relieve excess pressure. ... |
311 |
| Item - • Using a rag, slowly open cap approximately 1/2 turn to relieve excess pressure. If opene... |
311 |
| Row - <TABELLENREIHE> |
311 |
| Entry - • Do not spill antifreeze on hot engine parts. Antifreeze contains ethylene glycol which ... |
311 |
| ItemizedList - • Do not spill antifreeze on hot engine parts. Antifreeze contains ethylene glycol... |
311 |
| Item - • Do not spill antifreeze on hot engine parts. Antifreeze contains ethylene glycol which m... |
311 |
| Section - Windshield washer system |
311 |
| Title - Windshield washer system |
311 |
| Marker - Windshield washer system |
311 |
| Figure - <GRAPHIK> |
311 |
| OrderedList - 1 Windshield and headlamp washer fluid reservoir |
311 |
| Item - 1 Windshield and headlamp washer fluid reservoir |
311 |
| Para - The reservoir should be refilled with MB Windshield Washer Concentrate and water (or conce... |
311 |
| Para - Vehicles without headlamp cleaning system: Capacity approximately 3.2 US qt (3.0 l) |
312 |
| Para - Vehicles with headlamp cleaning system: Capacity approximately 6.4 US qt (6.0 l) |
312 |
| Warning - <TABELLE> |
312 |
| TBody - <TABELLENHAUPTTEXT> |
312 |
| Row - <TABELLENREIHE> |
312 |
| Entry - Warning! |
312 |
| Para - Warning! |
312 |
| Para - Washer solvent/antifreeze is highly flammable. Do not spill washer solvent/antifreeze on h... |
312 |
| Subsection - Windshield and headlamp washer fluid mixing ratio |
312 |
| Title - Windshield and headlamp washer fluid mixing ratio |
312 |
| Para - For temperatures above freezing: MB Windshield Washer Concentrate |
312 |
| Para - 1 part |
312 |
| Para - For temperatures below freezing: |
312 |
| Para - MB Windshield Washer Concentrate |
312 |
| Para - 1 part |
312 |
| Section - Spare wheel, vehicle tools, storage compartment |
313 |
| Title - Spare wheel, vehicle tools, storage compartment |
313 |
| Marker - Spare wheel, vehicle tools, storage compartment |
313 |
| Figure - <GRAPHIK> |
313 |
| OrderedList - 1 Vehicle tool kit and towing�eye�bolt |
313 |
| Item - 1 Vehicle tool kit and towing�eye�bolt |
313 |
| Item - 2 Jack |
313 |
| Item - 3 Spare wheel |
313 |
| Item - 4 Storage tray |
313 |
| Para - Lift trunk floor and engage handle in upper edge of trunk. |
313 |
| Para - Always lower trunk floor before closing trunk lid. |
313 |
| Para - To remove the spare wheel: Take out the vehicle tool kit tray. Turn the luggage bowl count... |
313 |
| Para - To store spare wheel: Place spare wheel in wheel well and secure it with luggage bowl. Tur... |
313 |
| Para - Place vehicle tool kit tray in luggage bowl. |
313 |
| Section - Jack |
314 |
| Title - Jack |
314 |
| Marker - Jack |
314 |
| Figure - <GRAPHIK> |
314 |
| Para - To prepare the jack for use: |
314 |
| Para - Remove the jack from the spare wheel well under the trunk floor. |
314 |
| Para - Push the crank handle up and turn clockwise until it engages (operational position). |
314 |
| Subsection - |
314 |
| Title - |
314 |
| Figure - <GRAPHIK> |
314 |
| Para - Storing the jack in the trunk: |
314 |
| Para - Before storing the jack, it should be fully collapsed, with handle folded in (storage posi... |
314 |
| Warning - <TABELLE> |
314 |
| TBody - <TABELLENHAUPTTEXT> |
314 |
| Row - <TABELLENREIHE> |
314 |
| Entry - |
314 |
| Row - <TABELLENREIHE> |
315 |
| Entry - Warning! |
315 |
| Para - Warning! |
315 |
| Para - The jack is designed exclusively for jacking up the vehicle at the jack take�up brackets b... |
315 |
| Row - <TABELLENREIHE> |
315 |
| Entry - Do not disengage parking brake while the vehicle is raised. Be certain that the jack is a... |
315 |
| Para - Do not disengage parking brake while the vehicle is raised. Be certain that the jack is al... |
315 |
| Section - Wheels |
315 |
| Title - Wheels |
315 |
| Marker - Wheels |
315 |
| Para - Replace rims or tires with the same designation, manufacturer and type as shown on the ori... |
315 |
| Para - See your authorized Mercedes-Benz Center for information on tested and recommended rims an... |
315 |
| Subsection - Tire replacement |
315 |
| Title - Tire replacement |
315 |
| Marker - Tire replacement |
315 |
| Para - Front and rear tires should be replaced in sets. Rims and tires must be of the correct siz... |
315 |
| Para - We recommend that you break in new tires for approximately 60�miles (100�km) at moderate s... |
315 |
| Para - It is imperative that the wheel mounting bolts be fastened to a tightening torque of 110 f... |
316 |
| Para - For rim and tire specifications, refer to |
316 |
| Warning - <TABELLE> |
316 |
| TBody - <TABELLENHAUPTTEXT> |
316 |
| Row - <TABELLENREIHE> |
316 |
| Entry - Warning! |
316 |
| Para - Warning! |
316 |
| Para - Worn, old tires can cause accidents. If the tire tread is badly worn, or if the tires have... |
316 |
| Row - <TABELLENREIHE> |
316 |
| Entry - When replacing rims, use only genuine Mercedes�Benz wheel bolts specified for the particu... |
316 |
| Para - When replacing rims, use only genuine Mercedes�Benz wheel bolts specified for the particul... |
316 |
| Subsection - Rotating wheels |
316 |
| Title - Rotating wheels |
316 |
| Marker - Rotating wheels |
316 |
| Para - The wheels can be rotated according to the degree of tire wear while retaining the same di... |
316 |
| Para - Rotating, however, should be carried out as recommended by the tire manufacturer, before t... |
316 |
| Note - Notes: |
316 |
| BlockTitle - Notes: |
316 |
| Para - Thoroughly clean the inner side of the wheels any time you rotate the wheels or wash the v... |
316 |
| Para - The use of retread tires is not recommended. Retread tires may adversely affect the handli... |
316 |
| Para - Dented or bent rims can cause tire pressure loss and damage to the tire beads. For this re... |
316 |
| Para - Check and ensure proper tire inflation pressure after rotating the wheels. For tire inflat... |
316 |
| Section - Spare wheel |
317 |
| Title - Spare wheel |
317 |
| Marker - Spare wheel |
317 |
| Important - Important! |
317 |
| BlockTitle - Important! |
317 |
| Para - The spare wheel rim is mounted with a full size tire of the same type as on the vehicle, a... |
317 |
| Para - In the case of a flat tire, you may temporarily use the spare wheel. |
317 |
| Para - Do not operate vehicle with more than one spare wheel mounted. |
317 |
| Warning - <TABELLE> |
317 |
| TBody - <TABELLENHAUPTTEXT> |
317 |
| Row - <TABELLENREIHE> |
317 |
| Entry - Warning! |
317 |
| Para - Warning! |
317 |
| Para - The spare wheel rim is for temporary use only. Use for over a total of 12�000�miles (20�00... |
317 |
| Subsection - Spare wheel |
317 |
| Title - Spare wheel |
317 |
| Para - The spare wheel rim size is 7 J x 16 H2 (C 240 Canada only - steel rims 6 |
317 |
| Para - In the case of a flat tire or breakdown, you may temporarily use the spare wheel, while ob... |
317 |
| ItemizedList - • Do not exceed vehicle speed of 50 mph (80 km�/�h). |
317 |
| Item - • Do not exceed vehicle speed of 50 mph (80 km�/�h). |
317 |
| Item - • Drive to the nearest repair facility to have the flat tire repaired or replaced as appro... |
317 |
| Item - • Do not operate vehicle with more than one spare wheel mounted. |
317 |
| Para - For additional information, refer to page� |
317 |
| Warning - <TABELLE> |
317 |
| TBody - <TABELLENHAUPTTEXT> |
317 |
| Row - <TABELLENREIHE> |
317 |
| Entry - |
317 |
| Row - <TABELLENREIHE> |
318 |
| Entry - Warning! |
318 |
| Para - Warning! |
318 |
| Para - The spare wheel rim is for temporary use only. Use for over a total of 12 000 miles (20 00... |
318 |
| Row - <TABELLENREIHE> |
318 |
| Entry - The dimensions of the spare wheel are different from those of road wheels. As a result, t... |
318 |
| Para - The dimensions of the spare wheel are different from those of road wheels. As a result, th... |
318 |
| Row - <TABELLENREIHE> |
318 |
| Entry - The spare wheel should only be used temporarily, and replaced with a regular road wheel a... |
318 |
| Para - The spare wheel should only be used temporarily, and replaced with a regular road wheel as... |
318 |
| Section - Changing wheels |
318 |
| Title - Changing wheels |
318 |
| Marker - Changing wheels |
318 |
| Warning - <TABELLE> |
318 |
| TBody - <TABELLENHAUPTTEXT> |
318 |
| Row - <TABELLENREIHE> |
318 |
| Entry - Warning! |
318 |
| Para - Warning! |
318 |
| Para - The jack is designed exclusively for jacking up the vehicle at the jack take�up brackets b... |
318 |
| Row - <TABELLENREIHE> |
318 |
| Entry - Do not disengage parking brake while the vehicle is raised. Be certain that the jack is a... |
318 |
| Para - Do not disengage parking brake while the vehicle is raised. Be certain that the jack is al... |
318 |
| Para - Move vehicle to a level area which is a safe distance from the roadway. |
319 |
| OrderedList - 1. Set parking brake and turn on hazard warning flasher. |
319 |
| Item - 1. Set parking brake and turn on hazard warning flasher. |
319 |
| Item - 2. Move selector lever to position� |
319 |
| Item - 3. Prevent vehicle from rolling away by blocking wheels with wheel chocks (not supplied wi... |
319 |
| OrderedList - <GRAPHIK> |
319 |
| Item - <GRAPHIK> |
319 |
| Graphic - <GRAPHIK> |
319 |
| Marker - P40.10-2077-26 |
319 |
| OrderedList - <GRAPHIK> |
320 |
| Item - <GRAPHIK> |
320 |
| Graphic - <GRAPHIK> |
320 |
| Marker - P40.10-2077-26 |
320 |
| OrderedList - P40.10-0520-26 |
320 |
| Item - P40.10-0520-26 |
320 |
| Marker - P40.10-0520-26 |
320 |
| OrderedList - <GRAPHIK> |
320 |
| Item - <GRAPHIK> |
320 |
| Graphic - <GRAPHIK> |
320 |
| Marker - P40.10-2074-26 |
320 |
| ItemPara - The jack take�up brackets are located directly behind the front wheel housings and in ... |
320 |
| Item - 8. Jack up the vehicle until the wheel is clear of the ground. Never start engine while ve... |
320 |
| OrderedList - <GRAPHIK> |
321 |
| Item - <GRAPHIK> |
321 |
| Graphic - <GRAPHIK> |
321 |
| Marker - P40.10-2076-26 |
321 |
| Item - 10. Remove wheel. Grip wheel from the sides. Keep hands from beneath the wheels. |
321 |
| OrderedList - <GRAPHIK> |
321 |
| Item - <GRAPHIK> |
321 |
| Graphic - <GRAPHIK> |
321 |
| Item - 2 Wheel bolt for steel rims (Canada model C 240) |
321 |
| OrderedList - <GRAPHIK> |
322 |
| Item - <GRAPHIK> |
322 |
| Graphic - <GRAPHIK> |
322 |
| Marker - P40.10-2075-26 |
322 |
| ItemPara - To avoid paint damage, place wheel flat against hub and hold it there while installing... |
322 |
| ItemPara - Unscrew the alignment bolt to install the last wheel bolt. |
322 |
| OrderedList - <GRAPHIK> |
322 |
| Item - <GRAPHIK> |
322 |
| Graphic - <GRAPHIK> |
322 |
| Marker - P40.10-2072-26 |
322 |
| Item - <GRAPHIK> |
323 |
| Graphic - <GRAPHIK> |
323 |
| Marker - P40.10-2073-26 |
323 |
| Item - 14. Vehicles with steel rims |
323 |
| Note - Notes: |
324 |
| BlockTitle - Notes: |
324 |
| Para - Before storing the jack, it should be fully collapsed, with handle folded in. |
324 |
| Para - For proper storage of vehicle jack see page� |
324 |
| Warning - <TABELLE> |
324 |
| TBody - <TABELLENHAUPTTEXT> |
324 |
| Row - <TABELLENREIHE> |
324 |
| Entry - Warning! |
324 |
| Para - Warning! |
324 |
| Para - Always replace wheel bolts that are damaged or rusted. |
324 |
| Row - <TABELLENREIHE> |
324 |
| Entry - Never apply oil or grease to wheel bolts. |
324 |
| Para - Never apply oil or grease to wheel bolts. |
324 |
| Row - <TABELLENREIHE> |
324 |
| Entry - Damaged wheel hub threads should be repaired immediately. |
324 |
| Para - Damaged wheel hub threads should be repaired immediately. |
324 |
| Row - <TABELLENREIHE> |
324 |
| Entry - Incorrect mounting bolts or improperly tightened mounting bolts can cause the wheel to co... |
324 |
| Para - Incorrect mounting bolts or improperly tightened mounting bolts can cause the wheel to com... |
324 |
| Section - Tire inflation pressure |
324 |
| Title - Tire inflation pressure |
324 |
| Marker - Tire inflation pressure |
324 |
| Para - A table (see fuel filler flap) lists the tire inflation pressures specified for Mercedes-B... |
324 |
| Important - Important! |
324 |
| BlockTitle - Important! |
324 |
| Para - Tire pressure changes by approximately 1.5 psi (0.1 bar) per 18 |
324 |
| Para - Example: |
324 |
| Para - If garage temperature = approximately +68 |
324 |
| Para - Tire pressures listed for light loads are minimum values offering high driving comfort. In... |
324 |
| Para - Tire temperature and pressure increase with the vehicle speed. Tire pressure should theref... |
324 |
| Para - An underinflated tire due to a slow leak (e.g. due to a nail in the tire) may cause damage... |
325 |
| Para - If a tire constantly loses air, it should be inspected for damage. |
325 |
| Para - The spare tire should be checked periodically for condition and inflation. Spare tire will... |
325 |
| Warning - <TABELLE> |
325 |
| TBody - <TABELLENHAUPTTEXT> |
325 |
| Row - <TABELLENREIHE> |
325 |
| Entry - Warning! |
325 |
| Para - Warning! |
325 |
| Para - Do not overinflate tires. Overinflating tires can result in sudden deflation (blowout) bec... |
325 |
| Row - <TABELLENREIHE> |
325 |
| Entry - Do not overload the tires by exceeding the specified vehicle capacity weight as indicated... |
325 |
| Para - Do not overload the tires by exceeding the specified vehicle capacity weight as indicated ... |
325 |
| Section - Battery |
325 |
| Title - Battery |
325 |
| Marker - Battery |
325 |
| Warning - <TABELLE> |
325 |
| TBody - <TABELLENHAUPTTEXT> |
325 |
| Row - <TABELLENREIHE> |
325 |
| Entry - Warning! |
325 |
| Para - Warning! |
325 |
| Para - Failure to follow these instructions can result in severe injury or death. |
325 |
| Row - <TABELLENREIHE> |
325 |
| Entry - Never lean over batteries while connecting, you might get injured. |
325 |
| Para - Never lean over batteries while connecting, you might get injured. |
325 |
| Row - <TABELLENREIHE> |
325 |
| Entry - Battery fluid contains sulfuric acid. Do not allow this fluid to come in contact with eye... |
325 |
| Para - Battery fluid contains sulfuric acid. Do not allow this fluid to come in contact with eyes... |
325 |
| Row - <TABELLENREIHE> |
325 |
| Entry - A battery will also produce hydrogen gas, which is flammable and explosive. Keep flames o... |
325 |
| Para - A battery will also produce hydrogen gas, which is flammable and explosive. Keep flames or... |
325 |
| Important - Important! |
325 |
| BlockTitle - Important! |
325 |
| Para - Battery replacement information: |
325 |
| Para - The maintenance-free battery is located in the engine compartment on the right hand side. |
325 |
| Para - The service life of the battery is dependent on its condition of charge. The battery shoul... |
325 |
| Para - Therefore, we strongly recommend that you have the battery charge checked frequently, and ... |
326 |
| Bold - Therefore, we strongly recommend that you have the battery charge checked frequently, and ... |
326 |
| Para - Only charge a battery with a battery charger after the battery has been disconnected from ... |
326 |
| Para - Always disconnect the battery negative lead first and connect last. |
326 |
| Para - When removing and connecting the battery, always make sure that all electrical consumers a... |
326 |
| Para - While the engine is running the battery terminal clamps must not be loosened or detached, ... |
326 |
| Para - P54.10-2054-26 |
326 |
| Marker - P54.10-2054-26 |
326 |
| Graphic - <GRAPHIK> |
326 |
| Para - Release three clamps�(1) and remove filter box. |
326 |
| Para - Installation of filter box: |
326 |
| Para - Install filter box properly and secure with three�clamps�(1). |
326 |
| Note - Note: |
327 |
| BlockTitle - Note: |
327 |
| Para - After reconnecting the battery also set the clock (vehicles with COMAND: see COMAND operat... |
327 |
| Subsection - Battery recycling |
327 |
| Title - Battery recycling |
327 |
| Para - Batteries contain materials that can harm the environment with improper disposal. |
327 |
| Para - Large 12 Volt storage batteries contain lead. |
327 |
| Para - Recycling of batteries is the preferred method of disposal. |
327 |
| Para - Many states require sellers of batteries to accept old batteries for recycling. |
327 |
| Section - Jump starting |
327 |
| Title - Jump starting |
327 |
| Marker - Jump starting |
327 |
| Warning - <TABELLE> |
327 |
| TBody - <TABELLENHAUPTTEXT> |
327 |
| Row - <TABELLENREIHE> |
327 |
| Entry - Warning! |
327 |
| Para - Warning! |
327 |
| Para - Failure to follow these directions will cause damage to the electronic components, and can... |
327 |
| Row - <TABELLENREIHE> |
327 |
| Entry - Never lean over batteries while connecting or jump starting, you might get injured. |
327 |
| Para - Never lean over batteries while connecting or jump starting, you might get injured. |
327 |
| Row - <TABELLENREIHE> |
327 |
| Entry - Battery fluid contains sulfuric acid. Do not allow this fluid to come in contact with eye... |
327 |
| Para - Battery fluid contains sulfuric acid. Do not allow this fluid to come in contact with eyes... |
327 |
| Row - <TABELLENREIHE> |
327 |
| Entry - A battery will also produce hydrogen gas, which is flammable and very explosive. Keep fla... |
327 |
| Para - A battery will also produce hydrogen gas, which is flammable and very explosive. Keep flam... |
327 |
| Row - <TABELLENREIHE> |
327 |
| Entry - Read all instructions before proceeding. |
327 |
| Para - Read all instructions before proceeding. |
327 |
| Important - Important! |
328 |
| BlockTitle - Important! |
328 |
| Para - A discharged battery can freeze at approximately +14 |
328 |
| ItemizedList - • Minimum cable cross-section of 25�mm |
328 |
| Item - • Minimum cable cross-section of 25�mm |
328 |
| Item - • Maximum length of 11.5 ft. (3.5 m). |
328 |
| Para - If the battery is discharged, the engine should be started with jumper cables and the (12 ... |
328 |
| Para - Only use 12 V battery to jump start your vehicle. Jump starting with more powerful battery... |
328 |
| Para - The battery is located in the engine compartment on the right hand side. |
328 |
| OrderedList - <GRAPHIK> |
328 |
| Item - <GRAPHIK> |
328 |
| Graphic - <GRAPHIK> |
328 |
| Item - 2 Positive�(+) under hood terminal |
328 |
| Para - Proceed as follows: |
329 |
| OrderedList - 1. Position the vehicle with the charged battery so that the jumper cables will rea... |
329 |
| Item - 1. Position the vehicle with the charged battery so that the jumper cables will reach, but... |
329 |
| Item - 2. On both vehicles: |
329 |
| Important - Important! |
329 |
| BlockTitle - Important! |
329 |
| OrderedList - 3. Clamp one end of the first jumper cable to the positive (+) under hood terminal ... |
329 |
| Item - 3. Clamp one end of the first jumper cable to the positive (+) under hood terminal of the ... |
329 |
| Item - 4. Clamp one end of the second jumper cable to the grounded negative (–) terminal of the c... |
329 |
| Important - Important! |
329 |
| BlockTitle - Important! |
329 |
| OrderedList - 5. Start engine of the vehicle with the charged battery and run at high idle. Make ... |
329 |
| Item - 5. Start engine of the vehicle with the charged battery and run at high idle. Make sure th... |
329 |
| Item - 6. After the engine has started, remove jumper cables by exactly reversing the above insta... |
329 |
| Note - Note: |
330 |
| BlockTitle - Note: |
330 |
| Para - If engine does not run after several unsuccessful starting attempts, have it checked at th... |
330 |
| Para - Excessive unburned fuel may damage the catalytic converter. |
330 |
| Section - Towing the vehicle |
330 |
| Title - Towing the vehicle |
330 |
| Marker - Towing the vehicle |
330 |
| Warning - <TABELLE> |
330 |
| TBody - <TABELLENHAUPTTEXT> |
330 |
| Row - <TABELLENREIHE> |
330 |
| Entry - Warning! |
330 |
| Para - Warning! |
330 |
| Para - Prior to towing the vehicle with all wheels on the ground, make certain that the electroni... |
330 |
| Row - <TABELLENREIHE> |
330 |
| Entry - If the electronic key is left in the starter switch position�0 for an extended period of ... |
330 |
| Para - If the electronic key is left in the starter switch position�0 for an extended period of t... |
330 |
| Important - Important! |
331 |
| BlockTitle - Important! |
331 |
| Para - When towing the vehicle, please, note the following: |
331 |
| Para - With the automatic central locking activated and the electronic key in starter switch posi... |
331 |
| Para - To prevent the vehicle door locks from locking, deactivate the automatic central locking. See |
331 |
| Para - Towing of the vehicle should only be done using the properly installed towing eye bolt. Ne... |
331 |
| Bold - Towing of the vehicle should only be done using the properly installed towing eye bolt. Ne... |
331 |
| Note - Notes: |
331 |
| BlockTitle - Notes: |
331 |
| Para - The selector lever will remain locked in position� |
331 |
| Para - Transmission selector lever, manually unlocking, see page� |
331 |
| OrderedList - <GRAPHIK> |
331 |
| Item - <GRAPHIK> |
331 |
| Graphic - <GRAPHIK> |
331 |
| Marker - P88.20-0408-26 |
331 |
| Para - To remove cover: Press mark on cover in direction of arrow and lift cover off to reveal th... |
331 |
| Para - To reinstall cover: Fit cover and snap into place. |
331 |
| OrderedList - <GRAPHIK> |
332 |
| Item - <GRAPHIK> |
332 |
| Graphic - <GRAPHIK> |
332 |
| Marker - P88.20-0410-26 |
332 |
| Para - To remove cover: Press mark on cover in direction of arrow and lift cover off to reveal th... |
332 |
| Para - To reinstall cover: Fit cover and snap into place. |
332 |
| Para - We recommend that the vehicle be transported using flat bed equipment. This method is pref... |
332 |
| Important - Important! |
332 |
| BlockTitle - Important! |
332 |
| Para - To prevent damage during transport, do not tie down vehicle by its chassis or suspension p... |
332 |
| Bold - To prevent damage during transport, do not tie down vehicle by its chassis or suspension p... |
332 |
| Para - Towing restrictions for vehicles with automatic transmission: |
332 |
| Para - The vehicle may be towed with all wheels on the ground and the selector lever in position |
332 |
| Para - To be certain to avoid a possibility of damage to the transmission, however, we recommend ... |
332 |
| Para - Do not tow with sling-type equipment. Towing with sling-type equipment over bumpy roads wi... |
332 |
| Para - Use wheel lift, dolly, or flat bed equipment, with electronic key in starter switch turned... |
333 |
| Note - Note: |
333 |
| BlockTitle - Note: |
333 |
| Para - To signal turns while being towed with hazard warning flasher in use, turn electronic key ... |
333 |
| Para - Upon canceling the turn signal, the hazard warning flasher will operate again. |
333 |
| Caution - Caution! |
333 |
| BlockTitle - Caution! |
333 |
| Para - If the vehicle is towed with the front axle raised, the engine must be shut off (electroni... |
333 |
| Para - Switch off the tow-away alarm (see page� |
333 |
| Subsection - Transmission selector lever, manually unlocking |
334 |
| Title - Transmission selector lever, manually unlocking |
334 |
| Marker - Transmission selector lever, manually unlocking |
334 |
| Figure - <GRAPHIK> |
334 |
| Para - In the case of power failure the transmission selector lever can be manually unlocked, e.g... |
334 |
| Para - To do so, open storage compartment in front of center armrest. |
334 |
| Para - Using a small coin, release the coin holder�(1) and swing it aside. |
334 |
| Para - Insert a tool�(2), e.g. the screw driver, into the opening below the coin holder. While pu... |
334 |
| Para - After removal of the tool from the opening, reinstall the coin holder. |
334 |
| Para - The selector lever is locked again when moving it to position� |
334 |
| Section - Exterior lamps |
335 |
| Title - Exterior lamps |
335 |
| Marker - Exterior lamps |
335 |
| Subsection - Headlamp adjustment |
335 |
| Title - Headlamp adjustment |
335 |
| Para - Correct headlamp adjustment is extremely important. Check and readjust headlamps at regula... |
335 |
| Warning - <TABELLE> |
335 |
| TBody - <TABELLENHAUPTTEXT> |
335 |
| Row - <TABELLENREIHE> |
335 |
| Entry - Warning! |
335 |
| Para - Warning! |
335 |
| Para - Bulbs and bulb holders can be very hot. Allow the lamp to cool down before changing a bulb. |
335 |
| Para - Halogen lamps contain pressurized gas. A bulb can explode if you: |
335 |
| ItemizedList - • touch or move it when hot, |
335 |
| Item - • touch or move it when hot, |
335 |
| Item - • drop the bulb, |
335 |
| Item - • scratch the bulb. |
335 |
| Row - <TABELLENREIHE> |
335 |
| Entry - Wear eye and hand protection. |
335 |
| Para - Wear eye and hand protection. |
335 |
| Subsection - Replacing bulbs |
335 |
| Title - Replacing bulbs |
335 |
| Marker - Replacing bulbs |
335 |
| Warning - <TABELLE> |
335 |
| TBody - <TABELLENHAUPTTEXT> |
335 |
| Row - <TABELLENREIHE> |
335 |
| Entry - Warning! |
335 |
| Para - Warning! |
335 |
| Para - Because of high voltage in Xenon lamps, it is dangerous to replace the bulb or repair the ... |
335 |
| Note - Notes: |
335 |
| BlockTitle - Notes: |
335 |
| Para - To prevent a possible electrical short circuit, switch off lamp prior to replacing a bulb. |
335 |
| Para - When replacing bulbs, install only 12 volt bulbs with the specified watt rating. |
335 |
| Para - When replacing halogen bulbs do not touch glass portion of bulb with bare hands. Use plain... |
335 |
| Para - If the newly installed bulb does not light up, switch the lamp off and on again. If the bu... |
335 |
| Subsection - P82.10-0912-26 |
336 |
| Title - P82.10-0912-26 |
336 |
| Marker - P82.10-0912-26 |
336 |
| Figure - <GRAPHIK> |
336 |
| OrderedList - 1 Headlamp cover for low beam headlamp |
336 |
| Item - 1 Headlamp cover for low beam headlamp |
336 |
| Item - 2 Headlamp cover for parking and standing lamp, and high beam headlamp |
336 |
| Subsection - P82.10-0913-26 |
336 |
| Title - P82.10-0913-26 |
336 |
| Marker - P82.10-0913-26 |
336 |
| Figure - <GRAPHIK> |
336 |
| OrderedList - 3 Bulb socket for turn signal lamp |
336 |
| Item - 3 Bulb socket for turn signal lamp |
336 |
| Item - 4 Electrical connector for low beam headlamp bulb (Halogen type) |
336 |
| Item - 5 Electrical connector for high beam headlamp bulb |
336 |
| Item - 6 Bulb socket for parking and standing lamp |
336 |
| Subsection - Exterior lamps:Bulbs for high and low beam |
337 |
| Title - Exterior lamps:Bulbs for high and low beam |
337 |
| Marker - Exterior lamps:Bulbs for high and low beam |
337 |
| Para - Open hood. |
337 |
| Para - Press the clamp and remove headlamp cover�(1�or�2). |
337 |
| Para - Pull electrical connector off. |
337 |
| Para - Unclip the retainer spring and take out the bulb. |
337 |
| Para - Insert the new bulb so that the base locates in the recess on the holder. |
337 |
| Para - Clip in retainer springs and plug the connector onto the bulb. |
337 |
| Para - Align headlamp cover (1�or�2) and click into place. |
337 |
| Para - Xenon |
337 |
| Bold - Xenon |
337 |
| Warning - <TABELLE> |
337 |
| TBody - <TABELLENHAUPTTEXT> |
337 |
| Row - <TABELLENREIHE> |
337 |
| Entry - Warning! |
337 |
| Para - Warning! |
337 |
| Para - Because of high voltage in Xenon lamps, it is dangerous to replace the bulb or repair the ... |
337 |
| Subsection - Exterior lamps:Turn signal lamp |
337 |
| Title - Exterior lamps:Turn signal lamp |
337 |
| Marker - Exterior lamps:Turn signal lamp |
337 |
| Para - Open hood. |
337 |
| Para - Twist bulb socket (3) counterclockwise and pull out. Push bulb into socket, turn countercl... |
337 |
| Para - Insert new bulb in socket, push in and twist clockwise. Reinstall bulb socket. |
337 |
| Subsection - Exterior lamps:Parking and standing lamp |
337 |
| Title - Exterior lamps:Parking and standing lamp |
337 |
| Marker - Exterior lamps:Parking and standing lamp |
337 |
| Para - Open hood. |
337 |
| Para - Press the clamp and remove headlamp cover�(2). |
337 |
| Para - Pull out bulb socket (6). Remove bulb from socket. |
337 |
| Para - Insert new bulb in socket and push in. Reinstall bulb socket. |
337 |
| Para - Align headlamp cover (2) and click into place. |
337 |
| Subsection - P82.10-0917-26 |
338 |
| Title - P82.10-0917-26 |
338 |
| Marker - P82.10-0917-26 |
338 |
| Figure - <GRAPHIK> |
338 |
| Para - Open trunk lid. |
338 |
| Para - Fold trim to the side. |
338 |
| Para - Turn locking lever (1) to vertical position and remove bulb carrier. |
338 |
| Para - Push bulb into socket, turn counterclockwise and remove. |
338 |
| Para - Insert new bulb in socket, push in and twist clockwise. Reinstall bulb socket. |
338 |
| Para - Reinstall trim. |
338 |
| Subsection - |
338 |
| Title - |
338 |
| Figure - <GRAPHIK> |
338 |
| OrderedList - 2 Driver’s side: �rear fog lamp (P 21 W/32 cp bulb) |
338 |
| Item - 2 Driver’s side: �rear fog lamp (P 21 W/32 cp bulb) |
338 |
| Item - 3 Backup lamp (P 21 W�/�32 cp bulb) |
338 |
| Item - 4 Stop lamp (P 21 W/32 cp bulb) |
338 |
| Item - 5 Turn signal lamp (PY 21 W bulb [yellow]) |
338 |
| Item - 6 �tail, parking, standing and side marker� lamp (R 5 W�/�4 cp bulb) |
338 |
| Subsection - P82.10-2199-26 |
339 |
| Title - P82.10-2199-26 |
339 |
| Marker - P82.10-2199-26 |
339 |
| Figure - <GRAPHIK> |
339 |
| Para - Loosen both securing screws�(1), remove lamp and replace tubular lamp (C 5 W/4 cp). |
339 |
| Subsection - Exterior lamps:High mounted stop lamp |
339 |
| Title - Exterior lamps:High mounted stop lamp |
339 |
| Marker - Exterior lamps:High mounted stop lamp |
339 |
| Para - The high mounted stop lamp (3rd brake lamp), and the additional turn signals on the exteri... |
339 |
| Para - Have the system checked at an authorized Mercedes�Benz Center if a malfunction occurs. |
339 |
| Section - Standby bulb function |
340 |
| Title - Standby bulb function |
340 |
| Marker - Standby bulb function |
340 |
| Para - a) The stop lamps, dimmed, will act as a replacement lamp, if one taillamp stops working. |
340 |
| Para - b) The left stop lamp acts as a replacement for the rear fog lamp, if it stops working. |
340 |
| Para - c) The respective fog lamp, dimmed, will act as a replacement lamp, if the left or right s... |
340 |
| Note - Notes: |
340 |
| BlockTitle - Notes: |
340 |
| Para - The multifunction display will indicate that a bulb has failed. See malfunction and warnin... |
340 |
| Section - Trunk lamp |
340 |
| Title - Trunk lamp |
340 |
| Marker - Trunk lamp |
340 |
| Para - The trunk lamp will switch off after approximately 10�minutes if the trunk lid is left open. |
340 |
| Section - Electronic main key:Changing batteries |
341 |
| Title - Electronic main key:Changing batteries |
341 |
| Marker - Electronic main key:Changing batteries |
341 |
| Figure - <GRAPHIK> |
341 |
| OrderedList - 1 Transmit buttons |
341 |
| Item - 1 Transmit buttons |
341 |
| Item - 2 Lamp for battery check and function control |
341 |
| Subsection - Checking batteries |
341 |
| Title - Checking batteries |
341 |
| Para - If one of the transmit buttons�(1) is pressed, the battery check lamp�(2) lights up briefl... |
341 |
| Para - Change batteries if the battery check lamp�(2) does not light up briefly. |
341 |
| Subsection - P80.30-2062-26 (2c) |
341 |
| Title - P80.30-2062-26 (2c) |
341 |
| Marker - P80.30-2062-26 (2c) |
341 |
| Figure - <GRAPHIK> |
341 |
| Subtitle - Changing batteries |
341 |
| Bold - Changing batteries |
341 |
| Para - Move locking tab�(3) in direction of right arrow and remove mechanical key�(4, left arrow). |
341 |
| Para - <GRAPHIK> |
342 |
| Graphic - <GRAPHIK> |
342 |
| Marker - P80.30-2063-26 (2c) |
342 |
| Para - Remove mechanical key from side opening. |
342 |
| Para - Carefully remove battery compartment in direction of arrow�(6). |
342 |
| Para - P80.xx-xxxx-26 |
342 |
| Marker - P80.xx-xxxx-26 |
342 |
| Graphic - <GRAPHIK> |
342 |
| Para - Return battery compartment into housing until locked in place and slide mechanical key bac... |
342 |
| Important - Important! |
343 |
| BlockTitle - Important! |
343 |
| Para - Batteries contain materials that can harm the environment if disposed of improperly. Recyc... |
343 |
| Para - Replacement Battery: Lithium, type CR�2025 or equivalent. |
343 |
| Subsection - Electronic main key:Synchronizing remote control |
343 |
| Title - Electronic main key:Synchronizing remote control |
343 |
| Marker - Electronic main key:Synchronizing remote control |
343 |
| Para - The remote control may have to be resynchronized, if the vehicle cannot be locked or unloc... |
343 |
| Para - To synchronize insert electronic key in starter switch. |
343 |
| Para - The remote control should once again be operational. |
343 |
| Section - Emergency engine shut-down |
343 |
| Title - Emergency engine shut-down |
343 |
| Marker - Emergency engine shut-down |
343 |
| Para - If the engine can no longer be stopped using the electronic key, the engine can be turned ... |
343 |
| Para - For easy removal of fuses use the fuse extractor (located in the auxiliary fuse box in the... |
343 |
| Para - The fuse chart is located in the fuse box in the passenger compartment. |
343 |
| Para - For fuses see page� |
343 |
| Section - Fuel filler flap, manual release |
344 |
| Title - Fuel filler flap, manual release |
344 |
| Marker - Fuel filler flap, manual release |
344 |
| Figure - <GRAPHIK> |
344 |
| Para - Open the trunk lid and fold right-side taillamp trim aside. Reach inside and pull the rele... |
344 |
| Section - Emergency operation of sliding/pop-up roof |
344 |
| Title - Emergency operation of sliding/pop-up roof |
344 |
| Marker - Emergency operation of sliding/pop-up roof |
344 |
| Figure - <GRAPHIK> |
344 |
| Para - The sliding�/�pop-up roof can be opened or closed manually should an electrical malfunctio... |
344 |
| Para - The sliding�/�pop-up roof drive is located behind the lens�(1) of the interior overhead li... |
344 |
| Para - <GRAPHIK> |
345 |
| Graphic - <GRAPHIK> |
345 |
| Note - Note: |
345 |
| BlockTitle - Note: |
345 |
| Para - Do not disconnect electrical connectors. |
345 |
| Para - Obtain crank (3) (supplied with vehicle) and insert through hole. |
345 |
| Para - To slide roof closed or to raise the roof at the rear: turn crank clockwise. |
345 |
| Para - To slide the roof open or to lower the roof at the rear: turn crank counterclockwise. |
345 |
| Para - See page� |
345 |
| Section - Replacing wiper blade insert |
346 |
| Title - Replacing wiper blade insert |
346 |
| Marker - Replacing wiper blade insert |
346 |
| Para - For safety reasons, remove electronic key from steering lock before replacing the wiper bl... |
346 |
| Note - Notes: |
346 |
| BlockTitle - Notes: |
346 |
| Para - Do not open engine hood with wiper arm folded forward. |
346 |
| Para - Do not allow the wiper arm to contact the windshield glass without a wiper blade inserted.... |
346 |
| Para - Make certain that the wiper blades are properly installed. Improperly installed wiper blad... |
346 |
| Para - <GRAPHIK> |
346 |
| Graphic - <GRAPHIK> |
346 |
| Marker - P82.30-0333-26 |
346 |
| Para - Fold wiper arm forward. Press safety tab down�(1), push wiper blade downward�(2) and remove. |
346 |
| Subsection - P82.30-2037-26 |
347 |
| Title - P82.30-2037-26 |
347 |
| Marker - P82.30-2037-26 |
347 |
| Figure - <GRAPHIK> |
347 |
| Para - Place wiper blade on firm support. Press down both tabs and slide (direction of arrow) the... |
347 |
| Para - Installation: |
347 |
| Para - Slide (direction of arrow) wiper blade insert into retainer claws until tabs are engaged. |
347 |
| Para - Slide wiper blade onto wiper arm until it locks in place. |
347 |
| Section - Roof rack |
347 |
| Title - Roof rack |
347 |
| Marker - Roof rack |
347 |
| Figure - <GRAPHIK> |
347 |
| Para - Only mount roof racks to the fastening bolts (see arrows) located under the door weatherst... |
347 |
| Para - Use only those roof racks approved by Mercedes-Benz to avoid damage to the vehicle. Follow... |
347 |
| ToC - Contents - Vehicle care |
348 |
| Title - Contents - Vehicle care |
348 |
| Marker - Contents - Vehicle care |
348 |
| ToCEntry - Cleaning and care of the vehicle 340 |
348 |
| ToCEntry - Power washer 341 |
348 |
| ToCSubEntry - Power washer 341 |
348 |
| ToCSubEntry - Tar stains 341 |
348 |
| ToCSubEntry - Paintwork, painted body components 341 |
348 |
| ToCSubEntry - Engine cleaning 342 |
348 |
| ToCSubEntry - Vehicle washing 342 |
348 |
| ToCSubEntry - Ornamental moldings 343 |
348 |
| ToCSubEntry - Headlamps, taillamps, turn signal lenses 343 |
348 |
| ToCSubEntry - Window cleaning 343 |
348 |
| ToCSubEntry - Wiper blade 343 |
348 |
| ToCSubEntry - Light alloy wheels 344 |
348 |
| ToCSubEntry - Instrument cluster 344 |
348 |
| ToCSubEntry - Steering wheel and gear selector lever 344 |
348 |
| ToCSubEntry - Cup holder 344 |
348 |
| ToCSubEntry - Seat belts 345 |
348 |
| ToCSubEntry - Headliner and shelf below rear window 345 |
348 |
| ToCSubEntry - Leather upholstery 345 |
348 |
| ToCSubEntry - Hard plastic trim items 345 |
348 |
| ToCSubEntry - Plastic and rubber parts 345 |
348 |
| Part - Vehicle care |
349 |
| Section - Vehicle care |
349 |
| Title - Vehicle care |
349 |
| Hypertext - Vehicle care |
349 |
| Marker - Cleaning and care of the vehicle |
349 |
| Warning - <TABELLE> |
349 |
| TBody - <TABELLENHAUPTTEXT> |
349 |
| Row - <TABELLENREIHE> |
349 |
| Entry - Warning! |
349 |
| Para - Warning! |
349 |
| Para - Many cleaning products can be hazardous. Some are poisonous, others are flammable. Always ... |
349 |
| Row - <TABELLENREIHE> |
349 |
| Entry - Never use fluids or solvents that are not designed for cleaning your vehicle. |
349 |
| Para - Never use fluids or solvents that are not designed for cleaning your vehicle. |
349 |
| Para - In operation, your vehicle is subjected to varying external influences which, if gone unch... |
349 |
| Para - Such damage is caused not only by extreme and varying climatic conditions, but also by air... |
349 |
| Para - More frequent washings are necessary to deal with unfavorable conditions; for example, nea... |
349 |
| Para - You should check your vehicle from time to time for stone chipping or other damage. Any da... |
349 |
| Para - In doing so, do not neglect the underside of the vehicle. A prerequisite for a thorough ch... |
349 |
| Para - Your vehicle has been treated at the factory with a wax- base rustproofing in the body cav... |
349 |
| Para - We have selected car-care products and compiled recommendations which are specially matche... |
349 |
| Para - Scratches, corrosive deposits, corrosion or damage due to negligent or incorrect care cann... |
350 |
| Para - The following topics deal with the cleaning and care of your vehicle and give important |
350 |
| Para - Additional information can be found in the booklet titled |
350 |
| Subsection - Power washer |
350 |
| Title - Power washer |
350 |
| Marker - Power washer |
350 |
| Para - When using a power washer for cleaning the vehicle always observe manufacturer’s operating... |
350 |
| Caution - Caution! |
350 |
| BlockTitle - Caution! |
350 |
| Para - Never use a round nozzle to power wash tires. The intense jet of water can result in damag... |
350 |
| Para - Always replace a damaged tire. |
350 |
| Para - Always keep the jet of water moving across the surface. Do not aim directly at electrical ... |
350 |
| Subsection - Tar stains |
350 |
| Title - Tar stains |
350 |
| Marker - Tar stains |
350 |
| Para - Quickly remove tar stains before they dry and become more difficult to remove. A tar remov... |
350 |
| Subsection - Paintwork, painted body components |
350 |
| Title - Paintwork, painted body components |
350 |
| Marker - Paintwork, painted body components |
350 |
| Para - Mercedes-Benz approved Paint Care should be applied when water drops on the paint surface ... |
350 |
| Para - Mercedes-Benz approved Paint Cleaner should be applied if paint surface shows signs of dir... |
350 |
| Para - Do not apply any of these products or wax if your vehicle is parked in the sun or if the h... |
350 |
| Para - Use the appropriate MB-Touch-Up Stick for quick and provisional repairs of minor paint dam... |
350 |
| Subsection - Engine cleaning |
351 |
| Title - Engine cleaning |
351 |
| Marker - Engine cleaning |
351 |
| Para - Prior to cleaning the engine compartment make sure to protect electrical components and co... |
351 |
| Para - Corrosion protection, such as MB Anticorrosion Wax should be applied to the engine compart... |
351 |
| Subsection - Vehicle washing |
351 |
| Title - Vehicle washing |
351 |
| Marker - Vehicle washing |
351 |
| Para - Do not use hot water or wash your vehicle in direct sunlight. Use only a mild car wash det... |
351 |
| Para - Thoroughly spray the vehicle with a diffused jet of water. Direct only a very weak spray t... |
351 |
| Para - Rinse with clear water and thoroughly wipe dry with a chamois. Do not allow cleaning agent... |
351 |
| Para - Due to the width of the vehicle, prior to running the vehicle through an automatic car was... |
351 |
| Para - In the winter, thoroughly remove all traces of road salt as soon as possible. |
351 |
| Para - When washing the underbody, do not forget to clean the inner sides of the wheels. |
351 |
| Subsection - Ornamental moldings |
352 |
| Title - Ornamental moldings |
352 |
| Marker - Ornamental moldings |
352 |
| Para - For regular cleaning and care of very dirty chrome- plated parts, use a chrome cleaner. |
352 |
| Subsection - Headlamps, taillamps, turn signal lenses |
352 |
| Title - Headlamps, taillamps, turn signal lenses |
352 |
| Marker - Headlamps, taillamps, turn signal lenses |
352 |
| Para - Use a mild car wash detergent, such as Mercedes-Benz approved Car Shampoo, with plenty of ... |
352 |
| Para - To prevent scratches, never apply strong force and use only a soft, non�scratchy cloth whe... |
352 |
| Subsection - Window cleaning |
352 |
| Title - Window cleaning |
352 |
| Marker - Window cleaning |
352 |
| Para - Use a window cleaning solution on all glass surfaces. An automotive glass cleaner is recom... |
352 |
| Note - Note: |
352 |
| BlockTitle - Note: |
352 |
| Para - For safety reasons, switch off wipers and remove electronic key from starter switch before... |
352 |
| Subsection - Wiper blade |
352 |
| Title - Wiper blade |
352 |
| Marker - Wiper blade |
352 |
| Para - Clean the wiper blade rubbers with a clean cloth and detergent solution. |
352 |
| Note - Note: |
352 |
| BlockTitle - Note: |
352 |
| Para - For safety reasons, remove electronic key from starter switch before cleaning the wiper bl... |
352 |
| Subsection - Light alloy wheels |
353 |
| Title - Light alloy wheels |
353 |
| Marker - Light alloy wheels |
353 |
| Para - Mercedes-Benz approved Wheel Care should be used for regular cleaning of the light alloy w... |
353 |
| Para - If possible, clean wheels once a week with Mercedes� Benz approved Wheel Care, using a sof... |
353 |
| Para - Follow instructions on container. |
353 |
| Note - Note: |
353 |
| BlockTitle - Note: |
353 |
| Para - Use only acid-free cleaning materials. The acid could lead to corrosion. |
353 |
| Subsection - Instrument cluster |
353 |
| Title - Instrument cluster |
353 |
| Marker - Instrument cluster |
353 |
| Para - Use a gentle dishwashing detergent or mild detergent for delicate fabrics as a washing sol... |
353 |
| Subsection - Steering wheel and gear selector lever |
353 |
| Title - Steering wheel and gear selector lever |
353 |
| Marker - Steering wheel and gear selector lever |
353 |
| Para - Wipe with a damp cloth and dry thoroughly or clean with Mercedes-Benz approved Leather Care. |
353 |
| Subsection - Cup holder |
353 |
| Title - Cup holder |
353 |
| Marker - Cup holder |
353 |
| Para - Use a gentle dishwashing detergent or mild detergent for delicate fabrics as a washing sol... |
353 |
| Subsection - Seat belts |
354 |
| Title - Seat belts |
354 |
| Marker - Seat belts |
354 |
| Para - The webbing must not be treated with chemical cleaning agents. Use only clear, lukewarm wa... |
354 |
| Warning - <TABELLE> |
354 |
| TBody - <TABELLENHAUPTTEXT> |
354 |
| Row - <TABELLENREIHE> |
354 |
| Entry - Warning! |
354 |
| Para - Warning! |
354 |
| Para - Do not bleach or dye seat belts as this may severely weaken them. In a crash they may not ... |
354 |
| Subsection - Headliner and shelf below rear window |
354 |
| Title - Headliner and shelf below rear window |
354 |
| Marker - Headliner and shelf below rear window |
354 |
| Para - Clean with soft bristle brush, or use a dry-shampoo cleaner in case of excessive dirt. |
354 |
| Subsection - Leather upholstery |
354 |
| Title - Leather upholstery |
354 |
| Marker - Leather upholstery |
354 |
| Para - Using aftermarket seat covers or wearing clothing that have the tendency to give off color... |
354 |
| Para - Leather Upholstery Wipe leather upholstery with a damp cloth and dry thoroughly or clean w... |
354 |
| Para - MB Tex Upholstery Pour Mercedes-Benz approved Interior Care onto soft lint-free cloth and ... |
354 |
| Subsection - Hard plastic trim items |
354 |
| Title - Hard plastic trim items |
354 |
| Marker - Hard plastic trim items |
354 |
| Para - Pour Mercedes-Benz approved Interior Care onto soft lint-free cloth and apply with light p... |
354 |
| Subsection - Plastic and rubber parts |
354 |
| Title - Plastic and rubber parts |
354 |
| Marker - Plastic and rubber parts |
354 |
| Para - Do not use oil or wax on these parts. |
354 |
| ToC - Contents - Technical data |
356 |
| Title - Contents - Technical data |
356 |
| Marker - Contents - Technical data |
356 |
| ToCEntry - Spare parts service 348 |
356 |
| ToCEntry - Warranty coverage 348 |
356 |
| ToCEntry - Identification labels 349 |
356 |
| ToCEntry - Layout of poly-V-belt drive 350 |
356 |
| ToCEntry - Technical data 351 |
356 |
| ToCEntry - Fuels, coolants, lubricants etc. - capacities 355 |
356 |
| ToCEntry - Engine oils 357 |
356 |
| ToCEntry - Engine oil additives 357 |
356 |
| ToCEntry - Air conditioner refrigerant 357 |
356 |
| ToCEntry - Brake fluid 357 |
356 |
| ToCEntry - Premium unleaded gasoline 358 |
356 |
| ToCEntry - Fuel requirements 358 |
356 |
| ToCEntry - Gasoline additives 359 |
356 |
| ToCEntry - Coolants 359 |
356 |
| ToCEntry - Consumer information 361 |
356 |
| ToCEntry - Uniform tire quality grading 361 |
356 |
| Part - Technical data |
357 |
| Section - Technical data |
357 |
| Title - Technical data |
357 |
| Hypertext - Technical data |
357 |
| Marker - Technical data |
357 |
| Para - All authorized Mercedes-Benz Centers maintain a stock of original spare parts required for... |
357 |
| Para - More than 300�000 different spare parts, for Mercedes�Benz models, are available. |
357 |
| Para - Mercedes-Benz original spare parts are subjected to stringent quality inspections. Each pa... |
357 |
| Para - Therefore, Mercedes-Benz original spare parts should be installed. |
357 |
| Important - Important! |
357 |
| BlockTitle - Important! |
357 |
| Para - The use of non-genuine parts and accessories not authorized by Mercedes-Benz could damage ... |
357 |
| Section - Warranty coverage |
357 |
| Title - Warranty coverage |
357 |
| Marker - Warranty coverage |
357 |
| Para - Your vehicle is covered under the terms of the |
357 |
| OrderedList - 1. New vehicle limited warranty |
357 |
| Item - 1. New vehicle limited warranty |
357 |
| Item - 2. Emission systems warranty |
357 |
| Item - 3. Emission performance warranty |
357 |
| Item - 4. California, Massachusetts, and Vermont emission control systems warranty |
357 |
| Para - Replacement parts and accessories are covered by the Mercedes-Benz Spare Parts and Accesso... |
357 |
| Subsection - Loss of Service and Warranty Information Booklet |
357 |
| Title - Loss of Service and Warranty Information Booklet |
357 |
| Para - Should you lose your Service and Warranty Information booklet, have your authorized Merced... |
357 |
| Section - Identification labels |
358 |
| Title - Identification labels |
358 |
| Marker - Identification labels |
358 |
| Figure - <GRAPHIK> |
358 |
| OrderedList - 1 Certification label |
358 |
| Item - 1 Certification label |
358 |
| Subsection - |
358 |
| Title - |
358 |
| Figure - <GRAPHIK> |
358 |
| OrderedList - P60.00-2054-26 |
358 |
| Item - P60.00-2054-26 |
358 |
| Marker - P60.00-2054-26 |
358 |
| Subsection - |
359 |
| Title - |
359 |
| Figure - <GRAPHIK> |
359 |
| OrderedList - 3 VIN, visible (lower edge of windshield) |
359 |
| Item - 3 VIN, visible (lower edge of windshield) |
359 |
| Item - P61.20-2009-26 |
359 |
| Marker - P61.20-2009-26 |
359 |
| Item - 5 Emission control label |
359 |
| Item - 6 Information label, California version Vacuum line routing for emission control system |
359 |
| Para - When ordering spare parts, please specify vehicle identification and engine numbers. |
359 |
| Section - P13.22-2008-26 |
359 |
| Title - P13.22-2008-26 |
359 |
| Marker - P13.22-2008-26 |
359 |
| Figure - <GRAPHIK> |
359 |
| OrderedList - 1 Automatic belt tensioner |
359 |
| Item - 1 Automatic belt tensioner |
359 |
| Item - 2 Crankshaft |
359 |
| Item - 3 Air conditioner compressor |
359 |
| Item - 4 Generator (alternator) |
359 |
| Item - 5 Idler pulley |
359 |
| Item - 6 Power steering pump |
359 |
| Item - 7 Coolant pump, fan |
359 |
| Section - Technical data |
360 |
| Title - Technical data |
360 |
| Marker - Technical data |
360 |
| Table - <TABELLE> |
360 |
| THead - <TABELLENKOPFZEILE> |
360 |
| Row - <TABELLENREIHE> |
360 |
| Entry - Model |
360 |
| Bold - Model |
360 |
| Entry - C 240 (203.0611) |
360 |
| Bold - C 240 |
360 |
| Entry - C 320 (203.0641) |
360 |
| Bold - C 320 |
360 |
| TBody - <TABELLENHAUPTTEXT> |
360 |
| Row - <TABELLENREIHE> |
360 |
| Entry - Engine |
360 |
| Bold - Engine |
360 |
| Entry - 112.912 |
360 |
| Entry - 112.946 |
360 |
| Row - <TABELLENREIHE> |
360 |
| Entry - Mode of operation |
360 |
| Entry - 4-stroke engine, gasoline injection |
360 |
| Entry - 4-stroke engine, gasoline injection |
360 |
| Row - <TABELLENREIHE> |
360 |
| Entry - No. of cylinders |
360 |
| Entry - 6 |
360 |
| Entry - 6 |
360 |
| Row - <TABELLENREIHE> |
360 |
| Entry - Bore |
360 |
| Entry - 3.54�in (89.90�mm) |
360 |
| Entry - 3.54�in (89.90�mm) |
360 |
| Row - <TABELLENREIHE> |
360 |
| Entry - Stroke |
360 |
| Entry - 2.68�in (68.20�mm) |
360 |
| Entry - 3.30�in (84.00�mm) |
360 |
| Row - <TABELLENREIHE> |
360 |
| Entry - Total piston displacement |
360 |
| Entry - 158,5�cu.in. (2597�cm3) |
360 |
| Entry - 195.2�cu.in. (3199�cm3) |
360 |
| Row - <TABELLENREIHE> |
360 |
| Entry - Compression ratio |
360 |
| Entry - 10:1 |
360 |
| Entry - 10:1 |
360 |
| Row - <TABELLENREIHE> |
360 |
| Entry - Output acc. to SAE J 1349 |
360 |
| Entry - 167�hp/6000�rpm (125�kW/6000�rpm) |
360 |
| Entry - 221�hp/5600�rpm (165�kW/5600�rpm) |
360 |
| Row - <TABELLENREIHE> |
360 |
| Entry - Maximum torque acc. to SAE J 1349 |
360 |
| Entry - 130�ft.lb/4500�rpm (240�Nm/4500�rpm) |
360 |
| Entry - 232�ft.lb/3000�rpm (315�Nm/3000�rpm) |
360 |
| Row - <TABELLENREIHE> |
360 |
| Entry - Maximum engine speed |
360 |
| Entry - 6200 rpm |
360 |
| Entry - 6000 rpm |
360 |
| Row - <TABELLENREIHE> |
360 |
| Entry - Firing order |
360 |
| Entry - 1-4-3-6-2-5 |
360 |
| Entry - 1-4-3-6-2-5 |
360 |
| Row - <TABELLENREIHE> |
360 |
| Entry - Poly-V-belt |
360 |
| Entry - 2390 mm |
360 |
| Entry - 2390 mm |
360 |
| Row - <TABELLENREIHE> |
360 |
| Entry - |
360 |
| Entry - |
360 |
| Entry - |
360 |
| Row - <TABELLENREIHE> |
360 |
| Entry - 1 The quoted data apply only to the standard vehicle. See an authorized Mercedes-Benz Cen... |
360 |
| Footnote - 1 The quoted data apply only to the standard vehicle. See an authorized Mercedes-Benz ... |
360 |
| Subsection - Rims — Tires |
361 |
| Title - Rims — Tires |
361 |
| Table - <TABELLE> |
361 |
| THead - <TABELLENKOPFZEILE> |
361 |
| Row - <TABELLENREIHE> |
361 |
| Entry - Model |
361 |
| Bold - Model |
361 |
| Entry - C 240 (203.061) |
361 |
| Bold - C 240 |
361 |
| Entry - C 320 (203.064) |
361 |
| Bold - C 320 |
361 |
| Entry - C 240 (Canada only – incl. spare wheel) |
361 |
| TBody - <TABELLENHAUPTTEXT> |
361 |
| Row - <TABELLENREIHE> |
361 |
| Entry - Rims (light alloy) Wheel offset: |
361 |
| Entry - 7J�x�16�H2 1.46 in (37 mm) |
361 |
| Entry - 7J�x�16�H2 1.46 in (37 mm) |
361 |
| Entry - (steel rims) 61/2 J x 16 H2 1.46 in (37 mm) |
361 |
| Row - <TABELLENREIHE> |
361 |
| Entry - All season tires: Radial-ply tires |
361 |
| Entry - 205/55�R16�91 H |
361 |
| Entry - 205/55�R16�91 H |
361 |
| Entry - 205/55 R 16 91 H |
361 |
| Row - <TABELLENREIHE> |
361 |
| Entry - Winter tires: Radial-ply tires |
361 |
| Entry - 205/55�R16�91 H�M+S |
361 |
| Entry - 205/55�R16�91 H�M+S |
361 |
| Entry - 205/55 R 16 91 H�M+S |
361 |
| Row - <TABELLENREIHE> |
361 |
| Entry - |
361 |
| Entry - |
361 |
| Entry - |
361 |
| Entry - |
361 |
| Row - <TABELLENREIHE> |
361 |
| Entry - Spare wheel |
361 |
| Bold - Spare wheel |
361 |
| Entry - |
361 |
| Entry - |
361 |
| Entry - |
361 |
| Row - <TABELLENREIHE> |
361 |
| Entry - Rim (light alloy) Wheel offset: |
361 |
| Entry - 7J�x�16�H2 1.46 in (37 mm) |
361 |
| Entry - 7J�x�16�H2 1.46 in (37 mm) |
361 |
| Entry - |
361 |
| Row - <TABELLENREIHE> |
361 |
| Entry - All season tires: Radial-ply tires |
361 |
| Entry - 205/55�R16�91 H |
361 |
| Entry - 205/55�R16�91 H |
361 |
| Entry - |
361 |
| Subsection - Electrical system |
362 |
| Title - Electrical system |
362 |
| Table - <TABELLE> |
362 |
| THead - <TABELLENKOPFZEILE> |
362 |
| Row - <TABELLENREIHE> |
362 |
| Entry - Model |
362 |
| Bold - Model |
362 |
| Entry - C 240 (203.061) |
362 |
| Bold - C 240 |
362 |
| Entry - C 320 (203.064) |
362 |
| Bold - C 320 |
362 |
| TBody - <TABELLENHAUPTTEXT> |
362 |
| Row - <TABELLENREIHE> |
362 |
| Entry - Generator (alternator) |
362 |
| Entry - 14 V/120 A |
362 |
| Entry - 14 V/120 A |
362 |
| Row - <TABELLENREIHE> |
362 |
| Entry - Starter motor |
362 |
| Entry - 12V/1.7 kW |
362 |
| Entry - 12V/1.7 kW |
362 |
| Row - <TABELLENREIHE> |
362 |
| Entry - Battery |
362 |
| Entry - 12V/100 Ah |
362 |
| Entry - 12V/100 Ah |
362 |
| Row - <TABELLENREIHE> |
362 |
| Entry - Spark plugs Electrode gap Tightening torque |
362 |
| Entry - Bosch F 8 DPER Beru 14 FGH 8 DPUR X 2 NGK IFR 5 D 10 0.039�in (1.0�mm) 15�–�22�ft.lb (20�... |
362 |
| Entry - Bosch F 8 DPER Beru 14 FGH 8 DPUR X 2 NGK IFR 5 D 10 0.039�in (1.0�mm) 15�–�22�ft.lb (20�... |
362 |
| Subsection - Weights |
362 |
| Title - Weights |
362 |
| Table - <TABELLE> |
362 |
| TBody - <TABELLENHAUPTTEXT> |
362 |
| Row - <TABELLENREIHE> |
362 |
| Entry - Roof load max. |
362 |
| Entry - 220�lb (100�kg) |
362 |
| Row - <TABELLENREIHE> |
362 |
| Entry - Trunk load max. |
362 |
| Entry - 220�lb (100�kg) |
362 |
| Subsection - Main Dimensions |
363 |
| Title - Main Dimensions |
363 |
| Table - <TABELLE> |
363 |
| THead - <TABELLENKOPFZEILE> |
363 |
| Row - <TABELLENREIHE> |
363 |
| Entry - Model |
363 |
| Bold - Model |
363 |
| Entry - C 240 (203.061) C 320 (203.064) |
363 |
| Bold - C 240 |
363 |
| TBody - <TABELLENHAUPTTEXT> |
363 |
| Row - <TABELLENREIHE> |
363 |
| Entry - Overall vehicle length |
363 |
| Entry - 178.2 in (4526 mm) |
363 |
| Row - <TABELLENREIHE> |
363 |
| Entry - Overall vehicle width |
363 |
| Entry - 68.0 in (1728 mm) |
363 |
| Row - <TABELLENREIHE> |
363 |
| Entry - Overall vehicle height |
363 |
| Entry - 56.1 in (1426 mm) |
363 |
| Row - <TABELLENREIHE> |
363 |
| Entry - Wheel base |
363 |
| Entry - 106.9 in (2715 mm) |
363 |
| Row - <TABELLENREIHE> |
363 |
| Entry - Track, front |
363 |
| Entry - 59.3 in (1505 mm) |
363 |
| Row - <TABELLENREIHE> |
363 |
| Entry - Track, rear |
363 |
| Entry - 58.1 in (1476 mm) |
363 |
| Section - Fuels, coolants, lubricants etc. - capacities |
364 |
| Title - Fuels, coolants, lubricants etc. - capacities |
364 |
| Marker - Fuels, coolants, lubricants etc. - capacities |
364 |
| Para - |
364 |
| Table - <TABELLE> |
364 |
| TBody - <TABELLENHAUPTTEXT> |
364 |
| Row - <TABELLENREIHE> |
364 |
| Entry - Vehicle components and their respective lubricants must match. Therefore use only brands ... |
364 |
| Table - <TABELLE> |
364 |
| THead - <TABELLENKOPFZEILE> |
364 |
| Row - <TABELLENREIHE> |
364 |
| Entry - |
364 |
| Entry - Capacity |
364 |
| Bold - Capacity |
364 |
| Entry - Fuels, coolants, lubricants etc. |
364 |
| Bold - Fuels, coolants, lubricants etc. |
364 |
| TBody - <TABELLENHAUPTTEXT> |
364 |
| Row - <TABELLENREIHE> |
364 |
| Entry - Engine with oil filter |
364 |
| Entry - 8.5 US qt (8.0 l) |
364 |
| Entry - Recommended engine oils |
364 |
| Row - <TABELLENREIHE> |
364 |
| Entry - Automatic transmission |
364 |
| Entry - 8.5 US qt (8.0 l) |
364 |
| Entry - Automatic transmission fluid |
364 |
| Row - <TABELLENREIHE> |
364 |
| Entry - Rear axle |
364 |
| Entry - 1.2 US qt (1.1 l) |
364 |
| Entry - Hypoid gear oil SAE 85 W 90 |
364 |
| Row - <TABELLENREIHE> |
364 |
| Entry - Power steering |
364 |
| Entry - approx. 1.1 US qt (1.0 l) |
364 |
| Entry - MB Power steering fluid |
364 |
| Row - <TABELLENREIHE> |
364 |
| Entry - Front wheel hubs |
364 |
| Entry - approx. 2.1 oz (60 g) each |
364 |
| Entry - High temperature roller bearing grease |
364 |
| Row - <TABELLENREIHE> |
364 |
| Entry - Accelerator control linkage |
364 |
| Entry - |
364 |
| Entry - Hydraulic fluid |
364 |
| Row - <TABELLENREIHE> |
364 |
| Entry - Brake system |
364 |
| Entry - approx. 0.5 US qt (0.5 l) |
364 |
| Entry - MB Brake fluid (DOT 4+) |
364 |
| Row - <TABELLENREIHE> |
364 |
| Entry - Cooling system |
364 |
| Entry - approx. 9.5 US qt (10.5 l) |
364 |
| Entry - MB Anticorrosion�/�antifreeze |
364 |
| Row - <TABELLENREIHE> |
364 |
| Entry - Fuel tank including a reserve of |
364 |
| Entry - 16.4 US gal (62.0 l) 2.1 US gal (8.0 l) |
364 |
| Entry - Premium unleaded gasoline: Posted Octane 91 (Avg. of 96 RON�/�86 MON) |
364 |
| Row - <TABELLENREIHE> |
364 |
| Entry - |
364 |
| Entry - |
364 |
| Entry - |
364 |
| Row - <TABELLENREIHE> |
365 |
| Entry - Air conditioner system |
365 |
| Entry - |
365 |
| Entry - R-134a refrigerant and special PAG lubricant (Never R-12) |
365 |
| Row - <TABELLENREIHE> |
365 |
| Entry - Windshield washer and headlamp cleaning system |
365 |
| Entry - Vehicles without headlamp cleaning system: Capacity approx. 3.2 US qt (3.0 l) |
365 |
| Para - Vehicles without headlamp cleaning system: Capacity approx. 3.2 US qt (3.0 l) |
365 |
| Para - Vehicles with headlamp cleaning system: Capacity approx. 6.4 US qt (6.0 l) |
365 |
| Entry - MB Windshield washer concentrate1 |
365 |
| Row - <TABELLENREIHE> |
365 |
| Entry - 1 Use MB Windshield Washer Concentrate “S” and water for temperatures above freezing or M... |
365 |
| Footnote - 1 Use MB Windshield Washer Concentrate “S” and water for temperatures above freezing o... |
365 |
| Section - Engine oils |
366 |
| Title - Engine oils |
366 |
| Marker - Engine oils |
366 |
| Para - Engine oils are specifically tested for their suitability in our engines. Therefore, use o... |
366 |
| Para - Please follow Service Booklet recommendations for scheduled oil changes. Failure to do so ... |
366 |
| Section - Engine oil additives |
366 |
| Title - Engine oil additives |
366 |
| Marker - Engine oil additives |
366 |
| Para - Do not blend oil additives with engine oil. They may be harmful to the engine operation. |
366 |
| Para - Damage or malfunctions resulting from blending oil additives are not covered by the Merced... |
366 |
| Section - Air conditioner refrigerant |
366 |
| Title - Air conditioner refrigerant |
366 |
| Marker - Air conditioner refrigerant |
366 |
| Para - R-134a (HFC) refrigerant and special PAG lubricating oil is used in the air conditioner sy... |
366 |
| Para - Never use R-12 (CFC) or mineral-based lubricating oil, otherwise damage to the system will... |
366 |
| Section - Brake fluid |
366 |
| Title - Brake fluid |
366 |
| Marker - Brake fluid |
366 |
| Para - During vehicle operation, the boiling point of the brake fluid is continuously reduced thr... |
366 |
| Para - The brake fluid must therefore be replaced every two years, preferably in the spring. |
366 |
| Para - It is recommended to use only brake fluid approved by Mercedes-Benz. Your authorized Merce... |
366 |
| Section - Premium unleaded gasoline |
367 |
| Title - Premium unleaded gasoline |
367 |
| Marker - Premium unleaded gasoline |
367 |
| Caution - Caution! |
367 |
| BlockTitle - Caution! |
367 |
| Para - To maintain the engine’s durability and performance, premium unleaded gasoline must be use... |
367 |
| ItemizedList - • have the fuel tank filled only partially with unleaded regular and fill up with ... |
367 |
| Item - • have the fuel tank filled only partially with unleaded regular and fill up with premium ... |
367 |
| Item - • avoid full throttle driving and abrupt acceleration, |
367 |
| Item - • do not exceed an engine speed of 3000 rpm, if the vehicle is loaded with a light load su... |
367 |
| Item - • do not exceed |
367 |
| Section - Fuel requirements |
367 |
| Title - Fuel requirements |
367 |
| Marker - Fuel requirements |
367 |
| Para - Use only Premium unleaded meeting ASTM standard D 439: |
367 |
| Para - The octane number (posted at the pump) must be 91�min. It is an average of both the Resear... |
367 |
| Para - Unleaded gasoline containing oxygenates such as Ethanol, IPA, IBA and TBA can be used prov... |
367 |
| Para - The ratio of Methanol to gasoline must not exceed 3% plus additional cosolvents. |
367 |
| Para - Using mixtures of Ethanol and Methanol is not allowed. Gasohol, which contains 10% Ethanol... |
367 |
| Para - These blends must also meet all other fuel requirements such as resistance to spark knock,... |
367 |
| Section - Gasoline additives |
368 |
| Title - Gasoline additives |
368 |
| Marker - Gasoline additives |
368 |
| Para - A major concern among engine manufacturers is carbon build up caused by gasoline. Mercedes... |
368 |
| Para - After an extended period of using fuels without such additives, carbon deposits can build ... |
368 |
| ItemizedList - • warm-up hesitation, |
368 |
| Item - • warm-up hesitation, |
368 |
| Item - • unstable idle, |
368 |
| Item - • knocking�/�pinging, |
368 |
| Item - • misfire, |
368 |
| Item - • power loss. |
368 |
| Para - Do not blend other specific fuel additives with fuel. They only result in unnecessary cost... |
368 |
| Para - Damage or malfunctions resulting from poor fuel quality or from blending specific fuel add... |
368 |
| Section - Coolants |
368 |
| Title - Coolants |
368 |
| Marker - Coolants |
368 |
| Para - The engine coolant is a mixture of water and anticorrosion�/�antifreeze, which provides: |
368 |
| ItemizedList - • corrosion protection, |
368 |
| Item - • corrosion protection, |
368 |
| Item - • freeze protection, |
368 |
| Item - • boiling protection (by increasing the boiling point). |
368 |
| Para - The cooling system was filled at the factory with a coolant providing freeze protection to... |
368 |
| Para - If the antifreeze mixture is effective to - 22 |
368 |
| Para - The coolant solution must be used year round to provide the necessary corrosion protection... |
368 |
| Para - To provide the important corrosion protection, the solution must be at least 45% anticorro... |
368 |
| Para - If the coolant level is low, water and MB anticorrosion�/ antifreeze should be used to bri... |
369 |
| Para - The water in the cooling system must meet minimum requirements, which are usually satisfie... |
369 |
| Para - Anticorrosion�/�antifreeze |
369 |
| Para - Your vehicle contains a number of aluminium parts. The use of aluminium components in moto... |
369 |
| Para - Therefore the following product is strongly recommended for use in your vehicle: Mercedes-... |
369 |
| Para - Before the start of the winter season (or once a year in the hot southern regions), you sh... |
369 |
| Para - Anticorrosion�/�antifreeze quantity |
369 |
| Table - <TABELLE> |
369 |
| THead - <TABELLENKOPFZEILE> |
369 |
| Row - <TABELLENREIHE> |
369 |
| Entry - Approximately freeze protection |
369 |
| TBody - <TABELLENHAUPTTEXT> |
369 |
| Row - <TABELLENREIHE> |
369 |
| Entry - – 35°F (– 37°C) |
369 |
| Entry - – 49°F (– 45°C) |
369 |
| Row - <TABELLENREIHE> |
369 |
| Entry - 4.8 US qt (4.5 l) |
369 |
| Entry - 5.3 US qt (5.0 l) |
369 |
| Section - Consumer information |
370 |
| Title - Consumer information |
370 |
| Marker - Consumer information |
370 |
| Para - This has been prepared as required of all manufactures of passenger cars under Title 49, C... |
370 |
| Para - Uniform tire quality grading |
370 |
| Marker - Uniform tire quality grading |
370 |
| Bold - Uniform tire quality grading |
370 |
| Para - Quality grades can be found where applicable on the tire sidewall between tread shoulder a... |
370 |
| Para - |
370 |
| Table - <TABELLE> |
370 |
| TBody - <TABELLENHAUPTTEXT> |
370 |
| Row - <TABELLENREIHE> |
370 |
| Entry - Tread wear 200 |
370 |
| Entry - Traction AA |
370 |
| Entry - Temperature A |
370 |
| Para - All passenger car tires must conform to federal safety requirements in addition to these g... |
370 |
| Para - Treadwear |
370 |
| Para - The treadwear grade is a comparative rating based on the wear rate of the tire when tested... |
370 |
| Para - Traction |
370 |
| Para - The traction grades, from highest to lowest are AA, A, B, and C. Those grades represent th... |
370 |
| Warning - <TABELLE> |
370 |
| TBody - <TABELLENHAUPTTEXT> |
370 |
| Row - <TABELLENREIHE> |
370 |
| Entry - Warning! |
370 |
| Para - Warning! |
370 |
| Para - The traction grade assigned to this tire is based on straightahead braking traction tests,... |
370 |
| Para - Temperature |
371 |
| Para - The temperature grades are A (the highest), B, and C, representing the tire‘s resistance t... |
371 |
| Para - |
371 |
| Para - |
371 |
| Warning - <TABELLE> |
371 |
| TBody - <TABELLENHAUPTTEXT> |
371 |
| Row - <TABELLENREIHE> |
371 |
| Entry - |
371 |
| Row - <TABELLENREIHE> |
371 |
| Entry - Warning! |
371 |
| Para - Warning! |
371 |
| Para - The temperature grade for this tire is established for a tire that is properly inflated an... |
371 |
| Index - Index |
373 |
| Title - Index |
373 |
| Marker - Index |
373 |
| GroupTitle - A |
373 |
| IndexEntry - Airbags 65 |
373 |
| IndexEntry - ANTILOCK BRAKE SYSTEM |
373 |
| IndexEntry - Malfunction and warning message 277 |
373 |
| IndexSubEntry - Malfunction and warning message 277 |
373 |
| IndexEntry - Antilock brake system (ABS) 258 |
373 |
| IndexEntry - Antitheft alarm system 38 |
373 |
| IndexEntry - Ashtrays 199 |
373 |
| IndexEntry - Audio system |
373 |
| IndexEntry - Button and soft key operation 163 |
373 |
| IndexSubEntry - Button and soft key operation 163 |
373 |
| IndexSubEntry - Cassette mode 169 |
373 |
| IndexSubEntry - CD changer 174 |
373 |
| IndexSubEntry - CD mode 173 |
373 |
| IndexSubEntry - Operating and display elements 161 |
373 |
| IndexSubEntry - Operating safety 160 |
373 |
| IndexSubEntry - Operation 163 |
373 |
| IndexSubEntry - Operation Audio and telephone 160 |
373 |
| IndexSubEntry - Radio mode 166 |
373 |
| IndexSubEntry - Telephone operation 177 |
373 |
| IndexEntry - Audio systems 98 |
373 |
| IndexEntry - Cassette player 100 |
373 |
| IndexSubEntry - Cassette player 100 |
373 |
| IndexSubEntry - CD Player 99 |
373 |
| IndexSubEntry - Radio 98 |
373 |
| IndexEntry - Automatic central locking 34 |
373 |
| IndexEntry - Automatic climate control 146 |
373 |
| IndexEntry - Activated charcoal filter 154 |
373 |
| IndexSubEntry - Activated charcoal filter 154 |
373 |
| IndexSubEntry - Adjustable air outlets, rear passenger compartment 159 |
373 |
| IndexSubEntry - Air recirculation 153 |
373 |
| IndexSubEntry - Air volume, manual 151 |
373 |
| IndexSubEntry - Basic setting 150 |
373 |
| IndexSubEntry - Defrosting 152 |
373 |
| IndexSubEntry - Display and controls 148 |
373 |
| IndexSubEntry - Dust filter 150 |
373 |
| IndexSubEntry - Economy mode 155 |
373 |
| IndexSubEntry - Front center console storage compartment ventilation 158 |
373 |
| IndexSubEntry - Residual engine heat utilization 156 |
373 |
| IndexSubEntry - Special settings 151 |
373 |
| IndexSubEntry - Windows fogged up on the inside 152 |
373 |
| IndexSubEntry - Windows fogged up on the outside 152 |
373 |
| IndexEntry - Automatic transmission 234 |
373 |
| IndexEntry - Fluid level 301 |
373 |
| IndexSubEntry - Fluid level 301 |
373 |
| IndexSubEntry - Transmission selector lever, manually unlocking 325 |
373 |
| GroupTitle - B |
374 |
| IndexEntry - BabySmart |
374 |
| IndexEntry - Battery 316 |
374 |
| IndexEntry - Block heater 252 |
374 |
| IndexEntry - Brake assist system (BAS) 257 |
374 |
| GroupTitle - C |
374 |
| IndexEntry - Cellular telephone 210 |
374 |
| IndexEntry - Center console 18 |
374 |
| IndexEntry - Central locking switch 33 |
374 |
| IndexEntry - Central locking system 25 |
374 |
| IndexEntry - Automatic central locking 34 |
374 |
| IndexSubEntry - Automatic central locking 34 |
374 |
| IndexSubEntry - Central locking switch 33 |
374 |
| IndexSubEntry - Choosing global or selective mode 27 |
374 |
| IndexSubEntry - Doors 31 |
374 |
| IndexSubEntry - General notes 24 |
374 |
| IndexSubEntry - Locking and unlocking with remote control 27 |
374 |
| IndexSubEntry - Mechanical keys 30 |
374 |
| IndexSubEntry - Obtaining replacement keys 23 |
374 |
| IndexSubEntry - Summer opening/convenience feature 29 |
374 |
| IndexSubEntry - Vehicle keys 22 |
374 |
| IndexEntry - Check regularly and before a long trip 266 |
374 |
| IndexEntry - Checking engine oil level 300 |
374 |
| IndexEntry - Climate control 138 |
374 |
| IndexEntry - Adjustable air outlets, rear passenger compartment 159 |
374 |
| IndexSubEntry - Adjustable air outlets, rear passenger compartment 159 |
374 |
| IndexSubEntry - Air recirculation 144 |
374 |
| IndexSubEntry - Basic setting 142 |
374 |
| IndexSubEntry - Defrosting 143 |
374 |
| IndexSubEntry - Display and controls 140 |
374 |
| IndexSubEntry - Dust filter 141 |
374 |
| IndexSubEntry - Economy mode 145 |
374 |
| IndexSubEntry - Front center console storage compartment ventilation 158 |
374 |
| IndexSubEntry - Residual engine heat utilization 145 |
374 |
| IndexSubEntry - Special settings 142 |
374 |
| IndexSubEntry - Windows fogged up on the inside 143 |
374 |
| IndexSubEntry - Windows fogged up on the outside 144 |
374 |
| IndexEntry - COMAND, radio, telephone and two-way radio 218 |
374 |
| IndexEntry - Combination switch 134 |
374 |
| IndexEntry - Control and operation of radio transmitters 218 |
374 |
| IndexEntry - Coolant level 301 |
374 |
| IndexEntry - Coolant temperature gauge 124 |
374 |
| IndexEntry - Cruise control 254 |
374 |
| IndexEntry - Cup holder 197 |
374 |
| GroupTitle - D |
375 |
| IndexEntry - Dashboard 16 |
375 |
| IndexEntry - Door control panel 14 |
375 |
| IndexEntry - Door entry lamps 190 |
375 |
| IndexEntry - Drive sensibly - Save Fuel 244 |
375 |
| GroupTitle - E |
375 |
| IndexEntry - Easy-entry/exit feature 41 |
375 |
| IndexEntry - Electronic main key 23 |
375 |
| IndexEntry - Changing batteries 332 |
375 |
| IndexSubEntry - Changing batteries 332 |
375 |
| IndexSubEntry - Synchronizing remote control 334 |
375 |
| IndexEntry - Electronic stability program (ESP) 260 |
375 |
| IndexEntry - Emergency engine shut-down 334 |
375 |
| IndexEntry - Emergency operation of sliding/pop-up roof 335 |
375 |
| IndexEntry - Emergency tensioning retractor (ETR) 64 |
375 |
| IndexEntry - Emergency unlocking in case of accident 34 |
375 |
| IndexEntry - Engine oil consumption 129 |
375 |
| IndexEntry - Engine oil level indicator 128 |
375 |
| IndexEntry - Enlarged cargo area 207 |
375 |
| IndexEntry - ENTRANCE POSITION - malfunction and warning messages 292 |
375 |
| IndexEntry - Exterior lamp switch 130 |
375 |
| IndexEntry - Daytime running lamp mode 132 |
375 |
| IndexSubEntry - Daytime running lamp mode 132 |
375 |
| IndexEntry - Exterior lamps 326 |
375 |
| IndexEntry - Additional turn signals on the exterior mirror 330 |
375 |
| IndexSubEntry - Additional turn signals on the exterior mirror 330 |
375 |
| IndexSubEntry - Bulbs for high and low beam 328 |
375 |
| IndexSubEntry - Headlamp assembly 327 |
375 |
| IndexSubEntry - High mounted stop lamp 330 |
375 |
| IndexSubEntry - License plate lamps 330 |
375 |
| IndexSubEntry - Parking and standing lamp 328 |
375 |
| IndexSubEntry - Replacing bulbs 326 |
375 |
| IndexSubEntry - Taillamp assemblies 329 |
375 |
| IndexSubEntry - Turn signal lamp 328 |
375 |
| IndexEntry - Exterior mirror adjustment 81 |
375 |
| IndexEntry - Exterior mirror, front passenger side, parking position 82 |
375 |
| GroupTitle - F |
375 |
| IndexEntry - First aid kit 294 |
375 |
| IndexEntry - Flexible service system (FSS) 125 |
375 |
| IndexEntry - Front airbags 65 |
375 |
| IndexEntry - Front center console storage compartment ventilation 158 |
375 |
| IndexEntry - Front seat adjustment 42 |
375 |
| IndexEntry - Fuel filler flap, manual release 335 |
375 |
| IndexEntry - Fuel reserve warning 271 |
375 |
| IndexEntry - Fuses 295 |
375 |
| GroupTitle - G |
376 |
| IndexEntry - Garage door opener 212 |
376 |
| IndexEntry - Glove box 194 |
376 |
| GroupTitle - H |
376 |
| IndexEntry - Hazard warning flasher switch 137 |
376 |
| IndexEntry - Head restraints |
376 |
| IndexEntry - Rear seat 52 |
376 |
| IndexSubEntry - Rear seat 52 |
376 |
| IndexEntry - Head restraints, front seats |
376 |
| IndexEntry - Removal and installation 47 |
376 |
| IndexSubEntry - Removal and installation 47 |
376 |
| IndexEntry - Headlamp cleaning system 133 |
376 |
| IndexEntry - Headlamp mode 131 |
376 |
| IndexEntry - Heated seats 50 |
376 |
| GroupTitle - I |
376 |
| IndexEntry - Identification labels 349 |
376 |
| IndexEntry - Individual settings 111 |
376 |
| IndexEntry - "CONVENIENCE" 121 |
376 |
| IndexSubEntry - "CONVENIENCE" 121 |
376 |
| IndexSubEntry - "INSTRUMENT CLUSTER" 113 |
376 |
| IndexSubEntry - "LIGHTING" 117 |
376 |
| IndexSubEntry - "VEHICLE" 119 |
376 |
| IndexEntry - Infant and child restraint systems 73 |
376 |
| IndexEntry - Child seat mounts 76 |
376 |
| IndexSubEntry - Child seat mounts 76 |
376 |
| IndexSubEntry - Installation 75 |
376 |
| IndexEntry - Instrument cluster 88 |
376 |
| IndexEntry - Instruments and controls 12 |
376 |
| IndexEntry - Center console 18 |
376 |
| IndexSubEntry - Center console 18 |
376 |
| IndexSubEntry - Dashboard 16 |
376 |
| IndexSubEntry - Door control panel 14 |
376 |
| IndexSubEntry - Overhead control panel 15 |
376 |
| IndexEntry - Interior 193 |
376 |
| IndexEntry - Interior lighting 189 |
376 |
| GroupTitle - J |
376 |
| IndexEntry - Jack 305 |
376 |
| IndexEntry - Jump starting 318 |
376 |
| GroupTitle - L |
376 |
| IndexEntry - Lighter 201 |
376 |
| IndexEntry - Loading instructions (Vehicle with enlarged cargo area) 209 |
376 |
| IndexEntry - Locator lighting 133 |
376 |
| IndexEntry - Locking the vehicle with remote control 27 |
376 |
| GroupTitle - M |
377 |
| IndexEntry - Maintenance 219 |
377 |
| IndexEntry - Malfunction/warning message memory 109 |
377 |
| IndexEntry - Manual seat 45, 48 |
377 |
| IndexEntry - Manual transmission 233 |
377 |
| IndexEntry - Memory function 85 |
377 |
| IndexEntry - Mirror, exterior, parking position, front passenger side 82 |
377 |
| IndexEntry - Multicontour seat 49 |
377 |
| IndexEntry - Multifunction display 92 |
377 |
| IndexEntry - Coolant temperature 96 |
377 |
| IndexSubEntry - Coolant temperature 96 |
377 |
| IndexSubEntry - Engine oil level indicator 96 |
377 |
| IndexSubEntry - FSS 96 |
377 |
| IndexSubEntry - Individual settings 111 |
377 |
| IndexSubEntry - Tire inflation pressure monitor 96 |
377 |
| IndexSubEntry - Trip and main odometer 96 |
377 |
| IndexSubEntry - Vehicle speed 96 |
377 |
| IndexEntry - Multifunction steering wheel 92 |
377 |
| GroupTitle - N |
377 |
| IndexEntry - Navigation system 106 |
377 |
| IndexEntry - Night security illumination 132 |
377 |
| GroupTitle - O |
377 |
| IndexEntry - On-board diagnostic system 268 |
377 |
| IndexEntry - Overhead control panel 15 |
377 |
| GroupTitle - P |
377 |
| IndexEntry - Panic button 30 |
377 |
| IndexEntry - Parcel net in front passenger footwell 202 |
377 |
| IndexEntry - Parking brake 243 |
377 |
| IndexEntry - Power windows 184 |
377 |
| IndexEntry - Blocking of rear door window operation 186 |
377 |
| IndexSubEntry - Blocking of rear door window operation 186 |
377 |
| IndexSubEntry - Express opening and closing 185 |
377 |
| IndexSubEntry - Opening and closing 29 |
377 |
| IndexSubEntry - Synchronizing power windows 186 |
377 |
| IndexEntry - Problems with your vehicle 8 |
377 |
| IndexEntry - Product information 1 |
377 |
| GroupTitle - R |
377 |
| IndexEntry - Rain sensor 135 |
377 |
| IndexEntry - Rear passenger compartment adjustable air outlets 159 |
377 |
| IndexEntry - Rear window defroster 157 |
377 |
| IndexEntry - Rear window sunshade 191 |
377 |
| IndexEntry - Removal and installation of front seat head restraints 47 |
378 |
| IndexEntry - Replacement keys |
378 |
| IndexEntry - Obtaining 23 |
378 |
| IndexSubEntry - Obtaining 23 |
378 |
| IndexEntry - Replacing wiper blade insert 337 |
378 |
| IndexEntry - Reporting Safety Defects 9 |
378 |
| IndexEntry - REST 145, 156 |
378 |
| IndexEntry - Roof rack 338 |
378 |
| GroupTitle - S |
378 |
| IndexEntry - Seat belt nonusage warning system 56 |
378 |
| IndexEntry - Seat belts 55 |
378 |
| IndexEntry - Fastening 58 |
378 |
| IndexSubEntry - Fastening 58 |
378 |
| IndexSubEntry - Operation 59 |
378 |
| IndexSubEntry - Unfastening 59 |
378 |
| IndexSubEntry - Warning lamp 273 |
378 |
| IndexEntry - Seat belts and integrated restraint system 55 |
378 |
| IndexEntry - Seats |
378 |
| IndexEntry - Front seat adjustment 42 |
378 |
| IndexSubEntry - Front seat adjustment 42 |
378 |
| IndexSubEntry - Manual seat 45 |
378 |
| IndexSubEntry - Power seat 43 |
378 |
| IndexEntry - Setting the audio volume 123 |
378 |
| IndexEntry - Side impact airbags 68 |
378 |
| IndexEntry - Ski sack 202 |
378 |
| IndexEntry - Sliding/pop-up roof 187 |
378 |
| IndexEntry - Opening and closing 29 |
378 |
| IndexSubEntry - Opening and closing 29 |
378 |
| IndexSubEntry - Synchronizing 188 |
378 |
| IndexEntry - Spare wheel 308 |
378 |
| IndexEntry - Spare wheel, vehicle tools, storage compartment 304 |
378 |
| IndexEntry - Split folding rear seat bench 207 |
378 |
| IndexEntry - Standby bulb function 331 |
378 |
| IndexEntry - Start lock-out 24 |
378 |
| IndexEntry - Starter switch 230 |
378 |
| IndexEntry - Starting and turning off the engine 232 |
378 |
| IndexEntry - STEER. WHEEL ADJUST. - malfunction and warning messages 292 |
378 |
| IndexEntry - Steering lock |
378 |
| IndexEntry - See starter switch 230 |
378 |
| IndexSubEntry - See starter switch 230 |
378 |
| IndexEntry - Steering wheel |
378 |
| IndexEntry - Easy-entry/exit feature 41 |
378 |
| IndexSubEntry - Easy-entry/exit feature 41 |
378 |
| IndexEntry - Steering wheel adjustment |
378 |
| IndexEntry - electrical 79 |
378 |
| IndexSubEntry - electrical 79 |
378 |
| IndexSubEntry - manual 77 |
378 |
| IndexEntry - Storage compartments and armrests 193 |
378 |
| IndexEntry - Storing mirror positions 81 |
378 |
| IndexEntry - Storing seat positions 44 |
378 |
| IndexEntry - Stowing things in the vehicle 294 |
378 |
| IndexEntry - Sun visors 192 |
378 |
| IndexEntry - Supplemental Restraint System (SRS) 63 |
378 |
| GroupTitle - T |
379 |
| IndexEntry - Technical data 351 |
379 |
| IndexEntry - Tele Aid 220 |
379 |
| IndexEntry - Initiating an emergency call 222 |
379 |
| IndexSubEntry - Initiating an emergency call 222 |
379 |
| IndexEntry - Telephone 101 |
379 |
| IndexEntry - Incoming call 105 |
379 |
| IndexSubEntry - Incoming call 105 |
379 |
| IndexSubEntry - Redialing 103 |
379 |
| IndexSubEntry - Telephone book 101 |
379 |
| IndexEntry - Telephone, general 211 |
379 |
| IndexEntry - Telephones and two-way radios 218 |
379 |
| IndexEntry - Telescoping steering column - malfunction and warning messages 292 |
379 |
| IndexEntry - The first 1 000 miles (1 500 km) 219 |
379 |
| IndexEntry - Tire inflation pressure 315 |
379 |
| IndexEntry - Tow-away alarm 39 |
379 |
| IndexEntry - Towing the vehicle 321 |
379 |
| IndexEntry - Transmission selector lever, manually unlocking 325 |
379 |
| IndexEntry - Trip computer 107 |
379 |
| IndexEntry - Trunk 35 |
379 |
| IndexEntry - Opening 28 |
379 |
| IndexSubEntry - Opening 28 |
379 |
| IndexSubEntry - Release switch 37 |
379 |
| IndexEntry - Trunk lamp 331 |
379 |
| GroupTitle - U |
379 |
| IndexEntry - Unlocking the vehicle with remote control 27 |
379 |
| GroupTitle - V |
379 |
| IndexEntry - Vanity mirrors 192 |
379 |
| IndexEntry - Vehicle keys 22 |
379 |
| IndexEntry - Vehicle tools 304 |
379 |
| GroupTitle - W |
379 |
| IndexEntry - What you should know at the gas station 264 |
379 |
| IndexEntry - Wheels 306 |
379 |
| IndexEntry - Where to find it 7 |
379 |
| IndexEntry - Window curtain airbag 68 |
379 |
| IndexEntry - Windshield washer system 302 |
379 |
| IndexEntry - Wiper blade |
379 |
| IndexEntry - Replacing insert 337 |
379 |
| IndexSubEntry - Replacing insert 337 |
379 |
| Reference - Service and Literature |
380 |
| Title - Service and Literature |
380 |
| Bold - Service and Literature |
380 |
| Para - Your authorized Mercedes-Benz Center has trained technicians and original Mercedes-Benz pa... |
380 |
| Para - If your are interested in obtaining service literature for your vehicle, please contact yo... |
380 |
| Para - For further information you can find us on the Mercedes-Benz web-site |
380 |
| Para - We reserve the right to modify the technical details of the vehicle as given in the data a... |
380 |
| Para - Title�illustration�no.�P00.00-3006-26 |
380 |
| Para - Press time 03/31/00 MBUSA/TI Printed in the U.S.A. |
380 |
| Jacket - |
381 |
| Meta - |
381 |
| Data - |
381 |
| Data - |
381 |
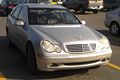
 1
1 315
315 316
316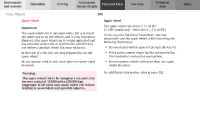 317
317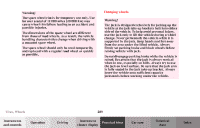 318
318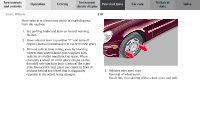 319
319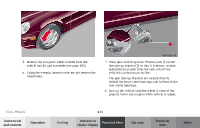 320
320 321
321 322
322 323
323 324
324 325
325