2001 Oldsmobile Aurora Owner's Manual - Page 177
2001 Oldsmobile Aurora Manual

Page 177 highlights
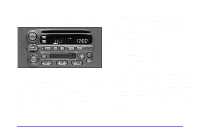
While the tape is playing, use the VOL, FAD, BAL, TREB, MID, BASS, AUTO EQ, SEEK and SCAN controls just as you do for the radio. The display will show TAPE and an arrow showing which side of the tape is playing. The tape player automatically begins playing the other side when it reaches the end of the tape. Your tape bias is set automatically when a metal or chrome tape is inserted. If you want to insert a tape when the ignition is off, first press EJECT or the RCL button. If an error appears on the radio display, the tape won't play because of an error. TIGHT TAPE is displayed when the tape is tight and the player can't turn the tape hubs. Remove the tape. Hold the tape with the open end down and try to turn the right hub counterclockwise with a pencil. Turn the tape over and repeat. If the hubs do not turn easily, your tape may be damaged and should not be used in the player. Try a new tape to make sure your player is working properly. BROKEN TAPE is displayed when the tape is broken. Try a new tape. WRAPPED is displayed when the tape is wrapped around the tape head. Attempt to get the cassette out. Try a new tape. If any error occurs repeatedly or if an error can't be corrected, please contact your dealer. If your radio displays an error message, write it down and provide it to your dealer when reporting the problem. REV (1): Press this button to reverse the tape rapidly. Press it again to return to playing speed. The radio will play the last selected station while the tape reverses. You may select stations during REV operation by using the TUNE knob. FWD (2): Press this button to advance quickly to another part of the tape. Press the button again to return to playing speed. The radio will play the last selected station while the tape advances. You may select stations during FWD operation by using the TUNE knob. (3): Press this button to reduce background noise. DOLBY B ON will appear on the display with the Dolby icon. Press it again to turn Dolby off. Dolby Noise Reduction is manufactured under a license from Dolby Laboratories Licensing Corporation. Dolby and the double-D symbol are trademarks of Dolby Laboratories Licensing Corporation. SIDE (5): Press this button to play the other side of the tape. D 3-16
-
 1
1 -
2
-
3
-
4
-
5
-
6
-
7
-
8
-
9
-
10
-
11
-
12
-
13
-
14
-
15
-
16
-
17
-
18
-
19
-
20
-
21
-
22
-
23
-
24
-
25
-
26
-
27
-
28
-
29
-
30
-
31
-
32
-
33
-
34
-
35
-
36
-
37
-
38
-
39
-
40
-
41
-
42
-
43
-
44
-
45
-
46
-
47
-
48
-
49
-
50
-
51
-
52
-
53
-
54
-
55
-
56
-
57
-
58
-
59
-
60
-
61
-
62
-
63
-
64
-
65
-
66
-
67
-
68
-
69
-
70
-
71
-
72
-
73
-
74
-
75
-
76
-
77
-
78
-
79
-
80
-
81
-
82
-
83
-
84
-
85
-
86
-
87
-
88
-
89
-
90
-
91
-
92
-
93
-
94
-
95
-
96
-
97
-
98
-
99
-
100
-
101
-
102
-
103
-
104
-
105
-
106
-
107
-
108
-
109
-
110
-
111
-
112
-
113
-
114
-
115
-
116
-
117
-
118
-
119
-
120
-
121
-
122
-
123
-
124
-
125
-
126
-
127
-
128
-
129
-
130
-
131
-
132
-
133
-
134
-
135
-
136
-
137
-
138
-
139
-
140
-
141
-
142
-
143
-
144
-
145
-
146
-
147
-
148
-
149
-
150
-
151
-
152
-
153
-
154
-
155
-
156
-
157
-
158
-
159
-
160
-
161
-
162
-
163
-
164
-
165
-
166
-
167
-
168
-
169
-
170
-
171
-
 172
172 -
 173
173 -
 174
174 -
 175
175 -
 176
176 -
 177
177 -
 178
178 -
 179
179 -
 180
180 -
 181
181 -
 182
182 -
183
-
184
-
185
-
186
-
187
-
188
-
189
-
190
-
191
-
192
-
193
-
194
-
195
-
196
-
197
-
198
-
199
-
200
-
201
-
202
-
203
-
204
-
205
-
206
-
207
-
208
-
209
-
210
-
211
-
212
-
213
-
214
-
215
-
216
-
217
-
218
-
219
-
220
-
221
-
222
-
223
-
224
-
225
-
226
-
227
-
228
-
229
-
230
-
231
-
232
-
233
-
234
-
235
-
236
-
237
-
238
-
239
-
240
-
241
-
242
-
243
-
244
-
245
-
246
-
247
-
248
-
249
-
250
-
251
-
252
-
253
-
254
-
255
-
256
-
257
-
258
-
259
-
260
-
261
-
262
-
263
-
264
-
265
-
266
-
267
-
268
-
269
-
270
-
271
-
272
-
273
-
274
-
275
-
276
-
277
-
278
-
279
-
280
-
281
-
282
-
283
-
284
-
285
-
286
-
287
-
288
-
289
-
290
-
291
-
292
-
293
-
294
-
295
-
296
-
297
-
298
-
299
-
300
-
301
-
302
-
303
-
304
-
305
-
306
-
307
-
308
-
309
-
310
-
311
-
312
-
313
-
314
-
315
-
316
-
317
-
318
-
319
-
320
-
321
-
322
-
323
-
324
-
325
-
326
-
327
-
328
-
329
-
330
-
331
-
332
-
333
-
334
-
335
-
336
-
337
-
338
-
339
-
340
-
341
-
342
-
343
-
344
-
345
-
346
-
347
-
348
-
349
-
350
-
351
-
352
-
353
-
354
-
355
-
356
-
357
-
358
-
359
-
360
-
361
-
362
-
363
-
364
-
365
-
366
-
367
-
368
-
369
-
370
-
371
-
372
-
373
-
374
-
375
-
376
 |
 |