AIWA NSX-MTD9 Operating Instructions
AIWA NSX-MTD9 Manual
 |
View all AIWA NSX-MTD9 manuals
Add to My Manuals
Save this manual to your list of manuals |
AIWA NSX-MTD9 manual content summary:
- AIWA NSX-MTD9 | Operating Instructions - Page 1
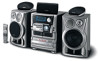
AIWA COMPACT DISC STEREO SYSTEM NSX-MTD9 OPERATING INSTRUCTIONS PRECAUTIONS pg. 1 WARNING TO REDUCE THE RISK OF FIRE OR ELECTRIC SHOCK, DO NOT EXPOSE THIS APPLIANCE TO RAIN OR MOISTURE. "CAUTION : TO REDUCE THE RISK OF ELECTRICAL SHOCK, DO NOT REMOVE COVER (OR BACK). NO USER-SERVICABLE PARTS - AIWA NSX-MTD9 | Operating Instructions - Page 2
operating instructions. Electric Power 1 Power sources - Connect this unit only to power sources specified in the Operating Instructions, and does not easily insert into the outlet, please call a qualified service technician to service or replace the outlet. To avoid defeating the safety feature of - AIWA NSX-MTD9 | Operating Instructions - Page 3
Code, ANSI/NFPA70, provides information on proper grounding of the mast, supporting structure, and the lead-in wire to the antenna discharge unit, as only as recommended in the Operating Instructions. Damage Requiring Service Have the units serviced by a qualified service technician if: - The AC - AIWA NSX-MTD9 | Operating Instructions - Page 4
17 CONTINUOUS PLAY 18 RECORDING BASIC RECORDING 19 DUBBING A TAPE MANUALLY 20 DUBBING THE WHOLE TAPE 20 AI EDIT RECORDING 21 PROGRAMMED 29 CONNECTING A DVD PLAYER 30 GENERAL CARE AND MAINTENANCE 31 TROUBLESHOOTING GUIDE 31 SPECIFICATIONS 32 PARTS INDEX Back cover PREPARATIONS pg. 3 - AIWA NSX-MTD9 | Operating Instructions - Page 5
SX-ND8 Front speakers SX-R275 Surround speakers SX-C605 Center speaker Operating Instructions, etc. POSITIONING THE SPEAKERS To achieve the optimum effects obtainable with the DOLBY PRO LOGIC system, it is important to position the speakers properly. Refer - AIWA NSX-MTD9 | Operating Instructions - Page 6
IMPORTANT Connect the speakers, antennas, and all optional equipment first. Then connect the AC cord. There are no differences between the front speakers as well as the surround speakers. Both speakers of its kind can be connected as L (left) or R (right). 1 Connect the right and left speaker to the - AIWA NSX-MTD9 | Operating Instructions - Page 7
the audio output jack of the video equipment with an optional audio connecting cord. 6 Connect the Television to the video equipment. Refer to the Operating Instructions of the connected equipment for details. 7 Connect the AC cord to an AC outlet. • The game Demo will begin when the AC cord is - AIWA NSX-MTD9 | Operating Instructions - Page 8
PREPARATIONS (cont) pg. 5 • Be sure to connect the speaker cords correctly. Improper connections can cause short circuits in the SPEAKERS terminals. • Do not leave objects generating magnetism, such as credit cards, near the speakers, as these objects may be damaged. • Do not bring the FM antenna - AIWA NSX-MTD9 | Operating Instructions - Page 9
main unit should be approximately 5 meters (16 feet). When this distance decreases, replace the batteries with new ones. Using the remote control The instructions in this manual refer mainly to the buttons on the main unit. Buttons on the remote control with the same names as those on the main unit - AIWA NSX-MTD9 | Operating Instructions - Page 10
. When the unit is turned on, the disc compartment may open and close to reset the unit. To turn the power off Press POWER. Illumination guides Whenever one of the function buttons is pressed, the buttons for that operation light up or flash. Flash windows The windows of the CD compartment - AIWA NSX-MTD9 | Operating Instructions - Page 11
When the AC cord is plugged in for the first time after purchase, the game Demo will begin in the display. When the power is turned on, the game Demo will end. Until the clock is set, the game Demo will automatically begin whenever the power is turned off. To play the game DEMO Press DEMO whether - AIWA NSX-MTD9 | Operating Instructions - Page 12
PREPARATIONS (cont.) pg. 7 SETTING THE POWER ECONOMIZING MODE Setting this unit power economizing mode reduces power consumption as follows. • When the power is turned off, all the display lights turned off. However, if the clock is not set, the game Demo will begin when the power is turned off. • - AIWA NSX-MTD9 | Operating Instructions - Page 13
set to 20 when the power is turned off with the volume level set to 21 or more. To change the left/right balance Press MANUAL SELECT on the remote control. L/R is displayed for 2 seconds. Press or on the remote control within these 2 seconds. • The DOLBY PRO LOGIC (page 23), the - AIWA NSX-MTD9 | Operating Instructions - Page 14
• When playing back a tape recorded with BBE, it is recommended that BBE be set to off to avoid distorted high frequency sound. • The BBE system does not perform wile the 5.1 CH (page 30) or the DOLBY PRO LOGIC (page 23) is selected. SOUND (cont) pg. 8 SUPER T-BASS SYSTEM The T-BASS system enhances - AIWA NSX-MTD9 | Operating Instructions - Page 15
the tempo of the rhythm pattern 1 Press RHYTHM repeatedly until "Tempo XXX" is displayed. If "AUTO" shows while you are pressing RHYTHM, change it to "MANUAL" by turning MULTI JOG to the left. In AUTO mode the tempo is automatically set and you cannot access the display of "Tempo". 2 Turn MULTI - AIWA NSX-MTD9 | Operating Instructions - Page 16
The tempo of GAME is not adjustable. To change the volume level of the rhythm pattern 1 Press RHYTHM repeatedly until "LEVEL X" is displayed. 2 Turn MULTI JOG. Three levels, 1-3, are available. To stop the beat function Press BEAT ON/OFF. BEAT toggles between On and Off. When you interrupt or stop - AIWA NSX-MTD9 | Operating Instructions - Page 17
You can let the music start playing before performing step 1 or later at the desired moment. 1 Press BEAT ON/OFF to switch the function on. You will hear the current rhythm pattern. 2 Turn MULTI JOG to select the desired rhythm pattern. 3 Press RHYTHM once while the selected rhythm pattern is - AIWA NSX-MTD9 | Operating Instructions - Page 18
The AUTO SPICE/FILL IN double function switch takes on the FILL IN function when the BEAT function is switched On. • The AUTO SPICE function is not available at the same time as the FILL IN function. • The FILL IN function is not available when making a tape copy between two tape decks using SYNC - AIWA NSX-MTD9 | Operating Instructions - Page 19
You'll hear the current sound stored at A. 2 Within 4 seconds, turn MULTI JOG to select the desired sound. As the display changes, you'll hear the respective sound. 3 In a similar way, select a sound for SPICE B. 4 Play the music source and hit SPICE A or B in time with the music as in playing - AIWA NSX-MTD9 | Operating Instructions - Page 20
1 Press AUTO SPICE to display "A-SPICE". 2 Press SPICE A. You'll hear the sound currently stored in A its name appearing in the display. 3 While the sound name is displayed, turn MULTI JOG to select the desired sound. (Repeat step 2 if sound name disappears before turning MULTI JOG). 4 Press SPICE B - AIWA NSX-MTD9 | Operating Instructions - Page 21
the equalization curve with the remote control Press GEQ repeatedly until the desired equalization curve is displayed. SOUND (cont.) pg. 12 SETTING NEW EQUALIZATION CURVES MANUALLY Up to four equalization curves can be stored as the - AIWA NSX-MTD9 | Operating Instructions - Page 22
. To cancel the selected mode Press the selected button again. "GEQ OFF" is displayed. To adjust the volume of the surround speakers Press MANUAL SELECT twice or three times on the remote control. "S-L" or "S-R" is displayed for 2 seconds. Press or on the remote control within these 2 seconds - AIWA NSX-MTD9 | Operating Instructions - Page 23
is also changed. DSP SURROUND The DSP (Digital Signal Processor) SURROUND adjusts the reverb level and delay time to give a resonant surround sound during playback, allowing you to enjoy the real sound presence of different environments. This unit has been programmed with 4 different DSP SURROUND - AIWA NSX-MTD9 | Operating Instructions - Page 24
The DSP SURROUND mode is canceled when: - the ECHO level is changed. - the DOLBY PRO LOGIC is turned on. - the headphones are plugged in. - the 5.1CH (page 30) is selected. CD PLAYING pg. 13 BASIC OPERATIONS LOADING DISCS Press CD, then press OPEN/CLOSE to open the disc compartment. Load disc(s) - AIWA NSX-MTD9 | Operating Instructions - Page 25
The display shows the information of the disc to be played. PLAYING DISCS Load discs. To play all discs in the disc compartment, press . All discs are played once. To play one disc only, press one of the DISC DIRECT PLAY 1-5. The selected disc is played once. To play with the remote control - AIWA NSX-MTD9 | Operating Instructions - Page 26
of the tray precisely. Otherwise, the disc may be damaged or the disc compartment will not open. If it does not open, please consult your Aiwa dealer for repair. • Do not use irregular shape CDs (example: heart-shaped, octagonal ones). It may result in malfunctions. • Do not place more than one - AIWA NSX-MTD9 | Operating Instructions - Page 27
REPEAT play A single disc or all the discs can be played repeatedly Press RANDOM/REPEAT. Each time it is pressed, the function can be selected cyclically. RANDOM play - RANDOM lights up on the display. REPEAT play - lights up on the display. RANDOM/REPEAT play - RANDOM and light up on the - AIWA NSX-MTD9 | Operating Instructions - Page 28
PROGRAMMED PLAY Up to 30 tracks can be programmed from any of the inserted disc. Use the remote control. 1 Press PRGM twice in stop mode. PRGM indicator lights up on the display. • When PRGM is pressed once in step 1, the unit enters KARAOKE PROGRAM (page 24). 2 Press DISC DIRECT PLAY, then press - AIWA NSX-MTD9 | Operating Instructions - Page 29
if you attempt to select a track or random play. • "FULL" is displayed if you attempt to program more than 30 tracks. RADIO RECEPTION pg. 16 MANUAL TUNING 1 Press TUNER/BAND repeatedly to select the desired band, FM or AM. When TUNER/BAND is pressed while the power is off, the power - AIWA NSX-MTD9 | Operating Instructions - Page 30
Keep DOWN or UP pressed until the frequency starts to change rapidly. After tuning in to a station, the search stops. To stop the Auto Search manually, press DOWN or UP. • The Auto Search may not stop at stations with very weak signals. When an FM stereo broadcast contains noise Press MONO - AIWA NSX-MTD9 | Operating Instructions - Page 31
PRESET NUMBER TUNING Use the remote control to select the preset number directly. 1 Press THUNDERBIRD to select a band. 2 Press numbered buttons 0-9 and +10 to select a preset number. Example: To select preset number 15, press +10 and 5. To select preset number 20, press +10, +10 and 0. - AIWA NSX-MTD9 | Operating Instructions - Page 32
Insert a tape with the exposed side down. Push the cassette holder to close. To select a reverse mode (deck 2 only) Each time REV MODE(DECK 2) is pressed, the reverse mode changes. To play one side only, select . To play from front side to reverse side once only, select . To play both sides - AIWA NSX-MTD9 | Operating Instructions - Page 33
For tapes recorded with DOLBY NR, turn on NR. For tapes recorded without DOLBY NR, turn off NR. 2 Press to start play. : The front side is being played (forward). : The back side is being played (reverse). When tapes are loaded in both decks Press TAPE/DECK 1/2 first to select a deck. The - AIWA NSX-MTD9 | Operating Instructions - Page 34
If there is a 4-second or longer blank between each track, a search for the beginning of the current or next track during playback can be done easily. When or button is flashing, press to move to the next track or to move to the beginning of the current track. When of button is flashing, press - AIWA NSX-MTD9 | Operating Instructions - Page 35
• Take up any slack in the tape with a pencil or similar tool before use. Slack tape may break or jam in the mechanism. DOLBY NR system The Dolby Noise Reduction system reduces tape hiss noise. For optimum performance when playing back a tape recorded with the DOLBY NR system, turn on the DOUBLER - AIWA NSX-MTD9 | Operating Instructions - Page 36
To record with DOLBY NR, turn on NR. To record without DOLBY NR, turn off NR. 4 Press function (CD,TUNER/BAND,VIDEO/AUX or MD) and prepare the source to be recorded. To record from a CD, press CD and load the disc(s). To record from a radio broadcast, press TUNER/BAND and tune in to a station. - AIWA NSX-MTD9 | Operating Instructions - Page 37
started. 3 Set the reverse mode by pressing REV MODE (DECK 2). 4 Press REC/REC MUTE to start the erasure. RECORDING (cont.) pg. 20 DUBBING A TAPE MANUALLY Preparation • Set the tape to the point where recording will start. • The reverse mode is automatically set to . Note that recording will be done - AIWA NSX-MTD9 | Operating Instructions - Page 38
Press . To set the Dolby NR when playing back the dubbed tape Press DOLBY NR and turn Dolby NR on or off to match the original tape. DUBBING THE WHOLE TAPE This function allows you to make exact copies of both sides of the original tape. The reverse side of both tapes will start simultaneously as - AIWA NSX-MTD9 | Operating Instructions - Page 39
the original tape, recording on the reverse side may stop midway through the recording. In this case, dub each side manually following the procedure in "DUBBING A TAPE MANUALLY". RECORDING (cont.) pg. 21 AI EDIT RECORDING The Al edit recording enables CD recording without worrying about tape length - AIWA NSX-MTD9 | Operating Instructions - Page 40
5 Press or to designate the tape length. 10 to 99 minutes can be specified. In a few seconds, the tracks to be recorded on each side of the tape are determined. • The numbered buttons 0-9 or MULTI JOG are also available to designate the tape length. Example: When using a 60-minute tape, press - AIWA NSX-MTD9 | Operating Instructions - Page 41
remaining on the tape (with the minus mark). • Recording is inhibited if the erasure prevention tab on either side of the tape is broken off. • The Al edit recording function cannot be used with discs containing 31 tracks or more. "TR OVER" is displayed if this is attempted. RECORDING (cont)pg. 22 - AIWA NSX-MTD9 | Operating Instructions - Page 42
• The numbered buttons 0-9 or MULTI JOG are also available to designate the tape length. 5 Press DISC DIRECT PLAY, then press numbered buttons 1-5 within 3 seconds on the remote control to select a disc. Then press numbered buttons 0-9 and +10 to program a track. Example: To select the 10th track of - AIWA NSX-MTD9 | Operating Instructions - Page 43
page 3 and 4) • Make sure the TV set and video unit are properly connected. (See page 4) • Make sure the laser disc, video tape, etc., support ADJUSTING SPEAKER LEVEL BALANCE This unit is whumped with a built-in test signal generator called a noise sequencer for easy balance adjustment of all five - AIWA NSX-MTD9 | Operating Instructions - Page 44
by pressing DOLBY PRO LOGIC until "PRO-OFF" is displayed. 4 Press MANUAL SELECT again to stop the noise signal. NOTE • If the surround speakers or to 20 ms (milliseconds). To change the standard delay time, press MANUAL SELECT on the remote control repeatedly until "TIME" is displayed. Then, - AIWA NSX-MTD9 | Operating Instructions - Page 45
, the sound levels of the center or each surround speaker can be adjusted during playback of laser discs or video software. 1 Press MANUAL SELECT on the remote control repeatedly to select "CEN" (center) or "S-R" (right surround speaker) or "S-L" (left surround speaker). 2 While the "CEN" or - AIWA NSX-MTD9 | Operating Instructions - Page 46
through the front speakers. To select PHANTOM or 3 STEREO Press DOLBY PRO LOGIC repeatedly until the desired Dolby Pro Logic mode is displayed. The DOLBY PRO LOGIC mode is displayed cyclically as follows. To adjust the balance of connected speaker sound levels Carry out steps 2 to 4 of "ADJUSTING - AIWA NSX-MTD9 | Operating Instructions - Page 47
case, decrease the microphone volume. Recommended microphones The use of unidirectional type microphones is recommended to prevent howling. Contact your local Aiwa dealer for details. LOCAL FADER/MULTIPLEX FUNCTIONS This unit can use discs or tapes as Karaoke sources. Use the vocal fader function - AIWA NSX-MTD9 | Operating Instructions - Page 48
•Vocal Fader The singer's voice becomes softer than the accompaniment. ,Auto Vocal Fader The singer's voice becomes softer only while there is audio input through microphones. ƒMultiplex The sound on the left channel is heard from both speakers, and the sound on the right channel is muted. „Auto - AIWA NSX-MTD9 | Operating Instructions - Page 49
Before or during CD play, you can reserve up to 15 tracks to be played after the current track. Each reservation is cleared when it finishes playing. Use the remote control. 1 Press CD and load the discs. 2 Press PRGM once. 3 Press DISC DIRECT PLAY, then press one of the numbered buttons 1-5 within - AIWA NSX-MTD9 | Operating Instructions - Page 50
To add a reservation during play Repeat step 3. To check the reserved tracks Press CD EDIT/CHECK repeatedly. Each time it is pressed, the disc number and track number are displayed in the reserved order. To stop play Press . When is pressed, the play starts from the last track again. To skip a - AIWA NSX-MTD9 | Operating Instructions - Page 51
The clock is displayed. (The ":" between the hours and minutes flashes.) When the power cord is plugged into an AC outlet for the first time after purchase or when the clock setting is canceled due to a power failure, the entire clock display flashes. 1 Press CLOCK. 2 Within 4 seconds, turn MULTI - AIWA NSX-MTD9 | Operating Instructions - Page 52
The unit can be turned off automatically at a specified time. Use the remote control. 1 Press SLEEP. 2 Within 4 seconds, press or to specify the time until the power is turned off. Each time the button is pressed, the time changes between 5 and 240 minutes in 5-minute steps. MULTI JOG is also - AIWA NSX-MTD9 | Operating Instructions - Page 53
The unit can be turned on at a specified time every day with the built-in timer. Preparation Make sure the clock is set correctly. 1 Press one of the function buttons to select a source. • If TUNER/BAND is pressed, the band cannot be selected in this step. 2 Press TIMER repeatedly until appears on - AIWA NSX-MTD9 | Operating Instructions - Page 54
The duration will be automatically set after 4 seconds. It will also be set if ENTER or seconds after step 4. is pressed within 4 5 Adjust the volume. The source sound will play at the volume level set in this step when the power is turned on by the timer. If the volume level is set to 21 or - AIWA NSX-MTD9 | Operating Instructions - Page 55
pg. 29 CONNECTING OPTIONAL EQUIPMENT Refer to the operating instructions of the connected equipment for details. • The connecting cords and the white plug to L jack. When connecting a turntable Use an Aiwa turntable equipped with a built-in equalizer amplifier. MD JACKS This jack is recommended - AIWA NSX-MTD9 | Operating Instructions - Page 56
Use a cable with RCA phono plugs to connect audio equipment with LINE IN (analog input) jacks. Connect the red plug to LINE OUT R jack and the white plug to LINE OUT L jack. Do not connect an equipment to LINE OUT and VIDEO/AUX simultaneously. Otherwise, noise is generated and malfunction occurs. - AIWA NSX-MTD9 | Operating Instructions - Page 57
) pg. 30 CONNECTING A DVD PLAYER 5.1CH INPUT jacks of this unit support the DOLBY DIGITAL SURROUND system. Connect a DVD player with 5.1 CH output the recording to be done. Refer also to the operating instructions of the DVD player. DOLBY DIGITAL SURROUND sound cannot be recorded in any - AIWA NSX-MTD9 | Operating Instructions - Page 58
is selected. • Make sure the software played back with the connected equipment support the DOLBY DIGITAL SURROUND. • The function is changed from the 5.1 CH Press VIDEO/AUX repeatedly until "5.1ch IN" is displayed. 2 Press MANUAL SELECT repeatedly. Speaker names appear in turn as follows: 3 Press - AIWA NSX-MTD9 | Operating Instructions - Page 59
10 hours of use, clean tape heads with a head cleaning cassette. Use separately sold dry-type or wet-type cleaning cassette. Refer to the instructions of the cleaning cassette for details. To demagnetize the heads The tape heads may become magnetized after long-term use. This may narrow the output - AIWA NSX-MTD9 | Operating Instructions - Page 60
a malfunction, reset by disconnecting the AC cord and connect it again. Then carry out step 2 TROUBLESHOOTING GUIDE If the unit fails to perform as described in these Operating Instructions, check the following guide. GENERAL There is no sound. • Is the AC cord connected properly? • Is there a bad - AIWA NSX-MTD9 | Operating Instructions - Page 61
CD PLAYER SECTION The CD player does not play. • Is the disc correctly inserted? (è page 13) • Is the disc dirty? (è page 30) • Is the lens affected by condensation? è Wait approximately one hour and try again. GENERAL (cont) pg. 32 SPECIFICATIONS Main unit CX-NMTD9 FM tuner section Tuning range 87 - AIWA NSX-MTD9 | Operating Instructions - Page 62
CENTER SPEAKER: accept speakers of 8 ohms or more PHONES (stereo jack): accepts headphones of 32 ohms or more Cassette deck section Track format 4 tracks, 2 channels stereo Frequency response CrO2 tape: 50 Hz - 16000 Hz Normal tape: 50 Hz - 15000 HZ Signal-to-noise ratio 60 dB (Dolby B NR - AIWA NSX-MTD9 | Operating Instructions - Page 63
. This equipment generates, uses, and can radiate radio frequency energy and, if not installed and used in accordance with the instructions, may cause harmful interference to radio communications. However, there is no guarantee that interference will not occur in a particular installation - AIWA NSX-MTD9 | Operating Instructions - Page 64
Name 1 TAPE/DECK 1/2 TUNER/BRAND VIDEO/AUX CD MD 2 ROCK/M1 POP/M2 LATIN/M3 CLASSIC/M4 PRGM/MANU 3 PHONES 4 POWER 5 SET CLEAR DIRECTION/PRESET DOWN UP REC/REC MUTE SYNC DUB 6 KARAOKE DOLBY PRO LOGIC 7 DOLBY NR REV MODE (DECK 2) CD EDIT/CHECK CD BLANK SKIP Page 6, 17-20 16 29, 30 6, 13 29 11, 12 11, - AIWA NSX-MTD9 | Operating Instructions - Page 65
8 VOLUME MIC ECHO 9 DISCO LIVE STADIUM HALL 10 ECO MIC 1, 2 11 BBE T-BASS DEMO 12 FREQUENCY UP, DOWN MULTI JOG BEAT ON/OFF RHYTHM ENTER SPICE A, B AUTO SPICE/FILL IN CLOCK TIMER 13 DISC DIRECT PLAY 1-5 DISC CHANGE OPEN/CLOSE 14 TIMER SLEEP MONO TUNER CLOCK 15 0-9, +10 DISC DIRECT PLAY 16 T-BASS GEQ - AIWA NSX-MTD9 | Operating Instructions - Page 66
19 TAPE/DECK 1/2 TUNER/BRAND VIDEO/AUX CD 20 SURROUND MANUAL SELECT DOLBY PRO LOGIC 21 VOL ( ) For assistance and information call toll free 1-800-BUY-AIWA. (United States and Puerto Rico) 6, 17-20 16 29, 30 6, 13 12 7, 12, 23, 24, 30 23, 24 7
-
 1
1 -
 2
2 -
 3
3 -
 4
4 -
 5
5 -
 6
6 -
 7
7 -
8
-
9
-
10
-
11
-
12
-
13
-
14
-
15
-
16
-
17
-
18
-
19
-
20
-
21
-
22
-
23
-
24
-
25
-
26
-
27
-
28
-
29
-
30
-
31
-
32
-
33
-
34
-
35
-
36
-
37
-
38
-
39
-
40
-
41
-
42
-
43
-
44
-
45
-
46
-
47
-
48
-
49
-
50
-
51
-
52
-
53
-
54
-
55
-
56
-
57
-
58
-
59
-
60
-
61
-
62
-
63
-
64
-
65
-
66
 |
 |

AIWA
COMPACT DISC STEREO SYSTEM
NSX-MTD9
OPERATING INSTRUCTIONS
PRECAUTIONS
pg. 1
WARNING
TO REDUCE THE RISK OF FIRE OR ELECTRIC SHOCK, DO NOT EXPOSE THIS APPLIANCE TO RAIN
OR MOISTURE.
"CAUTION : TO REDUCE THE RISK OF ELECTRICAL SHOCK, DO NOT REMOVE COVER (OR BACK).
NO USER-SERVICABLE PARTS INSIDE. REFER SERVICING TO QUALIFIED SER
VICE PERSONNEL."
Explanation of Graphical Symbols:
The lightning flash with arrowhead symbol, within an equilateral triangle, is intended to alert the user to the
presence of uninsulated "dangerous voltage" within the product's enclosure that may be of su
fficient magnitude to
constitute a risk of electric shock to persons.
The exclamation point within an equilateral triangle is intended to alert the user to the presence of important
operating and maintenance (servicing) instructions in the literature acco
mpanying the appliance.
OWNER'S RECORD
For your convenience, record the model number (you will find it at the bottom of the unit) and serial number (you
will find it in the battery compartment) in the space provided below.
Please refer to them when you contact your
AIWA dealer i
n case of difficulty.
Model No.
Serial No. (Lot No.)