Alpine CDE-151 Owners Manual - Page 15
Adjusting the Low Pass Filter, Setting the Subwoofer Phase, Setting the Subwoofer System, External
 |
View all Alpine CDE-151 manuals
Add to My Manuals
Save this manual to your list of manuals |
Page 15 highlights
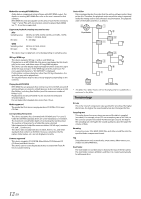
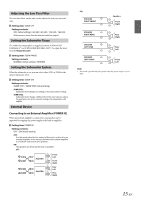
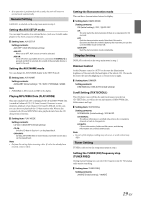
Adjusting the Low Pass Filter The Low Pass Filter on this unit can be adjusted to suit your personal taste. Setting item: SUBW LPF Setting contents: OFF (Initial setting) / 60 (Hz) / 80 (Hz) / 120 (Hz) / 160 (Hz) All frequencies lower than the selected cutoff are output. Setting the Subwoofer Phase The subwoofer output phase is toggeled between SUBWOOFER NORMAL (0°) or SUBWOOFER REVERSE (180°). To adjust the level, turn the Rotary encoder. Setting item: SUBW PHASE Setting contents: NORMAL (Initial setting) / REVERSE Setting the Subwoofer System When the subwoofer is on, you can select either SYS1 or SYS2 for the desired subwoofer effect. Setting item: SUBW SYS Setting contents: SUBW SYS1 / SUBW SYS2 (Initial setting) SUBW SYS1: Subwoofer level changes according to the main volume setting. SUBW SYS2: Subwoofer level change is different from the main volume setting. For example, even at low volume settings, the subwoofer is still audible. External Device Connecting to an External Amplifier (POWER IC) When an external amplifier is connected, sound quality can be improved by stopping the power supply of the built-in amplifier. Setting item: POWER IC Setting contents: OFF / ON (Initial setting) OFF: Use this mode when the line output of this unit is used to drive an external amplifier. In this setting, the head unit's internal amplifier is turned OFF and cannot drive speakers. ON: The speakers are driven by the built-in amplifier. OFF: Amplifier Amplifier Front Left Front Right Rear Left Rear Right ON: SPEAKER RIGHT FRONT Speakers Front Right SPEAKER RIGHT REAR SPEAKER LEFT REAR Rear Right Rear Left SPEAKER LEFT FRONT Front Left Note • No sound is produced by the system when the power output is set to OFF. 15-EN
-
 1
1 -
2
-
3
-
4
-
5
-
6
-
7
-
8
-
9
-
 10
10 -
 11
11 -
 12
12 -
 13
13 -
 14
14 -
 15
15 -
 16
16 -
 17
17 -
 18
18 -
 19
19 -
 20
20 -
21
-
22
-
23
-
24
-
25
-
26
-
27
-
28
-
29
-
30
-
31
-
32
-
33
-
34
-
35
-
36
-
37
-
38
-
39
-
40
-
41
-
42
-
43
-
44
-
45
-
46
-
47
-
48
-
49
-
50
-
51
-
52
-
53
-
54
-
55
-
56
-
57
-
58
-
59
-
60
-
61
-
62
-
63
-
64
-
65
-
66
-
67
-
68
 |
 |
