Alpine CDE-151 Owners Manual - Page 58
Deslice el CDE-152/CDE-151/CDE-150 hacia el
 |
View all Alpine CDE-151 manuals
Add to My Manuals
Save this manual to your list of manuals |
Page 58 highlights
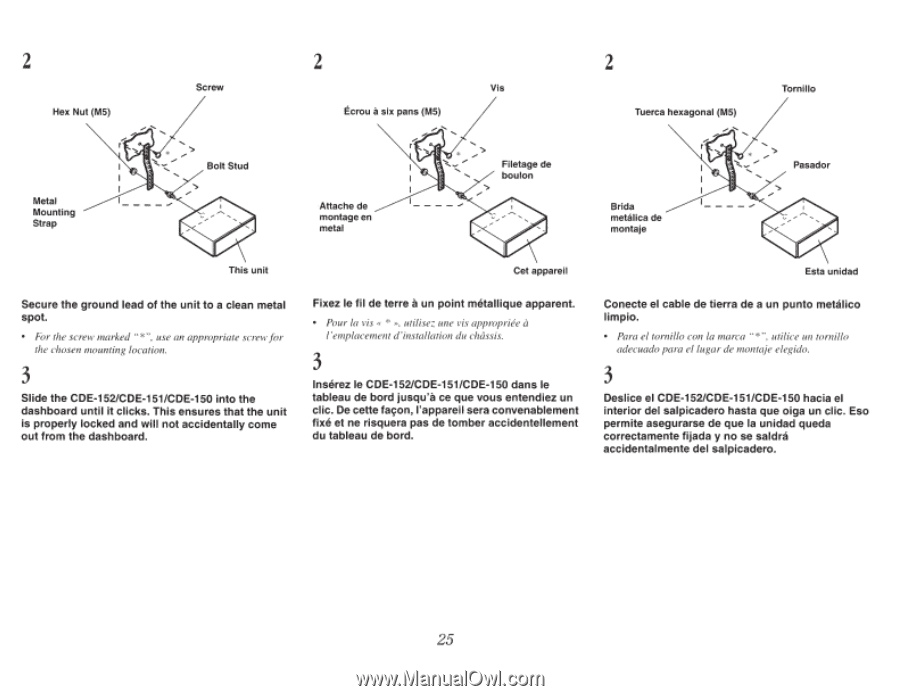
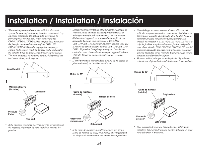
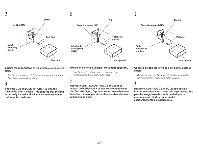
2 Hex Nut (MS) Screw 2 Vis Ecrou asix pans (MS) 2 Tuerca hexagonal (MS) Tornillo Metal Mounting Strap '----./ Bolt Stud Attache de montage en metal '----./ Filetage de boulon Brida metalica de montaje '----./ Pasador This unit Cet appareil Esta unidad Secure the ground lead of the unit to a clean metal spot. • For the screw marked " *'', use an appropriate scre"'v for th e chosen mounting location. 3 Slide the CDE-152/CDE-151/CDE-150 into the dashboard until it clicks. This ensures that the unit is properly locked and will not accidentally come out from the dashboard. Fixez le fil de terre a un point metallique apparent. a • Pou r fa vis « * » , utifisez un e vis appropriee f' emplacernent d 'instaflation du chassis. 3 lnserez le CDE-152/CDE-151/CDE-150 dans le tableau de bord jusqu'a ce que vous entendiez un clic. De cette fa~on, l'appareil sera convenablement fixe et ne risquera pas de tomber accidentellement du tableau de bord. Conecte el cable de tierra de a un punto metalico limpio. • Para el tornillo con La marca " *", uti/ice un tornillo adecuado para elluga r de montaje elegido. 3 Deslice el CDE-152/CDE-151/CDE-150 hacia el interior del salpicadero hasta que oiga un clic. Eso permite asegurarse de que Ia unidad queda correctamente fijada y no se saldra accidentalmente del salpicadero. 25
-
 1
1 -
2
-
3
-
4
-
5
-
6
-
7
-
8
-
9
-
10
-
11
-
12
-
13
-
14
-
15
-
16
-
17
-
18
-
19
-
20
-
21
-
22
-
23
-
24
-
25
-
26
-
27
-
28
-
29
-
30
-
31
-
32
-
33
-
34
-
35
-
36
-
37
-
38
-
39
-
40
-
41
-
42
-
43
-
44
-
45
-
46
-
47
-
48
-
49
-
50
-
51
-
52
-
 53
53 -
 54
54 -
 55
55 -
 56
56 -
 57
57 -
 58
58 -
 59
59 -
 60
60 -
 61
61 -
 62
62 -
 63
63 -
64
-
65
-
66
-
67
-
68
 |
 |