Alpine MRD-M301 User Manual - Page 9
Power Indicator/Amplifier LINK Indicator
 |
View all Alpine MRD-M301 manuals
Add to My Manuals
Save this manual to your list of manuals |
Page 9 highlights
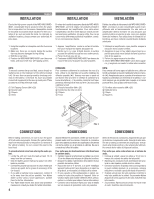
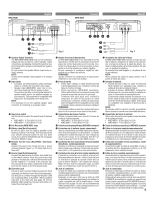
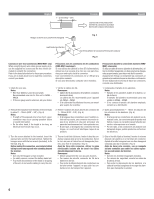
9 (DOWN) Button 10 MODE Button 11 MODE Button 12 ENT Button 13 (UP) Button 14 DISP Button 15 Status Indicator English Français Español 9 10 11 12 13 14 15 # Remove the two hexagon screws and open the door to operate the controls. When you finish making adjustments, close the door and fix it with the original hexagon screws. # Enlevez les deux vis à tête hexagonale et ouvrez la porte pour utiliser les MODE commandes. Une fois terminés les réglages, fermez la porte et fixez-la ENT avec les vis à tête hexagonale d'origine. MODE DISP # Quitar los dos tornillos hexagonales y abrir la puerta para utilizar los controles. Cuando acabe los ajustes, cerrar la puerta y fijarla con los tornillos hexagonales de origen. Power Indicator/Amplifier LINK Indicator Lights up when power is on. Is off when power is off. This flashes green when the main unit is controlled from the head unit etc., if an Amplifier LINK compatible head unit is connected to the main unit with an Amplifier LINK connection. # # Indicateur d'alimentation/Indicateur de LINK d'amplificateur Allumé lors de la mise en marche. Eteint lors de l'extinction. Cet indicateur clignote en vert quand l'unité centrale est commandé à partir de l'unité principale etc., si une unité principale compatible de LINK d'amplificateur est reliée à l'unité centrale avec un raccordement de LINK d'amplificateur. Indicador de alimentación/Indicador de ACOPLAMIENTO del amplificador Encendido cuando el aparato está en marcha. Apagado cuando el aparato está apagado. Este indicador destella en verde cuando la unidad central es controlada desde la unidad princi- pal etc., si una unidad principal compatible de ACOPLAMIENTO de amplificador está conectada con la unidad central con una conexión de ACOPLAMIENTO de amplificador. 9 Touche (DOWN) 10 Touche MODE 11 Touche MODE 12 Touche ENT 13 Touche (UP) 14 Touche DISP 15 Indicateur d'état 9 Botón (DOWN) 10 Botón MODE 11 Botón MODE 12 Botón ENT 13 Botón (UP) 14 Botón DISP 15 Indicador de estado OPERATION METHOD Switching of the display: (1) Press the "DISP" button. The display will change with each press of the button. METHODE DE FONCTIONNEMENT Commutation de l'affichage: (1) Appuyez sur la touche "DISP". Chaque fois que l'on appuie sur cette touche, l'affichage change. MÉTODO DE OPERACIÓN Cambio de la visualización: (1) Pulse el botón "DISP". La visualización cambiará cada vez que se pulse el botón. 12.3V 10.0A 87°F 31°C VOLTAGE Centigrade TEMPERATURE CURRENT Fahrenheit TEMPERATURE 12.3V 10.0A 87°F 31°C TENSION TEMPERATURE Centigrade INTENSITE TEMPERATURE Fahrenheit 12.3V 10.0A 87°F 31°C VOLTAJE TEMPERATURA Centígrada CORRIENTE TEMPERATURA Fahrenheit INPUT MODE Preparation: • Match the output level from the head unit to the amplifier input. 1) Gradually increase the volume of the head unit until the display starts flashing. 2) Gradually decrease head unit's volume until the display stops flashing. 3) Once again gradually increase the head unit's volume and stop at the point at which the "over" indicator flashes. After doing this, leave the head unit's volume control in that position. MODE D'ENTREE Préparation: • Assortir le niveau de sortie de l'unité principale à l'entrée de l'amplificateur. 1) Augmentez le volume de l'unité principale petit à petit jusqu'à ce que l'affichage commence à clignoter. 2) Diminuez le volume de l'unité principale petit à petit jusqu'à ce que l'affichage s'arrête de clignoter. 3) Une fois encore, augmentez le volume de l'unité principale petit à petit et arrêtez lorsque le voyant "over" clignote. Après cela, laisser la commande de volume de l'unité principale dans cette position. MODO DE ENTRADA Preparación: • Iguale el nivel de salida de la unidad principal a la entrada del amplificador. 1) Subir gradualmente el volumen de la unidad principal hasta que el visualizador comience a parpadear. 2) Bajar gradualmente el volumen de la unidad principal hasta que el visualizador deje de parpadear. 3) Una vez más subir gradualmente el volumen de la unidad principal y parar en el punto en el que parpadee el indicador "over". Después de hacer esto, dejar el mando del volumen de la unidad principal en esa posición. 9
-
 1
1 -
2
-
3
-
 4
4 -
 5
5 -
 6
6 -
 7
7 -
 8
8 -
 9
9 -
 10
10 -
 11
11 -
 12
12 -
 13
13 -
 14
14 -
15
-
16
-
17
-
18
-
19
-
20
 |
 |
