Alpine iLX-F309FRN Installation Manual - Page 5
Factory Unit Disassembly Process
 |
View all Alpine iLX-F309FRN manuals
Add to My Manuals
Save this manual to your list of manuals |
Page 5 highlights
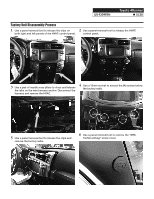
iLX-F309FRN Toyota 4Runner ˜ 5/20 Factory Unit Disassembly Process 1 Use a panel removal tool to release the clips on both right and left panels of the HVAC control panel. 2 Use a panel removal tool to release the HVAC control panel. 3 Use a pair of needle nose pliers to close and release the tabs on the wire harness anchor. Disconnect the harness and remove the HVAC. 4 Use a 10mm socket to extract the (4) screws below the factory radio. 5 Use a panel removal tool to release the clips and remove the factory radio. 6 Use a panel removal tool to remove the "SRS Curtain Airbag" screw cover.
-
 1
1 -
 2
2 -
 3
3 -
 4
4 -
 5
5 -
 6
6 -
 7
7 -
 8
8 -
 9
9 -
 10
10 -
 11
11 -
12
-
13
-
14
-
15
-
16
-
17
-
18
-
19
-
20
 |
 |

Toyota 4Runner
iLX-F309FRN
±
5/20
Factory Unit Disassembly Process
1
Use a panel removal tool to release the clips on
both right and left panels of the HVAC control panel.
3
Use a pair of needle nose pliers to close and release
the tabs on the wire harness anchor. Disconnect the
harness and remove the HVAC.
5
Use a panel removal tool to release the clips and
remove the factory radio.
2
Use a panel removal tool to release the HVAC
control panel.
4
Use a 10mm socket to extract the (4) screws below
the factory radio.
6
Use a panel removal tool to remove the “SRS
Curtain Airbag” screw cover.