Alpine iLX-F309FRN Installation Manual - Page 7
Removing Radio Panel Components
 |
View all Alpine iLX-F309FRN manuals
Add to My Manuals
Save this manual to your list of manuals |
Page 7 highlights
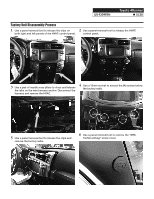
iLX-F309FRN Toyota 4Runner ˜ 7/20 Removing Radio Panel Components 1 Remove both left and right air vents following steps 2 and 3. 2 Use a small flat head screw driver to release the lock tabs on the outer side of the vent. 3 Tilt, lift, and remove both vents. 4 Use a small flat head screw driver to release the lock tab on the hazard light connector at the radio chassis. 5 Use a razor blade to cut the tape securing the hazard light switch harness and remove it. NOTE: Cut away from the harness so the wiring is not accidentally damaged. 6 Disconnect the hazard light switch and remove it by pushing it from the rear to the front of the radio panel.
-
 1
1 -
 2
2 -
 3
3 -
 4
4 -
 5
5 -
 6
6 -
 7
7 -
 8
8 -
 9
9 -
 10
10 -
 11
11 -
 12
12 -
13
-
14
-
15
-
16
-
17
-
18
-
19
-
20
 |
 |

Toyota 4Runner
iLX-F309FRN
±
7/20
Removing Radio Panel Components
1
Remove both left and right air vents following steps
2 and 3.
3
Tilt, lift, and remove both vents.
5
Use a razor blade to cut the tape securing the
hazard light switch harness and remove it. NOTE:
Cut away from the harness so the wiring is not
accidentally damaged.
2
Use a small flat head screw driver to release the
lock tabs on the outer side of the vent.
4
Use a small flat head screw driver to release the
lock tab on the hazard light connector at the radio
chassis.
6
Disconnect the hazard light switch and remove it
by pushing it from the rear to the front of the radio
panel.