Alpine iLX-F309FRN Installation Manual - Page 8
Removing Radio Panel Components Continued, Installation Instructions
 |
View all Alpine iLX-F309FRN manuals
Add to My Manuals
Save this manual to your list of manuals |
Page 8 highlights
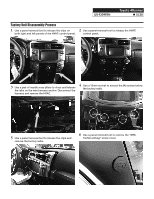
iLX-F309FRN Toyota 4Runner ˜ 8/20 Removing Radio Panel Components (Continued) 7 Extract (6) small Phillips screws from the factory radio panel. 8 Remove the top and vent trims. Note: be sure to retain all screws as they will be used on the new radio panel. Installation Instructions 1 Install the Hazard light switch, top and side vent trims using the factory screws into the iLX-F309FRN radio panel. 2 Snap both left and right vents into place. 3 Attach the microphone to the headliner next to the eyewear compartment with the provided Phillips screw. 4 Connect the OBD2 adapter to the OBD2 port below the driver's side dash. .
-
 1
1 -
2
-
 3
3 -
 4
4 -
 5
5 -
 6
6 -
 7
7 -
 8
8 -
 9
9 -
 10
10 -
 11
11 -
 12
12 -
 13
13 -
14
-
15
-
16
-
17
-
18
-
19
-
20
 |
 |

Toyota 4Runner
iLX-F309FRN
±
8/20
Removing Radio Panel Components (Continued)
8
Remove the top and vent trims. Note: be sure to
retain all screws as they will be used on the new
radio panel.
7
Extract (6) small Phillips screws from the factory
radio panel.
Installation Instructions
2
Snap both left and right vents into place.
4
Connect the OBD2 adapter to the OBD2 port below
the driver’s side dash. .
1
Install the Hazard light switch, top and side vent
trims using the factory screws into the iLX-F309FRN
radio panel.
3
Attach the microphone to the headliner next to the
eyewear compartment with the provided Phillips
screw.