Alpine iLX-F309FRN Installation Manual - Page 9
Installation Instructions Continued
 |
View all Alpine iLX-F309FRN manuals
Add to My Manuals
Save this manual to your list of manuals |
Page 9 highlights
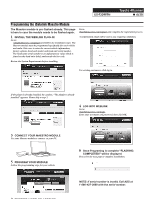
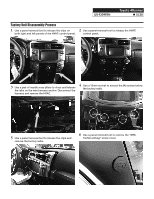
iLX-F309FRN Toyota 4Runner ˜ 9/20 Installation Instructions (Continued) 5 Route the microphone cable down to the OBD2 port and route both OBD2 cable and microphone to the radio cavity as shown below. 6 Connect the GPS antenna, FM antenna, SAT Radio antenna and USB adapters into the vehicle side. 7 Connect the main harness and additional connectors between the vehicle and radio according to the corresponding wiring diagram on pages 10 or 11. 8 Mount the iLX-F309FRN using the factory screws. Note: Kit only requires (2) 10mm screws. Place the additional (2) 10mm screws back into the factory location in case they are needed in the future. 9 Return all removed components to their factory locations and connect the negative (-) battery terminal.
-
 1
1 -
2
-
3
-
 4
4 -
 5
5 -
 6
6 -
 7
7 -
 8
8 -
 9
9 -
 10
10 -
 11
11 -
 12
12 -
 13
13 -
 14
14 -
15
-
16
-
17
-
18
-
19
-
20
 |
 |

Toyota 4Runner
iLX-F309FRN
±
9/20
Installation Instructions (Continued)
6
Connect the GPS antenna, FM antenna, SAT Radio
antenna and USB adapters into the vehicle side.
8
Mount the iLX-F309FRN using the factory screws.
Note: Kit only requires (2) 10mm screws. Place the
additional (2) 10mm screws back into the factory
location in case they are needed in the future.
5
Route the microphone cable down to the OBD2 port
and route both OBD2 cable and microphone to the
radio cavity as shown below.
7
Connect the main harness and additional
connectors between the vehicle and radio
according to the corresponding wiring diagram on
pages 10 or 11.
9
Return all removed components to their factory
locations and connect the negative (-) battery
terminal.