Asko DC7171 User manual Use & Care Guide ASKO DC7171 EN - Page 15
Level drying cabinet, Attaching drying cabinet to wall, Warning
 |
View all Asko DC7171 manuals
Add to My Manuals
Save this manual to your list of manuals |
Page 15 highlights
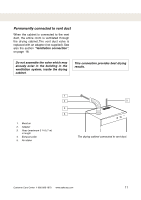
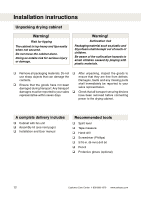
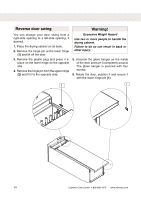
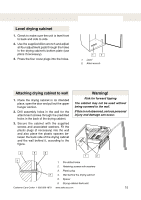
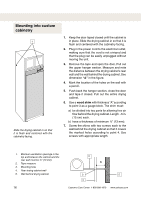
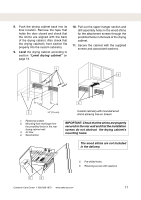
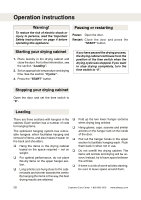
Level drying cabinet 1. Check to make sure the unit is level front to back and side to side. 2. Use the supplied Allen wrench and adjust all four adjustment pads through the holes in the drying cabinet's bottom plate (use pliers if necessary). 3. Press the four cover plugs into the holes. 1 2 1. Level 2. Allen wrench Attaching drying cabinet to wall 1. Place the drying cabinet in its intended place, open the door and pull out the upper hanger section. 2. Drill assembly holes in the wall for the attachment screws through the predrilled holes in the back of the drying cabinet. 3. Secure the cabinet with the supplied screws and associated washers. Fit the plastic plugs (if necessary) into the wall and also place the plastic spacers between the back side of the drying cabinet and the wall behind it, according to the figure. Warning! Risk for forward tipping The cabinet may not be used without being screwed to the wall. If this is not observed, serious personal injury and damage can occur. 4 5 6 1 2 3 1. Pre-drilled holes 2. Retaining screws with washers 3. Plastic plug 2 4. Wall behind the drying cabinet 5. Spacer 6. Drying cabinet back wall Customer Care Center 1-800-898-1879 www.askousa.com 15
-
 1
1 -
2
-
3
-
4
-
5
-
6
-
7
-
8
-
9
-
 10
10 -
 11
11 -
 12
12 -
 13
13 -
 14
14 -
 15
15 -
 16
16 -
 17
17 -
 18
18 -
 19
19 -
 20
20 -
21
-
22
-
23
-
24
-
25
-
26
-
27
-
28
-
29
-
30
-
31
-
32
 |
 |
