Asko DC7171 User manual Use & Care Guide ASKO DC7171 EN - Page 18
Ventilation connection, Electrical connection
 |
View all Asko DC7171 manuals
Add to My Manuals
Save this manual to your list of manuals |
Page 18 highlights
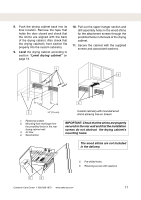
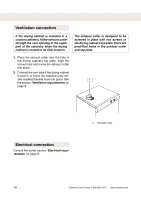
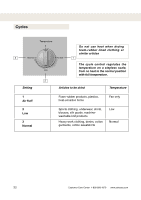
Ventilation connection If the drying cabinet is installed in a custom cabinetry, fit the exhaust collar through the vent opening in the upper part of the cabinetry when the drying cabinet is moved to its final location. The exhaust collar is designed to be screwed in place with two screws to the drying cabinet's top plate.There are predrilled holes in the exhaust collar and top plate. 1. Place the exhaust collar over the hole in the drying cabinet's top plate, align the screw holes and screw the exhaust collar into place. 2. Connect the vent pipe if the drying cabinet is built in, or press the supplied (only cer- tain markets) flexible hose into place. See 1 the section 'Ventilation requirements' on page 9. Electrical connection Consult the earlier section 'Electrical requirements' on page 8. 1. Exhaust collar 18 Customer Care Center 1-800-898-1879 www.askousa.com
-
 1
1 -
2
-
3
-
4
-
5
-
6
-
7
-
8
-
9
-
10
-
11
-
12
-
 13
13 -
 14
14 -
 15
15 -
 16
16 -
 17
17 -
 18
18 -
 19
19 -
 20
20 -
 21
21 -
 22
22 -
 23
23 -
24
-
25
-
26
-
27
-
28
-
29
-
30
-
31
-
32
 |
 |
