Asus AP110 AP110 User Manual - Page 30
Replace the Covers
 |
View all Asus AP110 manuals
Add to My Manuals
Save this manual to your list of manuals |
Page 30 highlights
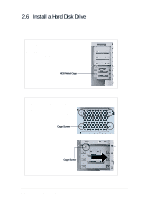
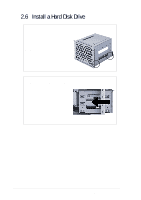
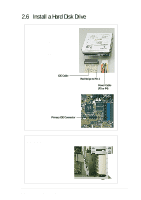
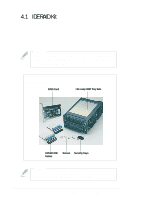
2.7 Replace the Covers NOTE If you are installing optional components such as the IDE RAID kit, proceed to Chapter 4 before replacing the covers. Re-install the Cover 1. Place the cover from the top of the chassis, leaving about an inch from the rear edge. 2. Slide the cover toward the rear panel until it fits in place. Re-install the Panel 1. Align the bottom edge of the panel to the chassis. 2. Firmly push the panel with both hands until it fits in place. 3. Open the panel door. 4. Secure the panel with the two screws that you removed earlier. 5. Lock the front panel with the system key. 30 Chapter 2: Hardware Setup
-
 1
1 -
2
-
3
-
4
-
5
-
6
-
7
-
8
-
9
-
10
-
11
-
12
-
13
-
14
-
15
-
16
-
17
-
18
-
19
-
20
-
21
-
22
-
23
-
24
-
 25
25 -
 26
26 -
 27
27 -
 28
28 -
 29
29 -
 30
30 -
 31
31 -
 32
32 -
 33
33 -
 34
34 -
 35
35 -
36
-
37
-
38
-
39
-
40
-
41
-
42
-
43
-
44
-
45
-
46
-
47
-
48
-
49
-
50
 |
 |

30
Chapter 2:
Hardware Setup
2.7
Replace the Covers
Re-install the Panel
1.
Align the bottom edge of the
panel to the chassis.
2.
Firmly push the panel with both
hands until it fits in place.
3.
Open the panel door.
4.
Secure the panel with the two
screws that you removed
earlier.
5.
Lock the front panel with the
system key.
Re-install the Cover
1.
Place the cover from the top of
the chassis, leaving about an
inch from the rear edge.
2.
Slide the cover toward the rear
panel until it fits in place.
NOTE
If you are installing optional components such as the IDE
RAID kit, proceed to Chapter 4 before replacing the covers.